Tag Archives: candy holder

Try This July 4th Treat Pouch!

4th of July Candy Treat Pouch

This July 4th Treat Pouch is a project from several years ago, but you could make it easily right away for a little treat for your 4th of July picnic, barbeque, or fireworks gathering. Use designer series paper which is a little easier to fold if you have some in appropriate colors. If not, you can use red, white, and blue cardstock! Or just use white if that’s what you have and do some patriotic stamping. Stars are ALWAYS good for an occasion like this so you can always add stars of any kind.

Use a sheet of 6″ x 6″ designer series paper for each pouch.  This 6″ x 6″ size makes a pretty small pouch, so if you want to put very much candy inside, you might want to use a 9″ x 9″ piece of designer paper or even cardstock. (It’s a good way to use up some of your retired designer paper if you are hoarding it for a special occasion!!) You could even make a big one at 12″ x 12″!

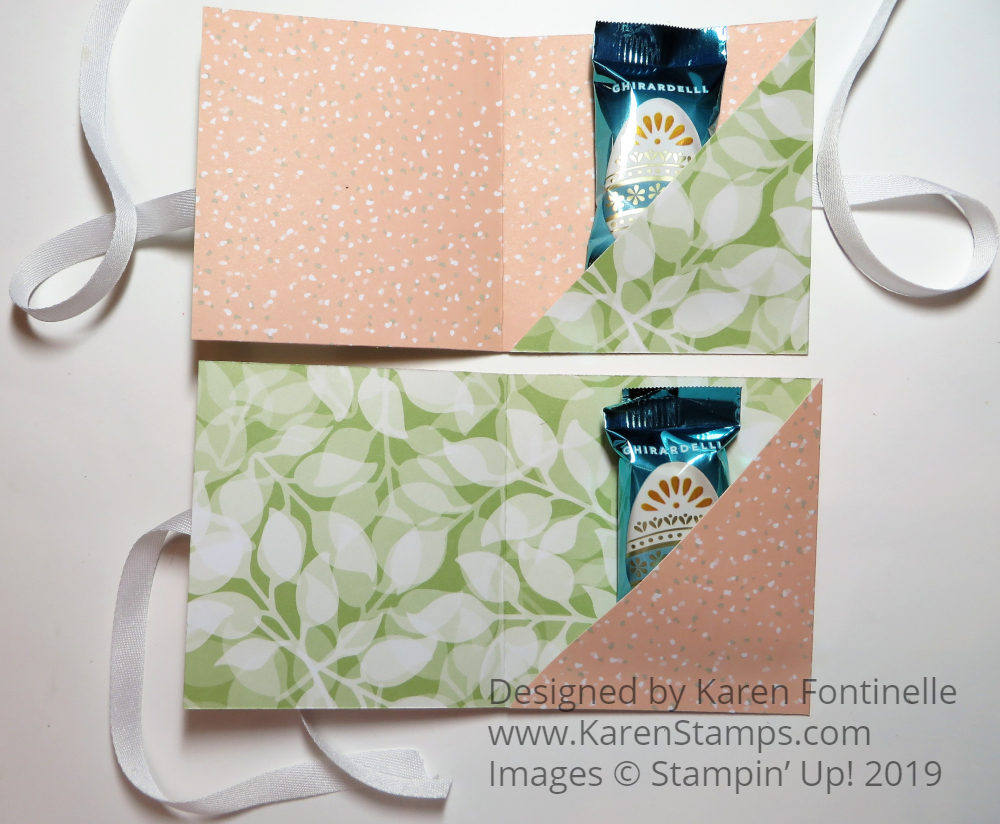
Fold the square paper in half to form a triangle.  Place the base of the triangle at the bottom, and fold down the top point to just about 1″ from the bottom edge. Then fold down the front layer of the point just as a guide.  Take the point on the right side and fold it over to the left side, but not all the way, so that it will fit underneath that point you folded down from the top.  Later you will fold that point down to stay, but for now, just make sure folding that point from the right will fit under it.  Then take the point on the left side and fold it over toward the right side. Now fold the front piece of that point at the top down. Tack it down with a little Stampin’ Seal or Glue Dot. Stick your hand inside to just poof it out a bit and it feels like everything locks in place when you do that!

For the candy, I always love decorating chocolate nuggets with designer paper. It just takes a 1″ x 3″ (or 3 1/4″) strip to wrap around the candy.  Be sure not to get adhesive on the candy itself!! Or use any candy of your choosing that will fit inside the pouch. Maybe a cookie will be perfect!

I hope you have a fabulous 4th of July planned to celebrate the birth of our country. We will go see fireworks that are close to home with friends. I’d love to see the gigantic fireworks display the city puts on, but I like getting home in ten minutes instead of sitting in traffic for who knows how long!

Growing up, my family and lots of the neighbors would take turns shooting off some fireworks in our driveways, but that’s not considered safe any more (and wasn’t then either, but my dad always had the garden hose and a bucket of water ready just in case). I have so many memories of my brother and I hitting some wooden thing with a cap or two or three inside on the concrete of the carport and the “bang” would kind of echo a bit. The first firework to get set off each year was something that a little parachute would fall out of, always landing on the roof of course! I loved the little colored balls we would throw down on the ground that would pop! Sometimes our grandparents would bring over a bag of fireworks to add to what my dad bought! What a thrill for little kids back then! When a shopping center did a big fireworks display my girlfriend across the street and I would stand at the top of our street on a hill and watch them.

Whatever your plans, be safe, have fun, and be thankful we are celebrating our country’s birthday!

Thanksgiving Candy Holder Favors

Thanksgiving Candy Holder Favors

It’s down to the wire for Thanksgiving, as hard as that is to believe, but there’s still time if you want to make some little Thanksgiving Candy Holder Favors. These are really easy and will hold two chocolate kisses or a chocolate nugget. Think how cute these would be by everyone’s plate at Thanksgiving dinner for a little favor!

To make these little candy holders, cut a strip of cardstock approximately 5″ long by 1 3/4″ wide. You can change up the measurements depending on what kind of candy you want to put inside. Score these strips at 2″ and 3″. Crease and fold on the score lines. You can use different colors and images on the front or make them all match.

After you have your candy inside, you can punch a hole in the top and tie a ribbon through the hole or use a couple of Mini Glue Dots to hold them closed. If you have any kinds of clips you could use those to hold them closed. You can also attach a greeting or a guest’s name to use each favor as a place card. I used to love to make place cards when I was young for family dinners!

I started with the pumpkin and the Pilgrim hat but I got a little carried away with the turkey! The pumpkin is stamped from the Pick of the Patch Stamp set and just a little diecut greenery that was already in a pile of scraps on my table.

The Pilgrim hat is made with Early Espresso for the hat and the brim. The hat is a 1″ x 1″ square and the brim is 1/4″ x 1 1/2″. The Basic Black band on the hat is 1/4″ x 1″. The buckle is made with a 1/2″ x 1/2″ square of Gold Foil with a center of Basic Black 1/4″ x 1/4″ to look like the band going through the buckle.

The turkey is made with two circles of Pecan Pie cardstock. The feathers are die cut greenery in the Joy of Noel Dies! Just use whatever you have or come across! The red turkey waddle is a diecut holly leaf from that set! The eyes are punched with my old Crop-a-Dile and colored in with black.

These are just fun little candy favors, so unless you want to, you don’t need to go to a lot of trouble making these!

Happy Thanksgiving!

Easy Easter Folded Candy Holders

Easy Easter Folded Candy Holders

If you are looking for some easy little Easter candy treats, these Easy Easter Folded Candy Holders might be just what you are looking for! The basic holder is so simple to make and then you can add whatever you want for the front design.

You can modify the measurements any way you like to suit what you are putting inside. Besides a piece of candy, you could put a tea bag or a small cookie or maybe even a gift card. As I said, just change up the dimensions.

My sample starts with a piece of paper 9 3/4″ x 3 1/2″. Mine uses the Floral Romance Specialty Designer Series Paper. I used the same piece of paper, just opposite sides for the front of the candy holder. When you use designer paper you get to see the opposite side of the paper on the inside. However, you could also use cardstock for the holder and use designer paper for a layer on the front or embellishment. Score the paper at 3 1/4″ from each end. This divides the paper into thirds. The end section on the right-hand side will have a diagonal cut. This piece will fold over and be adhered at the bottom to form a pocket. This is where you can put a piece of candy or tea bag or something. I used Tear & Tape Adhesive.

Easy Easter Folded Candy Holders Inside

On my candy holders, I stamped images from the Fable Friends Stamp Set. These were each colored with Stampin’ Blends markers (although I almost used Watercolor Pencils for a change!) and then die cut and layered on cardstock.

In order to have the ribbon going around to tie the candy holders closed, I popped up the images on the front of the holder with Stampin’ Dimensionals at the top and bottom. That way I could run ribbon underneath, in between the Dimensionals, and around the back. I put a little bit of Snail Adhesive on the back underneath the ribbon to hold it in place. The ribbon is the Whisper White 3/8″ Classic Weave Ribbon. (One advantage of white ribbon is that you can dye it another color with reinkers or maybe markers to match something!)

If you want to see the same kind of candy holder made for Christmas one year, click HERE.

You can make these candy holders for any occasion, of course, and make them as simple or fancy as you like. These work particularly well for the square Ghirardelli chocolate candy. I had these Ghirardelli chocolate eggs, which do fit, but they are not flat like the squares. Use whatever you like or modify the measurements on the candy holder to fit your kind of candy or treat. Go have fun making a few of these easy Easter folded candy holders.