Tag Archives: Beautiful Gallery 6″ x 6″ Designer Series Paper

Beautiful Gallery Orange Floral Card

Beautiful Gallery Orange Floral Card

This Beautiful Gallery Orange Floral Card came together pretty easily once I decided on colors for the center focal point. The Beautiful Gallery 6″ x 6″ Designer Series Paper is truly beautiful to use and several of the papers could, maybe should, be framed for home decor!

This particular paper I chose for the background on this card is not like most of the other papers. Most are outdoor landscapes, floral sketches, or look like images you would see in an old-world art gallery. This paper looks more like a tapestry or beautiful fabric, but the design and colors really appealed to me. The Lost Lagoon cardstock card base is cut at 11″ x 4 1/4″ with the fold at the top instead of the side just for something different.

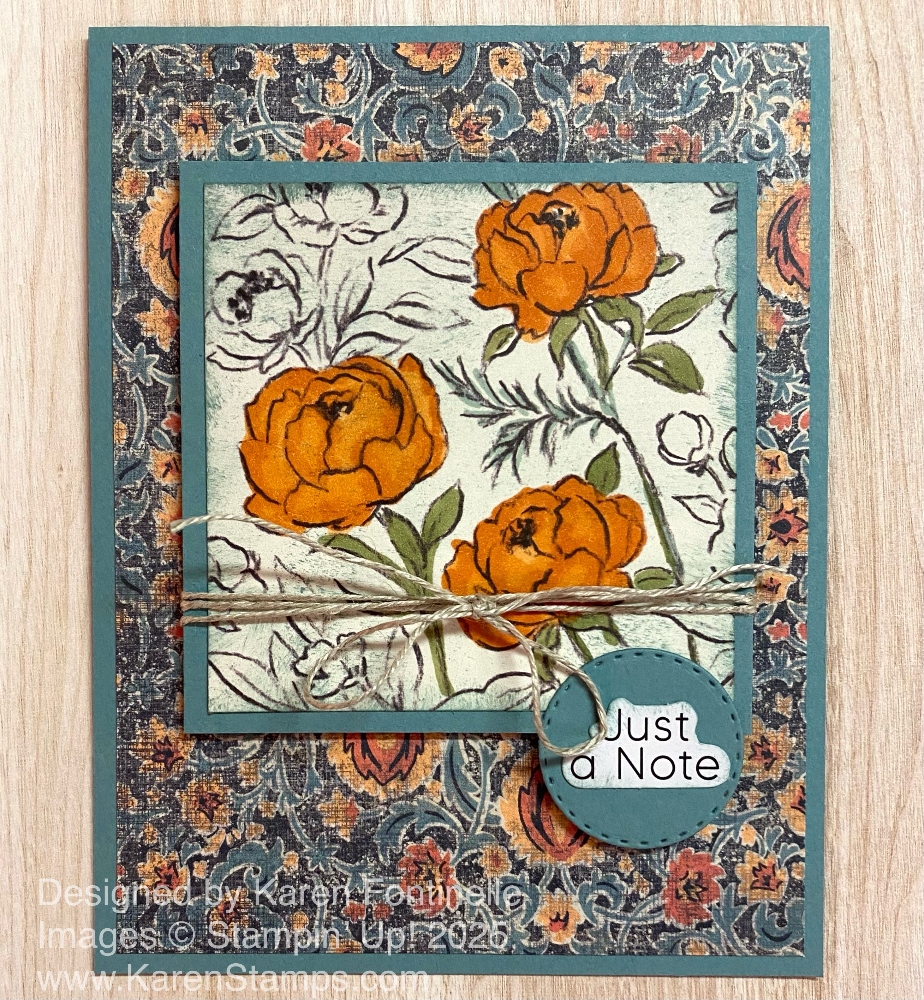
The center panel is another of the papers with outlines of flowers and foliage. I decided to color in three of the flowers and foliage, but not all of the images. I intended to color the flowers with Peach Pie Stampin’ Blends with maybe a highlight of Pumpkin Pie, but I got my colors mixed up and only used the Light and Dark Pumpkin Pie Combo. The leaves were colored with Light Mossy Meadow Stampin’ Blend and just a touch of Lost Lagoon on one feathery type of leafy foliage.

To make this floral piece go with the background, I sponged it lightly all around the edges with Lost Lagoon ink, but also brushed the sponge lightly across the paper as well to make it look blended with the print in the background. This 3″ x 3″ piece is layered on a 3 1/4″ x 3 1/4″ piece of Lost Lagoon cardstock Before adhering to the card, I wrapped around some Linen Thread and tied a bow. Then that piece was popped up on Stampin’ Dimensionals.

For a greeting, I chose one in the Greetings For All Ephemera Pack. I sponged a little Lost Lagoon ink on that and layered it on a small diecut circle in the Unbounded Love Dies. That little greeting has a Stampin’ Dimensional under the bottom portion so that the top will lay over the floral piece and the bottom part is popped up even with the floral piece.

SHOP STAMPIN’ UP! ONLINE HERE!

Beautiful Gallery Boats Father’s Day Card

Beautiful Gallery Boats Father's Day Card

Now that Mother’s Day is over, it seems I am already hearing about Father’s Day! Father’s Day this year is Sunday, June 15th. That’s only a month away. I didn’t intend to make a Father’s Day card, but as I looked through the Beautiful Gallery 6″ x 6″ Designer Series Paper, when I came across this scene with the boats on the water, I got the idea to make a Father’s Day card out of it. This Beautiful Gallery Boats Father’s Day Card would be perfect for the man in your life on Father’s Day or any other masculine occasion.

Because of the boat scene on the paper, I thought making a “slimline” card would make the best use of this pattern. I got out a regular envelope that you might use for paying bills or sending a note and measured that to make sure my card would fit. To make the card base, I cut a piece of the Secret Sea cardstock, one of the new In Colors, at 7″ x 6 1/4″. Folded in half, the card base is 3 1/2″ x 6 1/4″. The Cloud Cover cardstock (another new In Color) layer measures 3 1/4″ x 6″.

The designer paper is the Beautiful Gallery 6″ x 6″ Designer Series Paper. This paper will remind you of an old-world art gallery with landscape scenes, florals, still life art, and more. You. may be inclined to frame quite a few of the squares of the designer paper and use it for a decorative item in your home! For this card, the designer paper is cut at 6″ x 3″. Obviously, you can’t just cut the paper anywhere. You need to trim the top, bottom, and sides so that the part of the paper you want is the focal point of the card.

The greeting is stamped on a narrow strip of Cloud Cover cardstock in Secret Sea ink. This greeting is in the Memorable Blooms Stamp Set. I think it works well for a Father’s Day card. I added a narrow strip of Crumb Cake cardstock offset underneath the greeting although it doesn’t show up very much.

On the inside of the card, since the card base is such a dark color, I added a layer of Basic White for a stamped or written greeting. It measures 6″ x 3 1/4″. Since I had a little strip of the DSP leftover, I adhered that to the bottom of the white layer inside It was 1/4″ x 6″. It’s fun to add a little something inside the card.

I really encourage you to check out this Beautiful Gallery Designer Paper, even if at first you think it’s not your style. If nothing else, you could frame some of the papers and give them as gifts!

Shop Stampin’ Up! Online Here!

Beautiful Gallery White Bouquet Card

Beautiful Gallery White Bouquet Card

This Beautiful Gallery White Bouquet Card is made with one of the new and very interesting designer series papers in the new Stampin’ Up! Annual Catalog. You can’t even imagine all of the different designs on those papers in the Beautiful Gallery 6″ x 6″ Designer Series Paper. A lot, maybe most of these papers would be beautiful framed for home decor (hence the name, “Beautiful Gallery”!) so you can use these for framing, cut the papers down for cards and projects, or even use them for scrapbooking. These papers feature exclusive designs by in-house Stampin’ Up! artists. That makes them even more special.

To make this card, I did have to cut down a 6″ x 6″ beautiful paper! However, I am very happy with the card so it’s fine! Why do we hate to use our designer papers so much! I remember someone years ago saying she bought three packs of every designer paper….one to use, one in case she needed more, and one to keep!

The card base is Mossy Meadow, and I added a layer of Basic Beige. I have barely used that Basic Beige color but it goes well on this card as the flowers are not a pure or solid white. I think having the extra layer of Basic Beige makes the flowers stand out more. For the greeting I used one in the Memorable Blooms Stamp Set and stamped it with Mossy Meadow Ink on a scrap of Basic Beige. It is diecut with one of the Textured Notes Dies. I really like these dies! You will find them in the Online Exclusives.

For some embellishment, I made a little “nest” of Gold Twisted Thread and adhered it to the back of the greeting. The gold thread is one of the Last Chance products but isn’t discounted. Then the greeting is popped up on Stampin’ Dimensionals. I also added a few Iridescent Foil Gems, which have been one of my favorite gems to use since they came out!

Here is the link to page through the new Stampin’ Up! Catalog if you haven’t seen it yet.

SHOP STAMPIN’ UP!