Eastern Palace Medallion Card With Gold Accents

Eastern Palace Medallion Card With Gold Accents

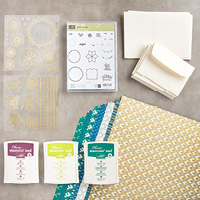
This Eastern Palace Medallion Card With Gold Accents is made with products in the newly released Eastern Palace Premier Bundle.  This Bundle contains products that will be in the new Stampin’ Up! Catalog coming out in June. This is your chance to get your hands on brand new Stampin’ Up! products right now while you wait for the new catalog! In face, these two Bundles that are being offered, will not have all these products bundled together in the new catalog, only the stamp set and thinlits dies.

These Bundles have so many exciting products, you will barely know where to start creating!

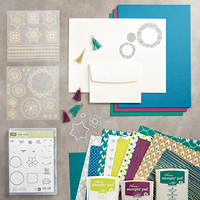
Let’s talk about the card I made. It starts with the card base made from the new In Color, Tranquil Tide. I originally chose two patterns of the Eastern Palace Specialty Designer Series Paper to layer on the front of the card, one on top and one on the bottom, but then I changed my mind and only used the one piece!  I took the Eastern Medallions Thinlits Dies to the Big Shot with a piece of the Tranquil Tide Cardstock just to experiment with the dies. No matter what dies you use, I’m convinced the medallions will turn out just beautiful! Since I had a scrap of Shimmery White Cardstock on the table, I used that, and that ended up being the piece I used as the focal point on the card.  It is adhered to the card using Stampin’ Dimensionals snipped a little smaller to make them fit on the back of the medallion. This pops up the medallion a little bit for a nice look. Then I put another die cut piece layered on the center of that medallion. This piece the petals can be pulled up for a 3D effect if you like. The little “hello” greeting is in the Eastern Beauty Photopolymer Stamp Set, and I punched it out with the 3/4″ Circle Punch.

The Eastern Gold Vinyl Stickers are a new item in the Bundle and are going to be fun to use! They have a clear border that is cut very close to the design so they aren’t going to scream “stickers!”. You get a lot of stickers in the package.  You can see the strip of gold accents I added to the bottom the designer paper. For two more accents on the card, I folded over a small piece of the Gold 1/4″ Natural Trim.  Thankfully this ribbon is not being retired because I think it will go quite well with the Eastern Palace products! And for a little bit more bling, I used the Metallic Enamel Shapes which come with both gold and silver in the one package.  These are sticking around as well!

Here’s a close up of the focal point of the card so you can see the dimension.

Eastern Palace Medallion Card Close Up

Shop Stampin’ Up! and don’t miss any of the sales and products that are available!


New Stampin’ Up! Product Available Today! Eastern Palace Suite Bundles!

Eastern Palace Suite Flyer Banner

If you are too excited to wait until June to get new Stampin’ Up! Catalog products, here is your chance to get a whole SUITE of products during the month of May! Beginning today, May 1, 2017 you can purchase the Eastern Palace Suite in a Bundle!  Choose from either the Starter Bundle or the Premier Bundle.  These products will be available separately in the new Stampin’ Up! Catalog, but not in the Bundle with the FREE GIFT! So take advantage of the Bundle while you can!

CHOOSE FROM THE STARTER BUNDLE!  #147196 CLICK HERE TO SHOP!Eastern Palace Starter Bundle

OR CHOOSE THE PREMIER BUNDLE!  #147207  CLICK HERE TO SHOP!

Eastern Palace Premier Bundle

Notice that with each Bundle, you get a FREE GIFT!

  • Starter Bundle:  Very Vanilla Notecards & Envelopes (NEW!)
  • Premier Bundle:  Very Vanilla Medium Envelopes AND Very Vanilla THICK Cardstock (NEW!)

Get your hands on the these colorful and exotic products from the Eastern Palace Suite one month before they’re released in the 2017-2018 annual catalog!  I can tell you that the Eastern Medallion Thinlits available only in the Premier Bundle right now are really amazing!  Lots of creativity with these dies!

By purchasing one of the Bundles, you will have lots of new product to make lovely cards and projects while you wait for the new Stampin’ Up! Catalog!!


Make a Birthday Gift Bag

Make a Birthday Gift BagYou might be doing some shopping this weekend, so here is how to recycle your shopping bag and make a Birthday Gift Bag. We often have these plain kraft bags in our stash at home, so use them to make nice gift bags and save a trip to the store to buy one! Even if the store name is printed on the bag, it can often be covered up with cardstock and the recipient will never know!

To decorate this small shopping bag, I used some Stampin’ Up! retiring products. The Warmth & Cheer Designer Series Paper Stack is on sale for only $4.00.  I started with wanting to use that paper.  One side of each sheet is more Christmas-y, but the other side is absolutely non-holiday. There are plaids and stars that you can use for lots of other occasions and would be useful making masculine cards.

Warmth & Cheer Paper Stack

Once I chose the star pattern to use, I picked the coordinating color Delightful Dijon Cardstock on which to layer the 6″ x 6″ piece. Since stars are great for lots of occasions like birthdays, graduations, patriotic holidays, congratulations and more, I decided to make some stars with the Stars Framelits Dies (on sale!) If you place one star framelit die inside another you can make the outline stars – and then you still have the center star that you cut out! For the stars, I also used some more of the Warmth & Cheer Paper Stack as well as some Gold Glimmer Paper.  Why not have some sparkle on a birthday gift bag??!  The greeting is stamped in Garden Green Ink with a stamp in the Big On Birthdays Photopolymer Stamp Set.

Here is a close-up of the decorated front of the gift bag.

Make a Birthday Gift Bag closeup

Be sure to take a look at the Warmth & Cheer Designer Series Paper Stack on the Retirement List until May 31 or while supplies last!  You can see some baby cards I made with this paper HERE.  And if you want something to suit a lot of purposes, you might want to pick up the set of Stars Framelits Dies at a discount!  And don’t forget the Clearance Rack!

Recycle those cute shopping bags with all your stamping supplies into birthday gift bags or whatever occasions you need one for!

Shop Stampin’ Up! Online 24/7!

Elegant Gold Foil Botanical Blooms Card

Elegant Gold Foil Botanical Blooms Card

I thought this Elegant Gold Foil Botanical Blooms Card would be difficult to photograph, but I think it turned out better than I thought! With all the gold foil, I knew the glare from my lighting would be a problem. I think it is a surprise that this gold foil patterned paper comes in the Pop of Pink Specialty Designer Series Paper! That is why it is called “specialty” but you wouldn’t think it would be included in something called “Pop of Pink”! Somehow I came up with the idea of adding Gold Foil flowers and just making an all white and gold card.  This would be perfect for a 50 Year Golden Wedding Anniversary!

The card base is Whisper White cardstock and the paper, as I already mentioned, is the Pop of Pink Specialty Designer Series Paper. This designer paper is on the Stampin’ Up! Retiring List so be sure to check it out and order it if you are interested in case it runs out at some point. It’s even on sale! To make the flowers, I used the Botanical Builders Framelits Diesalso on the list AND on sale 50% OFF!!  I wouldn’t pass that up if you don’t already have these dies! In fact, I can’t believe these are being retired.  There is also the coordinating stamp set, Botanical Blooms, on sale and retiring, too.  The paper I used is the Gold Foil.

Now as I assembled this card and tried to place the flowers (I also cut out extras while I was at it!), it just seemed like the card needed something. I looked at some previous cards I made recently using these flowers, like this black & white cardand thought I would try adding a Gold Glimmer Paper strip to the side. I like that, and decided to just have one large gold foil flower on the card instead of more.  For one more little something, I added some pearls (retired) to the flower centers. I didn’t even add a greeting, but I can if I use the card for an occasion that needs a greeting.

If you already own some retiring designer series papers, don’t hoard them!  Get them out and use them!  Then you will be ready for the “new stuff” in a month when all the new products comes out in the new Stampin’ Up! Catalog.  You KNOW you will want the new papers and products! And if you don’t already own some of the popular papers that are retiring May 31, be sure to order what you want while it is still available.

SHOP STAMPIN’ UP! ONLINE TODAY!

How to Make a Z Fold Birthday Card With Pop of Pink

Z Fold Pop of Pink Birthday Card

Learn to make a Z-Fold card and everyone will think you are extremely talented, as with this
Z- Fold Pop of Pink Birthday Card.  The fact that you can make a card with a fancy fold such as this example will really impress, and YOU know that really all you had to do was fold back the front of the card!  Look at the photo below!

Z Fold Plain Card

How to Make a Z-Fold Card

1.  Make the usual card base, 8 1/2″ x 5 1/2″, folded in half.

2.  Grab the right edge of the front of the card and fold back to the left edge of the card.

3.  Embellish!

OR, if you prefer to measure and score, score the front of the card at 2 1/8″ (center of the 4 1/4″ card front) and fold back as in the photo above.

The Pop of Pink Specialty Designer Series Paper and coordinating Washi Tape is on the Retiring List of the outgoing Stampin’ Up! Catalog so grab some while you can! I have always loved the white, pink and black mixed in with some gold, which is why it is called “Specialty” paper.  There are two sheets with gold foil, as I used for the birthday present on this card. And the designer paper is ON SALE!

The only “trick” to this card is to make a panel for the front of the card and glue it ONLY to the front z-fold panel. Hold it on the card before you apply adhesive and just make sure you know where to put the glue. Make sure none will extend beyond that front of the card fold or it will also stick to the inside of the card! My panel on this card is 3 1/4″ x 4″ but you can make yours whatever size you like.

Since I decided to put some Pop of Pink Specialty Designer Series Paper on the inside of the card where the greeting would go or note, I had to make a Whisper White panel to go inside.  I made it slightly smaller than the front panel and made sure it lined up BEHIND that front panel. When the card is closed completely flat you do not see the white panel on the inside. Now I have space to write or stamp a note or greeting even though I have decorated the card with the designer paper. There also is the back of the card which is plain where you could write more of a note if you wished.

If you want to see another example of a card like this one, check out my Z-Fold Valentine Card HERE.  This one is just a slightly different orientation.

Try this z-fold card today and check out the Pop of Pink paper in my Stampin’ Up! Online Store!


Make an Easy Elegant Birthday Card With the Detailed Floral Thinlits Dies

Elegant Birthday Card With Detailed Floral Thinlits Dies

Make an easy elegant birthday card with the Detailed Floral Thinlits Dies for someone special! Let the Big Shot and the dies to most of the work! I am SO glad that these dies are not on the Stampin’ Up! Retiring List of products!  There are a lot more beautiful cards to be made with the Detailed Floral Thinlits Dies!

To make this easy elegant birthday card, or card for any occasion, I started with a card base of Whisper White Cardstock. If you have it, I would recommend the Whisper White Thick Cardstock which is a little sturdier than the regular cardstock. Use the Detailed Floral Thinlits Dies to cut cardstock in the color of your choice. For this card, I used the In Color Flirty Flamingo. This is the grouping for 2016-2018 that is sticking around for another year! For an embellishment, I tied around the Flirty Flamingo 3/8″ Ruched Ribbon. This ribbon, as I write this, is on sale on the Retiring Products List, not because of the color but because they are retiring the ribbon style!  I loved this type of ribbon, though.  You can get it on sale right now, while supplies last.

I stamped the greeting on Whisper White and die cut with the Stitched Shapes Framelits Dies that give that little stitched look around the die cut.  I love those dies!!  Then the greeting is layered on the Layering Ovals Framelits Dies.  Click here to see a similar card I made with these beautiful dies.

When you are using the intricate dies like these Detailed Floral Thinlits Dies, you will get the best results with your Big Shot if you use the Precision Base Plate and use the Big Shot Die Brush to help get out any stubborn little pieces.

You may notice on the Retiring List that the Floral Phrases Bundle is retiring, but that just means that all Bundles in the current catalogs retire and will not be offered as bundles any more.  However, in a lot of cases you can still buy the components separately! But if you want to save 10%, get the bundles that are available before May 31 while they are available. If the two items are on sale, you might want to do the math and see which is the better deal, the separate items on sale or the 10% off Bundle!

Check out the Stampin’ Up! Retiring List of Products!

The easiest way to see the Retiring Products that are still available is to just go to my Online Store HERE.


Make Easy Animal Party Favor Treat Boxes and More!

Pyramid Pals

Two of the items on the Stampin’ Up! Retiring Products List are the Pyramid Pals Thinlits Dies and the Playful Pals Photopolymer Stamp Set which can help you make easy animal party favor treat boxes and more! It’s an infinite number of cards, party favors, gift boxes, party decorations and more that you can make. Fill these Pyramid Pals with candy or a treat or just make them for fun or for a decoration.  Just think of the fun you could have with your children or grandchildren if you make the box and then they help you decorate the pyramid to make an animal. Or just make a pyramid box, decorate with some designer paper or stamping or perhaps a clear window cut out, and use it as a party favor or gift box. Use the stamp set to decorate the boxes or just to make cards and other projects.

Both the Playful Pals Photopolymer Stamp Set and Pyramid Pals Thinlits Dies are still available as I write this post, so if you think this is something that would be fun and useful to own, grab it while you can.  All retiring items are available until May 31 or while supplies last.

Playful Pals Bundle

The Playful Pals Bundle may not still be available but you can order the dies and stamp set separately. It’s a fun and different product to use!

SHOP STAMPIN’ UP! FOR RETIRING AND OTHER PRODUCTS THIS WEEKEND!

Punch Art New Baby Giraffe Card

Punch Art New Baby Giraffe Card

Surely you have heard of the new baby giraffe the whole world has been watching and waiting for! I heard about it, but was not one who was constantly paying attention to the whole saga, but I did make a punch art card for the new baby giraffe!  Apparently the baby giraffe was born in New York on Saturday, April 15. The little newborn baby giraffe is probably about 6 feet tall and likely would weigh about 100-150 pounds!  Now that’s a baby!

While the New York giraffe made the headlines because the birth was live-streamed and millions of people watched, there was also a baby giraffe born in Houston, Texas several days before at the Houston Zoo! So it’s been a good month for baby giraffes!

To make my punch art new baby giraffe card I just used various circle punches, some retired, oval framelits, whatever I had. There are lots of examples of punch art animals online if you do a google search!  I used the Owl Builder Punch for two sizes of the circles.  I can’t believe the Owl Punch is retiring, it has been so useful over the years we’ve had it! There was no limit to what we could create with the Owl Punch.  So be sure to grab one while they are still available!

The little piece of grass on the bottom of the card and the flower I happened to already have die cut from the Basket Builder Framelits Dies. The dies and Basket Bunch Stamp Set come in a Bundle, which is retiring as all Bundles are, but actually, since both items are on sale separately, it is a better deal to buy the stamp set and then buy the framelits, not in a Bundle!

I wanted some kind of greeting on the card, but I didn’t have much space left, so I came across the word “Celebrate…” in the Beautiful You Stamp Set so I used that.  It fit perfectly in the space and was perfect since we are celebrating the births of baby giraffes!

Any time you need to celebrate something, even the birth of a giraffe in New York or in Houston, you can make a card for that! Isn’t stamping wonderful?!

Shop Stampin’ Up! Online and Check Out the Retiring List!


Die Cut Flowers Black and White Birthday Card

Die Cut Flowers Black and White Birthday CardDie Cut Flowers Black and White Birthday Card

Grab a bunch of die cut flowers in bright colors and put them on a card against black and white for a snazzy-looking birthday card. These flowers were all die cut with the Botanical Builder Framelits Dieswhich sadly are retiring.  If you don’t already own these dies yet, you an get them for 50% off during the Stampin’ Up! Retiring Sale!  I love the way the one flower has the petals partially die cut so that you can fold up the petals a little bit if you like. Then there are all kinds of little die cuts that you can add for flower centers or as little smaller flowers. Cut some extra flowers while you are at it with your Big Shot  so that you have some on hand for a last minute card!

The card is made with a Whisper White card base and layered with Basic Black Cardstock. You will be surprised to know that the designer paper that the black and white stripe piece belongs to is called Pop of Pink! The Pop of Pink Specialty Designer Series Paper was one of my favorites.  And now it is on the Retiring List at a good discount!  You can also get the matching Pop of Pink Designer Washi Tape for a fun accent on your cards or envelopes. There is also the  Melon Mambo Thick Baker’s Twine and the Basic Black Solid Baker’s Twine for more coordinating items for your projects.  And for a glittery accent, I adhered a strip of Gold Glimmer Paper between the black cardstock and designer paper in the center of the card.

The greeting on the card is stamped with Melon Mambo ink and is from the Build a Birthday Stamp Set.  You could make this card for almost any occasion, or none! It’s pretty enough to stand alone and just write a note inside.

Be sure to check out the Retiring List from Stampin’ Up!  Some products are already gone but there is still lots to choose from if you don’t want to miss out after May 31.

Shop Stampin’ Up! Retiring Products and More!


Easter Cross Card

Easter Cross Card

I was amazed when I saw someone make a cross out of the die cut strips in the Flourish Thinlits Dies  for this Easter Cross Card. You will have to trim some of the ends with your Paper Snips to get the correct size you want. After I made the cross, I stamped some flowers from the Basket Bunch Stamp Set and die cut with the Basket Builder Framelits Dies. Both the stamp set and framelits are on sale right now on the Retiring Products List, actually a little cheaper than buying the Bundle. I cut out quite a few flowers and colored them in with markers and tried to fit them on to the cross. I just wasn’t getting the right layout. Then I finally just put one single flower in the center of the cross and that was it! Actually, when I did that it reminded me of some small wooden crosses my brother made a gazillion years ago, me might have copied one someone gave my grandma as a gift, I don’t remember. And each white painted cross had a lovely plastic flower in the center! That was the thing back then!

I also die cut several pieces of the grass with the Basket Builder Framelits and played around with using three pieces or one. In the end, I liked the simplicity of one piece of grass just as the base of the cross.

The Easter cross card base is Whisper White although it is difficult to see in the photo. Next is a layer of Soft Suede with a layer of Soft Sky over that. It’s really a very easy card and will certainly mean something to whomever you send it!

Shop Stampin’ Up! HERE with all the Retiring Products!

Don’t Delay!

Make Easy Punch Art Easter Bunnies

Easy Punch Art Easter Bunnies

If you are making some last minute Easter cards or bunny tags for Easter baskets, here are two ways to make easy punch art Easter bunnies.  Punch art is always fun and easy to make and you can be so creative with your punch shapes and of course Big Shot dies.

I started with the card on the right with the Crumb Cake card base. To give a little interest, I stamped the Easter eggs from Basket Bunch randomly on the background of the card. You can do each one individually or do as I did, put all three eggs on a block and stamp! I stamped off once after inking up the stamps with Crumb Cake ink to give a very light watermark look on the card.  You can achieve the same look with Versamark Ink.

For the bunny on the Crumb Cake card — I used a heart shape from the Sweet & Sassy Framelits Dies and turned it upside down. The ovals for the ears are made with the Layering Ovals Framelits Dies.  The face is stamped with the bunny face pieces in the March 2017 Paper Pumpkin Kit.  I often forget to use the exclusive stamp set I get in each Paper Pumpkin Kit, but today I remembered!  The Easter greeting is stamped with the Teeny Tiny Wishes Stamp Set!  Boy, was I glad THAT set was not on the retirement list!  I use it all the time!  Such a good “go-to” stamp set for almost any greeting you need! I prefer the wood-mount set. Those are little Enamel Shapes on the end of the greeting, punched with the Classic Label Punch.

The other punch art Easter bunny on the Pink Pirouette card base, is made with the 2″ Circle Punch for the face.  The ears are made with the same oval die cuts as the other card.  The greeting has little pearls (retired). I couldn’t resist putting a little blush on the bunny’s cheeks with some Pink PIrouette ink and adding a little bow with the Smokey Slate 1/8″ Ribbon.

Here’s another Punch Art Easter Bunny I made a few years ago.  Just click the link.  If you would like more ideas, just do a search in the box on the right for “bunny”.

Sometimes you have to think outside the box for new ways to use your punches and dies and other tools and accessories.  There are so many creative ideas out there!  If only there was enough time to make everything that is cute!

You could also use a punch art or die cut bunny on a baby card or tag for a baby gift!  Bunnies aren’t just for Easter!

Shop Stampin’ Up! Online!  Check out the Retiring Products category!

Quick and Easy Easter Tiny Treat Box

Quick and Easy Easter Tiny Treat Box

Make a quick and easy Easter Tiny Treat Box for a little gift or a table favor or even a decoration in your home!  And you can eat the candy later!  The Stampin’ Up! Tiny Treat Boxes make this project so quick and easy. If you don’t have any “Easter grass” to put inside, just cut narrow strips of cardstock and moosh them up with your hands, unless you have the old Paper Crimper, which is what I used to get the crinkly effect.

My project was made super-quick because I already had extra Easter figures cut out while doing another project. I had already stamped and die cut the Easter bunny, carrot, chocolate bunny and little bunnies with the Basket Bunch Photopolymer Bundle. The Bundle includes the stamp set and matching framelits dies and is on the Stampin’ Up! Retirement List. Now the Bundle at $46.75  in the Occasions Catalog has always been the best deal if you wanted both the stamp set and the framelits, but now that the Retirement List is here, it looks to me like the best deal is to buy the Basket Bunch Photopolymer Stamp Set on sale at $16.80 and the Basket Builder Framelits Dies on sale at $15.50.

This set can be used for other occasions, not just Easter, so don’t worry that you don’t have time to order and use it now!  There is always next year, but even now you can use bunnies for any happy occasion and certainly the basket and flowers. One day I made a baby card with the bunnies that had nothing to do with Easter.

The Retirement List was released yesterday so be sure to check it out early so as not to be disappointed if any products sell out early!

  • Retiring stamp sets will continue to be manufactured by Stampin’ Up! in Kanab, UT until May 22, then it will be while supplies last.
  • Some items on the Retirement List are discounted, but not all.
  • Bundles in any catalog are only priced as bundles with the 10% discount for the first year in the catalog, after that the items may be available separately.
  • Tools and accessories are available “while supplies last”.

Shop Stampin’ Up! for all the Retiring Products HERE!

Retiring Stamp Sets

Retiring Bundles

Retiring Everything Else

Check out the Retirement List  in PDF or EXCEL.

Basket Bunch Easter Card

Basket Bunch Easter Card

Easter will be here in just one week! I don’t know where the time has gone considering Easter is late this year! Here is a Basket Bunch Easter Card that I got the basic inspiration from a card I saw online that was an egg-shaped card.  Instead of making mine an egg-shaped card, which I have done in that past, like THIS CARD,  I gave the impression of an egg by die-cutting an oval in the front of the card with the Layering Ovals Framelits Dies. Then I cut a Whisper White layer to put behind the opening and placed some of the Basket Bunch images on that layer inside the oval as well as stamping the greeting from the Basket Bunch Photopolymer Stamp Set.

There are a lot of little dies in the Basket Builder Framelits Dies  that you can use with the stamped images to die cut Easter eggs, bunnies, grass, a basket, a bow and more!  So many fun choices! As I was putting this little scene together, I thought I should have had a scalloped border around the oval, but the largest scallop was too small for the shape.  However, since the bottom portion was going to be covered up anyway, I just die cut the largest scalloped oval and then cut it open at the bottom to that I could “stretch” the oval around my opening to make it fit!  I think it worked pretty well!

Basket Bunch Easter Card Scallop

Here is a close-up of the die-cut elements of the card:

Basket Bunch Easter Card Close Up

While there are a lot of Easter elements in this Basket Bunch Photopolymer Bundle , I’m sure you can see how it can also be a good set for lots of occasions leaving out the parts that say “Easter”. A basket full of flowers, for example, is good for any occasion and is made even cuter with this die cut basket. And bunnies are cute any time!

Remember, the Stampin’ Up! Retirement List comes out tomorrow, April 10th at 1:00 pm MT, which is 2:00 PM Central Time. Remember, on big days like this, there can always be computer glitches and delays so just exercise patience if you have any problems viewing the website or putting in an order.

To order anything today or to see the Retiring Products tomorrow afternoon, just go to my Stampin’ Up! Online Store HERE!

A Fun Shaker Card to Make

A Fun Shaker Card to Make
Doesn’t everyone love a shaker card?  I think it brings out the child in us! It is so fun to move the card back and forth to see the movement of the beads or confetti or whatever the contents in the window are! Shaker cards are really easy to make and certainly fun.

First I made the card base with a piece of Peekaboo Peach cardstock folded in half.  I chose Peekaboo Peach because it is one of the coordinating colors of the Tasty Treats Specialty Designer Series Paper that I had already chosen to use. I die cut a circle in the designer paper for the window with the Layering Circle Framelits Dies or perhaps you could use a punch if you had the right size. Then I cut a piece of Whisper White cardstock to go behind the window on which I would stamp a greeting. I think a smaller greeting would have been a better choice.  I used the Watercolor Words Stamp Set for the greeting and the flowers on my card. A greeting this large made it a little difficult to make sure it was placed just right to show through the window. You’ll also need a piece of Window Sheet (or some piece of plastic like a transparency sheet) to adhere on the back of the window. After the window sheet is in place, place the Foam Adhesive Strips completely around the hole on the back of the window.  This forms the “well” where you will put your shaker pieces. For my card, I added the Sprinkles Embellishments in the Occasions Catalog and a few miscellanous sequins that I think are retired but I had handy. Next, peel off the adhesive strip on top of the foam strips and place the stamped white background piece over the window. This is tricky because you are doing it from the backside without seeing how it lines up. Once that is adhered, add some more Foam Strips or Dimensionals around the back of the window layer to hold that layer up all around the edge the same as the window.  Adhere to card base.  And there you have your Shaker Card! It just takes making one to get the hang of it!

The Watercolor Words flowers are stamped and cut out by hand with my Paper Snips. I just adhered those to the front of the card around the shaker window. Another tip is that you don’t want too much in your shaker window or it obscures your greeting or image and doesn’t move around as well. And if you don’t have the Foam Adhesive Strips yet, you can substitute the edge strips from the Dimensionals, just make sure you don’t leave any open spaces!

Try making a fun Shaker Card! You can also have the front of the card flat and the shaker area inside the card.  Just cover with another layer of cardstock to make it look pretty on the inside!

If you need any Foam Adhesive Strips, Sprinkles Embellishments, or other sequins and materials to make a Shaker Card, just order at my Stampin’ Up! Online Store!


Making a Generic Card For Any Occasion

Generic Butterfly Work of Art Card

Sometimes it is a good idea to make some generic cards to have on hand so you are ready for almost any occasion. In this case, I have a butterly work of art card!
To make this generic card, I used Pool Party cardstock for the card base and layered it with So Saffron for an accent. The Whisper White layer is stamped, lightly, with various swaths of color with the Work of Art image.  I used So Saffron, PInk Pirouette, Pool Party, and Calypso Coral ink. This provides a generic background but has color and interest in it.  The gold foil butterfly I found in my scraps! It was die cut with the Butterflies Thinlits Dies and the Big Shot. I added a few Pearl Basic Jewels on the butterfly for a little more accent. For the ribbon embellishment, I thought the Sale-A-Bration ribbon (retired) with the gold accents would be good for this card.

After you have some generic cards made, you will be ready to pull out a card for almost any occasion when you need one at the last minute. Add a greeting if you like or leave it without. Another way to add a greeting is to stamp a generic one, like “Just For You” or “Thinking of You”, something like that. Here’s an example of another card I made that could be considered generic and could be used for birthday, thinking of you, a written note, get well, congratulations, etc.

Look through the catalog and choose some stamp sets that could help you make generic cards. Flowers are probably always good but there are many others.

(Something is making my blog post push all the paragraphs together so I will have to find a way to fix this issue, just know I’m not trying to make my post difficult for you to read!)

Shop Stampin’ Up! Online 24/7 HERE!