Last Minute Card and Treat Ideas For Valentine’s Day

Easy Valentines to Make with Sending Love Paper Stack

Since we are just one day away from Valentine’s Day and we all probably procrastinate, I thought I would post some of my past projects that you can use for last minute Valentine ideas for cards and treats for inspiration if you need another card or two or a little treat for someone!

Click here for the above cards:  Easy Valentines to Make With Sending Love Paper Stack

A Valentine Mini Treat Bag For a Valentine Treat

A Valentine Mini Treat Bag With Glassine Sheet

Quick and Easy Last Minute Punched Hearts Valentine Card

Quick and Easy Last Minute Punched Hearts Valentine Card

Easy Stamped Valentine Card

Stamp An Easy Valentine Card with Sealed With Love

Valentine Treat Bag with Hearts Tag

Make a Valentine Treat Bag with Scraps

Valentine Sending Love Small Treat Bag

Valentine Sending Love Small Treat Bag

These are just a FEW of my past Valentine ideas!  You can put “Valentine” in the Search Box on the right sidebar and find even more, some very old ones! Or you can look through the Archives drop down menu and choose a very old year and see what we used to make! So if you need last minute Valentine ideas for cards and treats, just check these out!  Have fun!


Mini Mailbox For Valentine’s Day Candy

Mini Mailbox For Valentine's Day Candy

I’ve seen these Mini Mailboxes For Valentine’s Day Candy around on the internet and they are so quick and easy to make! I’m sure you could also make them for other occasions, like a birthday or Christmas.  Just change the paper and colors to suit the occasion!

This mailbox has two chocolate nuggets inside. You could use a low-temp glue gun so as not to melt the chocolate of course, but I just used Mini Glue Dots. They won’t interfere with the candy.

For the mailbox base, you need a strip of cardstock that is 3″ x 1″ with the corners rounded at both ends.  I used a Project Life Corner Rounder Punch (retired) but you could also just round the corners by hand with your scissors. This is just a little candy treat, it doesn’t need to be absolutely perfect! Mine isn’t! I think I used the wrong piece of paper for the base!

Score this base piece at 1″ to form the flap that makes the back of the mailbox.  You don’t need to score the other end unless you want to be able to fold it up like a mailbox door.

Next cut a piece of cardstock 1 1/4″ x 3″ and a piece of designer paper 1″ x 3″ and glue together. This will fold over the stacked chocolate candies. Again, you can use the low-temp glue gun or I used the Mini Glue Dots.  You might want to loosen the paper fibers a bit by kind of curling the paper just a bit with a Bone Folder.  Then just cut a very narrow strip of paper for the mailbox flag, topped with a tiny heart!  I used the Owl Punch (retired)for the small heart and another small heart punch for the lid of the mailbox.  You can also just cut these hearts by hand, too. We’ve all been cutting hearts since we were kids, right?!

Here are some other fun and easy Valentine candy treats to make! Click HERE.

Try this mailbox project!  It really only takes minutes and you can use up your scraps! Make a Mini Mailbox to hold a couple chocolate candies and give to someone on Valentine’s Day!

Quick and Easy Tiny Treat Box For Valentine’s Day

Quick and Easy Tiny Treat Box For Valentine's Day

If you keep a package of these Clear Tiny Treat Boxes on hand, you will be able to make things like this Quick and Easy Tiny Treat Box For Valentine’s Day in nothing flat! If you need a little gift box or treat box for an occasion or party favors, these Clear Tiny Treat Boxes are the answer!  Just wrap a little piece of paper or ribbon around the box and embellish for the occasion and you’ve got it!

These Clear Tiny Treat Boxes store flat and have a little plastic wrapping on them. Just crease the score lines when you are ready to use them and assemble the box. Fill with some deli cious candy or place a small gift inside. These would be great as party favors as well.  You can decorate them in any way you like!

For this Valentine treat box, I simply wrapped a narrow scrap of the Painted With Love Specialty Designer Series Paper (This paper has gold foil accents! So pretty!) around the box and adhered the two ends in the back. It’s best, I think, if you hold the strip of paper at the back of the box, then fold the paper around the first corner.  Take the paper off and give it a good crease, then hold it back on the box and fold around the next corner.  Again, remove it, give it a good straight crease, and continue folding around the box.  This way you don’t have to bother measuring. Sometimes when you measure a strip because of the folding, the measurements don’t quite work.

To decorate the box, I simply stamped a heart from Heart Happiness in Melon Mambo Ink on Powder Pink Cardstock and cut out. I adhered the heart on a piece of Gold Foil punched with the Starburst Punch. Just for a little extra I tied a piece of the Gold 1/8″ Ribbon around the box to match the gold in the paper and the Starburst Punch. You could add even more if you wanted to, like a banner greeting across the front of the heart or another smaller heart in the center. Lots of ideas!

As Valentine’s Day is fast approaching, think of how you can make a quick little gift for your family or a neighbor or friend like this Quick and Easy Tiny Treat Box For Valentine’s Day with any little box that you have in your home, and later you can order a supply of the Tiny Treat Boxes to keep on hand!


A Valentine Extravaganza For Kids’ Class Valentines

 Magical Day Valentine With Knight

It was a Valentine Extravaganza last night as I helped two moms make class valentines for their kids to take to their school valentine parties this week!  We’ve been doing this for a few years now.  I make some sample ideas, they see which ones their kids like, and then we get together and make them, sometimes with one of the girl’s help because Elsie has been stamping and scrapbooking since she was in preschool!  Really!  She taught a class on stamping in preschool!

The Magical Day Stamp Set in the Occasions Catalog proved to be perfect for Carl as he had just done some Shakespeare in school!  I tried various combinations of designs as you will see.  I used the new Stampin’ Blends markers to color in the knight.  That was a little time-consuming for making 30 valentines, but it had to be done and I knew the moms would want to try out the Stampin’ Blends markers. (They loved them!)

Magical Day Valentine You Are Awesome

Using a different greeting (“Awesome”) from the Marquee Messages, which the mom liked, but her son liked the greeting that came in the Magical Day Stamp Set.

Magical Day Scallop Knight

This version I thought using punches was going to be quicker and easier that cutting or die-cutting squares. That’s something you have to consider when you are making a quantity of cards.  What can you mass-produce fairly easily?

In the end we made a card with the “Magical” greeting, the knight layered on a  piece of Silver Glimmer Paper punched with the Starburst Punch and that all layered over a Black Glimmer Paper (retired) strip flagged at the ends like this silver one.  And we stamped the little stars in the stamp set around on the card front in Versamark ink, which was better than using the Bermuda Bay ink.

Soccer Valentine

Wyatt is a soccer player so I dug out a retired stamp set called I Love Soccer.  I bought this set in case I ever make scrapbook pages for my two boys who played soccer!  Luckily I met Wyatt who likes soccer valentines!  The grass is stamped from the Sheltering Tree Stamp Set. I stamped it in both Old Olive and Crumb Cake to look like some dirt mixed in. In the final version of the card (and late at night!) we decided it would be quicker to just stamp the “Woohoo” in Real Red ink right on the card instead of stamping and cutting out.  It looked fine!

All these cards were just one-sided (no fold) and the kids will sign them on the back.  Since this one is mounted on Basic Black, we added a Whisper White layer and stamped with some more soccer stamps.

Soccer Valentine Greeting

Last but not least, Elsie likes cats, so this was her card she chose!

Cat Love Valentine

The cat is from the retired stamp set Pun Fun. I got a lot of use out of that stamp set back in the day! The cat is stamped in Memento Black ink and colored in with the Smoky Slate Stampin’ Blends.  The cat is punched out with the 2″ Circle Punch and then layered on the Starburst Punch piece in Real Red.  The little hearts are from Heart Happiness (love that stamp set!) and the word “Love” is from Watercolor Words (another great set!).  Pretty quick and easy valentine to make for a cat-lover! If you are looking for a cat stamp set, the current one in the Annual Catalog is this adorable one, the Pretty Kitty Stamp Set.  If you need a dog, order this stamp set, Bella & Friends.  This stamp set was designed by one of the Demonstrators who reached $1 million in sales, Angie Juda.

Cat Punch Friend Valentine

This was another potential sample using the Cat Punch.  Her eyes are stamped from the Halloween set, Spooky Cat (retired).  The “friend” is die cut with the Lovely Words Thinlits Dies.  It comes attached to an oval, but to get only the word, just snip the ends to separate.

Cat Punch Eclipse Technique Valentine

And this was another sample I played around with.  I stamped the Whisper White in Melon Mambo with the beautiful flowery stamp in the Wood Words Stamp Set.  Then I used the Cat Punch to punch out the cat. Next, adhere the Whisper White layer to the Melon Mambo card base. Pop the cat up on Stampin’ Dimensionals and adhere it in the empty space.  This is called the Eclipse Technique and you can do it more elaborately with the Large Letters and Large Numbers dies, but it is very easy with just a punch!  She may give this card to one of her teachers.

For more ideas for class valentines for kids, check out my blog post from last year to see the valentines I designed for the kids!

So there you have lots of valentines ideas for kids!  I sure wish I’d know about Stampin’ Up! back when my kids were in elementary school.  I hope the schools don’t give up the tradition of handing out valentines. I think it is one where they can all participate and enjoy receiving their little cards and treats!  It’s even more fun if you can stamp some valentines, perhaps with your child’s help, and have a Valentine Extravaganza making their class valentines!

Simple Hearts Card For a Valentine

Simple Hearts Card For a Valentine

Valentine’s Day is coming soon so here is a Simple Hearts Card For a Valentine! I decided to use the color scheme from the Painted With Love Designer Series Paper, so I chose Melon Mambo and Calypso Coral, which is an unusual color combination.  You can certainly use this card for other occasions besides Valentine’s Day!

The card base is Melon Mambo with a layer of Calypso Coral. The top layer is Whisper White with a thin strip of the Painted With Love DSP.  I needed some piece of that paper so you could see the color combination.

I stamped two hearts from the Heart Happiness Stamp Set and cut them out.  This is a great stamp set to have on hand because hearts, like stars, can be used for many occasions!  I love this heart stamp! A grouping of the little hearts are also in this stamp set so you can stamp several little hearts at one time.  The greeting is from the Petal Palette Stamp Set.

Just to go with the gold accents, I used a piece of the 1/8″ Gold Ribbon to tie around the top layer.  This ribbon has been around for years and I use it a lot.  It also comes in silver. It’s perfect for when you need a little something.

This is the weekend to be making valentines and getting them in the mail. So I hope you can use this simple card with the hearts for a valentine idea!

SHOP STAMPIN’ UP! ONLINE HERE!

A Cupcake Box Made With Designer Paper and a Mini Pizza Box For Valentine’s Day

Cupcake Boxes

The other day, Sara Douglass, CEO of Stampin’ Up!, did a quick Facebook Live video about how to make a cupcake box like these.  The fact that she did it first thing in the office in just a few minutes before she had to dash off to a meeting, tells you that these are not real complicated!

This cupcake box is really one of the Mini Pizza Boxes for the base to hold the cupcake and then the paper “lid” with a cutout for a window sheet or piece of plastic for the window to see the cupcake inside…..or in my case, a homemade blueberry muffin! The lid of the Pizza Box has a hole cut in the center using one of the Layering Circle Framelit Dies which holds the cupcake in place.  You can make that hole as small or as large as you need it to be according to the size of the cupcake or treat. Just make sure you are clear on which area of the box gets the hole!Pizza Box Lid Hole

Like Sara, I chose one of the papers in the Painted With Love Specialty Designer Series Paper package. Each sheet has gold foil accents on it, so it is really a beautiful paper! No matter which design you choose! Your Stampin’ Trimmer really gets a workout cutting and scoring this paper that will become the box, but it is really handy for cutting out that window in the middle of the paper.  The second box is made with a paper in the Merry Little Christmas package (Retired). This one was going to a man so I didn’t want it to be Valentiney!

Unfortunately, the Fast Fuse Special sold out early this morning! I have edited this post but you can still enjoy the Cupcake Box! So sorry if you missed it….and I know you did miss it!  So did I!

Watch Sara’s Facebook video about making the Cupcake Box!

Cupcake Box Diagram Sara DouglassHere is the diagram Sara made with measurements.  If you need more info just go to her Facebook page HERE.

Try making a Cupcake Box for a cupcake, muffin, or small treat for any occasion, not just Valentine’s Day!

Adhesive Sale! Get a Special Deal on Fast Fuse Feb. 8 – 12

Fast Fuse Sold Out

Unfortunately, this offer sold out very early! It was supposed to be available for 5 days, but it didn’t make it to lunch on the first day! It was stated “while supplies last” but we expected supplies to last a little bit longer! 

You CAN still purchase Fast Fuse, but it will not be the special offer.  Sorry for the inconvenience.

 It’s an Adhesive Sale starting tomorrow, February 8 for 5 days only! Get a special deal on Fast Fuse Adhesive!

Buy 1 Fast Fuse, Get 2 Fast Fuse Refills FREE!

Check out the Fast Fuse Adhesive HERE!

I LOVE the Fast Fuse Adhesive, but I have to admit I didn’t in the beginning! Finally I got the hang of it and now I think it is a great adhesive to use. It’s stronger than SNAIL and that is an advantage on some projects, especially 3D projects! The trick seems to be not pressing hard when you use it. There are videos galore with tips online!

From Stampin’ Up!:

As you may remember, the response to our Fast Fuse promotion last fall was phenomenal. In fact, your enthusiasm was so overwhelming we simply didn’t have the inventory to keep the deal running! So, as promised, we’re bringing back the Fast Fuse Adhesive deal for five days only—while supplies last! For those of you who are unfamiliar with this promotion, here’s how it works: When you buy ONE Fast Fuse Adhesive, you’ll get TWO Fast Fuse Adhesive refills for FREE!

This deal will start on February 8 and end on February 12. Remember, that’s five days only—while supplies last!

Be sure to mark your calendars and prepare to stock up and save with this fabulous deal!

Check out this gift bag I made last year which is the type of project Fast Fuse is really good for!  Of course you can even use it on cards, too!

Watch this video from Stampin’ Up! with good tips on using Fast Fuse!  Some people even think the secret to a light touch is to not even put your index finger on the top of the applicator! And like she says, sometimes you will have to get the adhesive going again and you will need to clean off the adhesive that accumulates sometimes on the case. But the adhesive is worth a little bit of effort!

If you want to TRY Fast Fuse or you want to stock up, I would order as soon as possible tomorrow, if you can, just in case there is a mad rush on the adhesive sale right off the bat!  Hopefully they have FILLED the warehouse from floor to ceiling with Fast Fuse!!

Keep Sale-A-Bration in mind!  Whether you want to stock up on Fast Fuse to spend your $50 or whether you get some Fast Fuse and maybe some other adhesives you need or cardstock or new stamp sets, remember that with every $50 increment, you can choose a FREE Sale-A-Bration product!

Look over the Sale-A-Bration choices HERE!

DO NOT begin your order today or you may have trouble with the special deal showing up on your order tomorrow!  Just have your order and numbers all written out and ready to put in tomorrow!  Or let me know and I can do it for you.

Try the Fast Fuse Adhesive tomorrow on the Adhesive Sale tomorrow and see how useful it is when you want a strong hold for your projects!

Get Sale-A-Bration Rewards With Paper Pumpkin Prepaid Subscriptions!

Paper Pumpkin Sale-A-Bration Deals 2018

Did you know that one way to earn Sale-A-Bration rewards from Stampin’ Up! is to purchase a prepaid Paper Pumpkin subscription?!  This is a great opportunity for new subscribers to get a free bonus, and also for past subscribers to come back and get a Sale-A-Bration reward at the same time!

One way to get Paper Pumpkin, a papercrafting kit sent in the mail once a month from Stampin’ Up!, is to subscribe monthly.  But during Sale-A-Bration, there is an advantage to buying a prepaid subscription.

Prepaid Subscriptions Paper Pumpkin

3-Month Prepaid Subscription:  $59  (Earn 1 Sale-A-Bration product!) (over $50)

6-Month Prepaid Subscription:  $114 (Earn 2 Level 1 Sale-A-Bration items or 1 Level 2 item!)  (over $100)

12-Month Prepaid Subscription:  $215 (Earn 4 Level 1 SAB items or 2 Level 2 SAB items!) (over $200)

During Sale-A-Bration you can earn a free SAB item for every $50 you spend on any Stampin’ Up! order. To purchase the Prepaid Subscriptions you just go to my Online Store and choose which subscription you want like any order. Since the 3-, 6-, and 12-month subscriptions are over $50, you get FREE Sale-A-Bration!

If you want to save a little money, get the 6-month and save $1 per month or BEST DEAL, get the 12-month and save $2 per month, plus get the most Sale-A-Bration benefits!

Now if you do ONLY order the prepaid subscription, your FREE Sale-A-Bration still needs to be shipped to you so you will pay shipping…..so as long as you are paying shipping anyway, maybe you want to pick up some other Stampin’ Up! products in the store! Shipping on Paper Pumpkin Kits is already included in the price.

When you order a prepaid subscription, Stampin’ Up! will email you instructions and a code to redeem at paperpumpkin.com so you can get everything set up! If you have any questions, just let me know.

Did you know that CURRENT SUBSCRIBERS can also take advantage of Prepaid subscriptions?  Just purchase which one you want in the Online Store and your regular monthly subscription will be put on hold until you use up the prepaid subscription, then it will resume. So you don’t lose anything!  If you are going to pay monthly for Paper Pumpkin anyway, you might as well earn FREE SALE-A-BRATION products at the same time through March! (Note to self!!)

If you need a Sale-A-Bration Catalog with all your choices plus the new Occasions Catalog, let me know and I will be happy to mail you complimentary copies, if you do not already have a Demonstrator that you are working with. I would love to be yours!

If you would like to see the catalogs online, just click the Catalogs rotating photo in the right sidebar of my blog and you will find all the current catalogs on my blog page.

OR Click HERE:

Occasions 2018 Catalog HERE

Sale-A-Bration 2018 Catalog HERE

Want to know more about Paper Pumpkin? Watch here to see the January 2018 Kit, just to get an idea of how it all works!

Go check out the Paper Pumpkin Prepaid options during Sale-A-Bration and earn some FREE products!  Once you are a subscriber, you can also purchase any Past Paper Pumpkin Kits that are still available!  You’ll be so happy to receive a fun surprise Paper Pumpkin Kit in the mail each month!

Football Card Ideas for Super Bowl LII

Super Bowl 2017 Card With Punch Art Football Helmets

Are you a football fan and wanting to make a football card for Super Bowl LII?  Here are some past ideas of football cards I have made. You can adapt them to whatever supplies you have on hand today and choose the colors for the team you like!  You could also  adapt these card ideas to a scrapbook page you might be making about the day or the Super Bowl party you gave or attended!

To make the card above, just punch the helmets with a circle punch and then use smaller circle punches to cut out the shape. Check out the details HERE.

Super Bowl LI Football Card

This was the card I made for last year’s Super Bowl game! Just use some green cardstock and narrow white cardstock strips to look like the football field! Read about this card HERE.

Super Bowl 2017 Punch Art Football Game Card

If you own the wonderful retired Owl Punch, you can make some cute little football players with the punch!  Find out more about this card HERE.

Whether you are a fan of the game, just enjoy watching the commercials, or get to stamp while everyone else is interested in the game, you can put a little football into your cardmaking with these Super Bowl football ideas!

Plan your next Stampin’ Up! order while everyone else is watching the game!  Remember, for every $50 you spend you get to choose a free Sale-A-Bration product!

Quick and Easy Gatefold Valentine Card With Hearts

Quick and Easy Gate Fold Valentine Card With Hearts

Here is a quick and easy gatefold Valentine card with hearts for Valentine’s Day!  A gatefold card is something different to make and your recipient will think it is something exceptional! This card, in fact, will only take you a few minutes to make!

Start by cutting a sheet of cardstock in half like you always do – but don’t score it in the middle. instead score at 2 1/8″ from each end.  That will leave a 4 1/4″ center area like a usual card and then the two flaps on the front that close that are 2 1/8″ wide each, which covers that center area!  Very easy!

To decorate the card, cut two strips of designer paper, such as this Painted With Love Specialty Designer Series Paper, at 2″ x 5 3/8″, which leaves a very narrow little margin on each side. For inside the card, just cut a piece of Whisper White Cardstock to layer on the Melon Mambo Cardstock at 4″ x 5 1/4″. I stamped a heart from the Watercolor Words Stamp Set on the inside panel.

For the hearts on the front of the card, I used the Sweet & Sassy Framelits Dies (hearts) to cut the largest heart from Gold Foil, the next smaller heart from Melon Mambo, and the smallest heart from Whisper White.  On the white heart, I stamped the “Love” from Watercolor Words. When you adhere the hearts to the front of the card, remember that you only want to put adhesive on the side that will attach to the left “gate” of the card. Don’t adhere to both sides or you won’t be able to open the card!  I used Stampin’ Dimensionals but you could also use any adhesive, just being careful where you put the adhesive.

The card looked perfectly fine at that point, but just because I wanted to, I added some Metallic Enamel Shapes, a few of the gold hearts on to the Whisper White heart.

This is an easy card to make. Just do the basic and then embellish a little bit.  You can do as much as you like.  You can see a wedding card I did several years ago with this same fold HERE.

Change up your routine a little bit and make a gatefold card like this Quick and Easy Gatefold Valentine Card With Hearts.  

Shop Stampin’ Up! & Sale-A-Bration!

Valentine’s Day Party Pandas Mini Treat Bag

Valentine's Day Party Pandas Mini Treat Bag

How about a cute Valentine’s Day Mini Treat Bag stamped with one of the Party Pandas? This mini treat bag is big enough to hold a few pieces of candy inside, a gift card, a small gift or just a note! You can make it for Valentine’s Day, but really it could be used for lots of occasions!  And one of the best parts is that you can get the Party Pandas Stamp Set FREE during Sale-A-Bration with a $50 purchase of Stampin’ Up! products!

It’s so easy to make a treat bag with the Mini Treat Bag Thinlits Dies.  These dies have always been one of my favorites!  I also like the other pieces that come in the collection besides the two pieces that make up the treat bag.

Mini Treat Bag Thinlits Dies

For the Party Pandas treat bag, I made the treat bag with a paper in the Whole Lot of Lovely Designer Series Paper.  I figured the pink dots could be used for Valentine’s Day but also for other occasions.  I did trim off the top edge of the bag since I was going to tie the bag shut with the Powder Pink 3/8″ Shimmer Ribbon.

The Panda is stamped with the Party Pandas Stamp Set available during Stampin’ Up! Sale-A-Bration!  You can’t buy this stamp set, you have to earn it! You earn it with a $50 purchase, which is easy to do, and then you choose a special Sale-A-Bration product for your FREE product!  I think the pandas are probably one of the most popular Sale-A-Bration sets this year! The panda is just stamped in black ink.  (I used Memento Black.)  Just color in the little heart on the envelope with a pink marker.  I stamped just the word “Love” from the stamp in the set and inked it up with the Melon Mambo Marker.  I got lucky and stamped it in just the right place!

Next I die cut the panda with the Stitched Shapes Framelits Dies and layered on a piece of the Iridescent Myths & Magic Glimmer Paper in the Occasions Catalog. This glimmer paper was also die cut with the larger square in the Stitched Shapes Dies.  The paper almost seemed to take on a little bit of the pink from the paper and the ribbon!

Here is another Mini Treat Bag I made last summer with the Birthday Memories Designer Series Paper.  I put a card inside the bag for the birthday card.  There are so many ways you can use these treat bags!

If you need a little Valentine Treat Bag, you can make one yourself with the Mini Treat Bag Thinlits Dies out of any paper you choose. Best of all, with a $50 purchase, you can choose the Party Pandas Stamp Set for your free Sale-A-Bration item and make all kinds of cute cards and projects with the pandas.

If you like this project and want to share it with your friends, you can click one of the social media buttons right below this post! Or leave me a comment!

Shop Stampin’ Up! Online During Sale-A-Bration!

Easy to Stamp Valentine Card With Gold Vinyl Stickers

Easy to Stamp Valentine Card With Gold Vinyl Stickers

Today I thought I would make a simple, easy to stamp valentine card using the Gold Vinyl Stickers! It’s time to start making some valentines as tomorrow is the first day of February! Making valentines is something that takes us back to our childhood – the decorated shoebox or lunch sack to put on our school desks, the handmade valentines with doilies and red construction paper, the bottle of white paste!  Wow!  Does that bring back memories??! Now we can be a little more sophisticated with our wonderful Stampin’ Up! cardstock, creative stamps, and beautiful embellishments!

This card starts with a base of Real Red Cardstock and a layer of Whisper White Cardstock stamped in Real Red Ink!  Basic red and white for Valentine’s Day with a touch of gold! I stamped the various hearts from the Heart Happiness Photopolymer Stamp Set. Just choose whichever ones you want and stamp away!

To add a little bit of pizzazz to this valentine, I used some of the Painted Love Gold Vinyl Stickers.  If you haven’t noticed these in the Occasions Catalog, it’s not your fault!  They are barely noticeable on the page. But now that you know they are there, go look on page 19 on the left edge of the page in the fold!  These are self-adhesive stickers in gold that coordinate with the stamp set Sure Do Love You.  However, they coordinate with lots of stamp sets and designs, so you can use them even without this stamp set.  The stickers are really good quality, not flimsy, and they DO stick….so make sure you know exactly where you want to put them because you aren’t likely to be able to move them once they stick on the paper! Don’t ask me how I know!

Since the stickers come on a clear sheet, you can hold the sheet over your project and see where you want to place a certain sticker and what it will look like.

How to Place Gold Vinyl Stickers

Here are the Painted Love Gold Vinyl Stickers on page 19 of the Occasions Catalog.  Be sure to check them out!  They aren’t just for Valentine’s Day either!  They will go with any pretty card or project!  You get two sheets, so you might want to order an extra package or two to have on hand!  You will want to use them!

Painted Love Gold Vinyl Stickers

If you need any of these products to stamp an easy Valentine Card with the gold vinyl stickers, please visit my Stampin’ Up! Online Store HERE!


Make a Valentine Treat Box With a Mini Pizza Box

Valentine Treat Box with a Mini Pizza Box Embellished

Here’s an easy project for Valentine’s Day or any occasion –  Make a Valentine treat box with a Mini Pizza Box from Stampin’ Up!  Use a small box to decorate with paper and embellish to put a special treat inside!

Did you know you can still purchase the Mini Pizza Boxes that were in the Stampin’ Up! Holiday Catalog?  They are on the Carryover List of products that are still available at least until the next Annual Catalog comes out.  Then we will see which products continue on in the new catalog or if they are retired. Anyway, you will still find the Mini Pizza Boxes in my Online Store! You will find all the Carryover Products listed in the Online Store under Holiday Favorites.

The Mini Pizza Boxes come flat in the package so storage is not a problem.  Then just fold on all the scored lines and assemble the pizza box. Decorate however you like for whatever occasion! For this box, I chose to use the Painted With Love Specialty Designer Series Paper.  Even though one side of each sheet has gold foil accents, today I chose to use the side without the gold foil. Just cut a square slightly smaller than the top of the lid and individual strips to adhere on the sides of the pizza box.  You can make them the same or contrasting.

For the top of the box, I chose some hearts since we are close to Valentine’s Day, but hearts can be for anything! I used the Sweet & Sassy Framelits Dies to cut out the two hearts. If you look closely at these dies, you will see there are two styles of hearts – one sweet, and one sassy, I suppose! One shapes curves inward near the bottom and the other shape just has a straight edge to the bottom point. I don’t know which shape is sweet and which shape is sassy, but you can choose! Sometimes I don’t notice these subleties so in case you are like me, I thought I would point it out. Of course you can mix and match the shapes of the hearts however you like!

I also added two kinds of doilies. One is a small gold doily in the Metallic Foil Doilies package.  The other is part of a white doily in the Delicate White Doilies package.  Always good to have embellishments like these on hand for when your project needs a little something And for some extra little embellishments, I stuck on a few of the Glitter Enamel Dots.

At the last minute I added the word “Love” in Gold Foil because I thought the top of the box still needed “something”.  How did I get the word “Love”?  From the Lovely Words Thinlit Dies!  The die cuts out a heart and the word “Lovely”, so I just trimmed off all but the “love” part!  Very easy!  I think it adds just the right thing on this box. The other two words are “hugs” and “friend”.

Do you have some Mini Pizza Boxes that you can make into a Valentine Treat Box with embellishments and designer paper or cardstock?  If not, put them on your Stampin’ Up! order!Valentine Treat Box with a Mini Pizza Box Top Closeup


Make Your Own Easy Greeting Cards With the Mixed Medallions Card Kit

Medallion Card Kit

Images © Stampin’ Up! 2018

One of the choices you can make when you earn a FREE Sale-A-Bration product with a $50 purchase from Stampin’ Up! is the Mixed Medallions Card Kit on page 6 of the Sale-A-Bration Brochure.  This kit makes 8 beautiful trifold cards and also comes with envelopes. The kit contains 4 cards each of 2 designs. Besides the cards and envelopes, the kit also has a sheet of die-cuts to use on the cards as well as adhesive dots.  So everything you need for 8 cards is right there in the package!

Whether you are an experienced cardmaker  or a new papercrafter or stamper, you can enjoy this kit……especially when it is FREE!  Just purchase $50 or more in Stampin’ Up! products and choose a free Sale-A-Bration product for every $50 you purchase. That’s the Sale-A-Bration promotion offered annually by Stampin’ Up!

Watch the Stampin’ Up! video below and see if the Mixed Medallions Card Kit would be one of your Sale-A-Bration choices!

As Holly says in the video, even if you are a cardmaker, sometimes we run out of time, and this card kit makes it easy to save time.  I would add, sometimes it is nice to have the design already thought up for you, so you can just get to the crafting!

This card kit reminds me of the Eastern Beauty Photopolymer Bundle that is available in the Stampin’ Up! Online Store. Here is a card I made with that Eastern Palace Suite of products.

If you need a Sale-a-Bration Brochure, email me at Karen@Karenstamps.com and I’ll get one out to you! If you would like to check it out online, see the Sale-A-Bration Brochure HERE. And you can see the free products in the Stampin’ Up! Online Store HERE.

When you go to choose your free Sale-A-Bration product, consider the Mixed Medallions Card Kit!


Get a Stampin’ Up! Card Kit: Past Paper Pumpkin What a Gem Kit 50% off!

Past Paper Pumpkin Kit What a Gem 50% Off

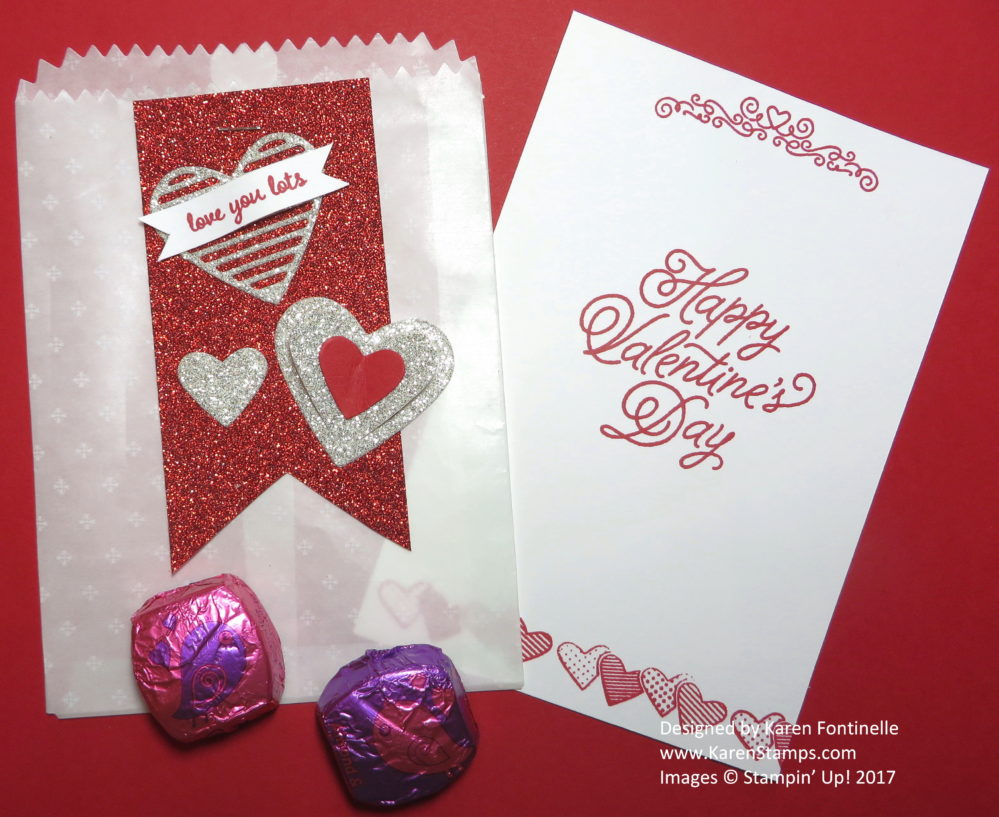
You can get a Stampin’ Up! Card Kit, the Past Paper Pumpkin “What a Gem Kit” 50% off through Valentine’s Day!  This is a Paper Pumpkin Kit that was offered a year ago July, and Stampin’ Up! is now offering it at half price! If you are looking for a little kit to have on hand for unique little gifts, this might be it!  Think about Valentine’s Day coming up and how you could use these little gem boxes for a small gift (or cash!) or candy inside. Time to order!

Normally this kit sells for $17.00 in my Stampin’ Up! Online Store under “Paper Pumpkin/Past Kits”, but right now it is selling for $8.50. You must be a Paper Pumpkin subscriber to even see the Past Kits available, I believe, so here is the information about the What a Gem Kit and Refill.

The Kit contains supplies for 8 treat boxes and 12 mini cards.

Your kit includes:

• What a Gem Photopolymer Stamp Set

• Emerald Envy Classic Stampin’ Spot® ink

• 4 small gem boxes• 4 large gem boxes

• 12 mini cards (6 ea. in 2 sizes)

• 8 pieces of pink baker’s twine (8″ ea.)

• 8 pieces of green baker’s twine (8″ ea.)

• 4 spools of pink baker’s twine (96″ ea.)

• 4 spools of green baker’s twine (96″ ea.)

Past Paper Pumpkin Kit What a Gem 50% Off

This is an exclusive stamp set for Paper Pumpkin that you can use forever. And of course you can use any of the materials in the kit however you like! If you don’t care for the original project, there are many alternative ideas online that other stampers have come up with!

Now if you need more than 8 treat boxes, also order the What A Gem Kit Refill which has all the supplies from the kit but not the stamp set or ink spot.

Contains supplies for 8 treat boxes and 12 mini cards

Your kit includes:

• 4 small gem boxes
• 4 large gem boxes
• 12 mini cards (6 ea. in 2 sizes)
• 8 pieces of pink baker’s twine (8″ ea.)
• 8 pieces of green baker’s twine (8″ ea.)
• 4 spools of pink baker’s twine (96″ ea.)
• 4 spools of green baker’s twine (96″ ea.)

Now you do have to be a Paper Pumpkin subscriber in order to purchase Past Kits. But if you haven’t joined Paper Pumpkin yet, now is the time!  In my opinion, the kits just keep getting better and better!  And it is so much fun to look forward to that red Paper Pumpkin Box showing up in your mail once a month! Paper Pumpkin is a monthly subscription to an exclusive papercrafting kit from Stampin’ Up!  Each month is a surprise! Some people, I know, do not like surprises, but I think that is part of the fun! I think the majority of the kits are for making cards, but some are for other projects – could be treat holders, a home decor piece, a small album, a holiday item, etc.

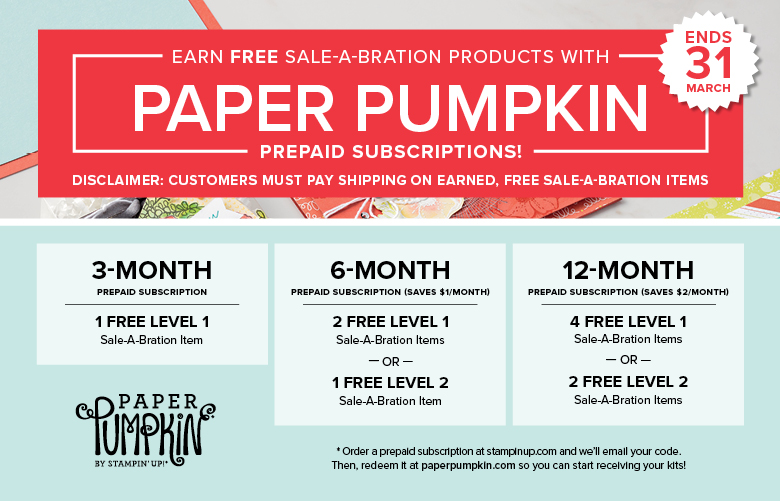
You can subscribe on a monthly basis by signing up on my Paper Pumpkin website HERE! But another choice is to order a 3-month Prepaid Subscription in the normal Stampin’ Up! ordering process in my Online Store.  This is a great deal during Sale-A-Bration, going on now, because a 3-month Prepaid Subscription will earn you a FREE Sale-A-Bration product! (Just so you know, if you ONLY order a prepaid subscription, your FREE Sale-A-Bration product will be shipped to you separately like a regular Stampin’ Up! order so you will pay $6.95 minimum shipping on that item. Therefore, I would recommend ordering some extra Stampin’ Up! supplies that you can use along with the Prepaid Subscription so you get your money’s worth out of the shipping charge!)  There are also longer Prepaid Subscriptions available to earn even more Sale-A-Bration items!

Even if you are already a monthly subscriber, you can take advantage of the Sale-A-Bration offer, by just purchasing the prepaid subscription you would like.  Your subscription will automatically send out the prepaid kits monthly and then your normal monthly subscription will resume, you don’t have to do anything.

Everyone will receive an email from Stampin’ Up! to activate the prepaid subscription so watch for that and follow the instructions.  If you have any questions, let me know!

So get a Stampin’ Up! Card Kit, the Past Paper Pumpkin What a Gem Kit at 50% off, until Valentine’s Day, February 14th and/or the What a Gem Kit Refill.

Shop Paper Pumpkin HERE at Stampin’ Up! Online!