Category Archives: 3-D, Gifts & Things

Check Out Stampin’ Up!’s New Kits! Make Papercrafting Easy!

Stampin' Up! A Little Sumthin' Sumthin' Gift Box Kit

Stampin’ Up! has several new kits available to you to make papercrafting easy! For a small gift package, perhaps for a gift card, consider the A Little Sumthin’ Sumthin’ Gift Box Kit that comes with cute pillow boxes, good for men, women or children and all the supplies to jazz it up a bit!  Watch Sara Douglass in the video below explain the contents of the kit and how to assemble it! Good thing to do on a hot summer day!

And if you are into the chalkboard style of decorating you’ll be interested in the new Chalkboard Banner Simply Created Kit.

To purchase any of the Stampin’ Up Simply Created Kits, just go to my Stampin’ Up! Online Store!

Make a Gift Box with the Stampin’ Up! Hamburger Box Die

Coastal Cabana Hamburger Box Die

I finally got around to playing with the new Stampin’ Up! Hamburger Box Die for the Big Shot. I made this one with Coastal Cabana card stock and a partial belly band with a piece of Lullaby Designer Series Paper. The greeting is from the new stamp set Something to Say. I thought the heart needed a little something so I used the little flower punch in the new Itty Bitty Accents Punch Pack to make a little flower with one punched out of the Coastal Cabana card stock and one punched out of the designer paper. If you can poke the center of the flowers, it will cause the petals to pop up a little making it 3D. I put a little Pearl Jewel in the center. And for a little more bling, I added some individual sequins from the Sequin Trim.

The box is not big enough for a double cheeseburger from Whataburger, but maybe it would hold a slider! It is smaller than you think but makes a nice gift box for a Hostess cupcake, a few small to medium size cookies or even any other gift.  You can decorate the inside of the box, the inside of the lid, tie it with ribbon, put a belly band around it, or stack a couple together as you see in the new catalog on page 17.

Stampin’ Up! has a video to show how to make the box and give you some ideas!  Watch it below.

Shop Online at my Stampin’ Up! Store at your convenience!

Flower Shop Pop Up Box Card

Flower Shop Pop Up Box Card

This Flower Shop Pop Up Box Card was one of the projects we made yesterday at my Stamp Camp with some stamping friends. It’s actually easy to make once you know how and can be varied in size if you want it smaller or larger.  This size is made with half a sheet of card stock and will fit in a regular size envelope. It’s amazing that something that looks so 3D can be folded up to fit perfectly in an envelope! You can design a card like this for almost any occasion! Just change up the images, the greeting, the colors and you can make anything!

Flower Shop Pop Up Box Card Folded

This is the pop up box card folded. I made a belly band to go around it just to hold it flat and decorate it.

If you are in the Houston or Sugarland area, sign up for my Mailing List in the upper right corner of my blog and you’ll find out when I am having a stamp camp. Stamping is not too hard for anyone, not even a beginner, so feel free to join in! If you prefer a free private beginner session to get the hang of it, just contact me at Karen@KarenStamps.com and we can arrange something.

For all the best in stamping supplies, please visit my Stampin’ Up! Online Store HERE!

Decorated Flip Album

Flip Album Cover Decorated

I actually got my flip album decorated yesterday that I first told you about in THIS POST and mailed off for a gift. You can see the way it folds from the photos on that blog post better there than here. I have to say I had so much fun decorating this flip album and coming up with ideas, but finally ran out of time and wanted to get it in the mail. I usually start out kind of slow, not many ideas of what to do, and then maybe I’ll look through all my stamp sets to see what words or images might be appropriate. I almost always look online for ideas, maybe by the stamp set name, paper name, or accessory name, or something like “paper flowers”. Out of all that, my brain will usually start coming up with its own ideas or I can just copy. The more you stamp and design, even in one day, the better you will get at it! In a little while, I had so many ideas and was having so much fun, I didn’t want to stop. I hope the recipient will like it, From the first time I saw one of these flip albums (that’s what I call it anyway) I thought it was one of the neatest things I’d ever seen!

The designer paper I used is Sweet Sorbet from Sale-A-Bration that isn’t available any more, but maybe you have some, or you can substitute something else.  Mainly I chose the colors that went with the designer paper (you can see the list on the back of every designer paper package now). That makes it easy to coordinate everything without thinking! The “Oh Happy Day” is from Starburst SayingsThe Gold Foil is cut out with the Starburst Framelits Dies. Now the “Oh Happy Day actually stamps as a starburst but you can very carefully punch it out in a circle with the 2 1/2″ Circle Punch.

Flip Album Decorated Pages on Film Framelits

These pages are just inside the front cover. I used the On Film FramelitsThe little camera is stamped with the Peachy Keen Stamp Set. The filmstrips are stamped with the single stamp, Filmstrip, which retired and I think is no longer available.

Flip Album Decorated Pages2

I stamped the smaller image in So Very Grateful with ink the same color as the cardstock Crisp Canteloupe

Flip Album Decorated Pages4

Flip Album Decorated Pages5

Just use whatever strikes your fancy! You can leave some pages plain so there will be room for photos and memorabilia. Also, be careful when adhering elements. Maybe just adhere the corners where no photo is going to go and then leave the other corner free so a photo can be slid underneath.

I hope you will try a flip album!  It really is fun and easy to do after you do the first one!

For any stamping supplies and accessories, just visit my Stampin’ Up! Online Store.


Make Something New From An Old Idea: A Flip Album

Flip Album Open

This flip album is something I haven’t made in several years, but I’ve always thought it was one of the neatest ideas ever! This one is going to be a gift, hopefully. It’s not even that hard to make, although it appears to be very complicated.  I think these albums are so much fun! I’m not sure what the official name of it is, but I think I’ve always known it as a Flip Album and there are other variations.

This flip album isn’t finished yet, but it is the basic layout. Now I need to go through and add some embellishments of some kind. But since the pages are relatively small, I don’t want to add too much and not leave room for photos.  I will post pictures when I finish it up. The paper I used is the beautiful paper from Sale-A-Bration 2014 called Sweet Sorbet. I chose that based on my paper supplies and what I thought the person would like who I plan to give this album to. You do need some 12×12 paper in order to make this.

So now I need to go finish up my little flip album and hopefully get it in the mail today!

Why don’t you take an old idea and make something new with it today?!

For any stamping supplies, retiring products, Weekly Deals, the new Endless Birthday Wishes Photopolymer Stamp Set, please visit my Stampin’ Up! Online Store.

Flip Album Pages

Flip Album Cover

Cookie Monster Celebrates Chocolate Chip Day

Cookie Monster Celebrates Chocolate Chip Day

Today is National Chocolate Chip Day!  Could there be a better holiday?!  Have you ever just dug into a bag of chocolate chip morsels to get your chocolate fix? Think of all the chocolate chip cookies that have been baked and all the variations that exist!

And who would celebrate this day more than anyone but Cookie Monster!  If you have baked some chocolate chip cookies as a gift for someone, you could put a few in this Stampin’ Up! Decorative WIndow Gift Box and decorate the box with a cute punch art Cookie Monster! He’s so fun and easy to make and you can vary the size or even make him into a card.  For this box, I punched his face with the 2 3/8″ Scallop Circle Punch. His mouth is die-cut with a 2″ Circle Framelit and then part cut off to look like a mouth. His eyes are punched with the 1/2″ Circle Punch and the circle in the Itty BItty Punch Pack. The all important cookie is punched with the 1″ Circle Punch and the eaten part punched out with the 7/8″ Scallop Punch.  I just colored in the chocolate chips with the Early Espresso Stampin’ Write Marker rather than deal with glueing tiny dots! You can use Stampin’ Dimensionals to pop up certain parts or the whole Cookie Monster face.

And now I think I will go bake some chocolate chip cookies to put inside that box!

Need some punches for your collection?  Just shop at my Online Store!

Cookie Monster Punch Art Close-up

April Paper Pumpkin Kit Framed Love – Lovely!

April Paper Pumpkin Kit Framed Love

I was late in opening my April Paper Pumpkin Kit and missed out on using the “Happy Mother’s Day” stamp that was inside! But what a cute project!!  And tons of materials included, extras, in fact! It was supposed to be wrapped in a wrapper that came in the kit, but since I am keeping it for myself at least so far, I will use the wrapper for some other project.  I LOVE this cute little frame that came in the kit. It had a piece of glass, like most picture frames, but I took it out so the paper design can be 3D with the popped up heart and the clear button. The photopolymer stamps that came in the kit stamped great to make the background design.

To start receiving your Paper Pumpkin papercrafting kits in the mail each month, just sign up HERE on my Paper Pumpkin site. It’s just $19.95 a month which includes the $5 shipping. You do pay tax.

And if you prefer, you can purchase a Paper Pumpkin prepaid subscription which can count towards your order, if you are putting one in, or counts toward Hostess Benefits if you are at a workshop. However you decide to go about Paper Pumpkin, you should try it out and see how much fun it is! Each kit only takes a few minutes, probably less than half an hour, to make, which gives you just a little bit of relaxation time for a creative adventure!  You deserve at least that much! And for a beginner, you don’t need a whole roomful of supplies, just some adhesive – and in this kit I didn’t even need to provide my own! It came with small little foam dimensionals and glue dots. But if you DO have a roomful of supplies, you might enjoy the treat you get in the mail and just taking the box, sitting down at the table and having a craft experience – without digging through all your craft supplies to find what you need.  Just sit down with the cute Paper Pumpkin box and start creating! Change it up if you want, it’s yours, or follow the instructions exactly!

Check out Paper Pumpkin and see if you want to have some creative fun at least once a month! You can always cancel or pause your monthly subscription or restart it later on.

Paper Pumpkin Prepaid Subscriptions & Gifts

Click Image Above for more Information

Burlap and Blooms Spring Wreath for Easter

Burlap and Blooms Spring WreathIt was nice to have a kit with everything needed except hot glue to make this Burlap and Blooms Simply Created Wreath Kit. I thought it would make a nice wreath for Easter and spring by my back door where my Be of Good Cheer Curly Paper Wreath was still hanging! My favorite flowers on this wreath are the fringed ones. I didn’t seem to have much of a knack for making the other ones! And I’m not sure I got the flowers placed in the best positions, but, I did get the wreath finished! And didn’t burn my finger on the hot glue until near the end!  Be careful pushing the flowers down onto the wreath! And have a glass of cold water nearby just in case! It still turned out pretty and was an interesting new project. It’s nice to have a kit and not have to think about all the supplies! It’s available in the Occasions Catalog.

Speaking of supplies, the Stampin’ Up! retired list comes out on Monday! And Stampin’ Up! is offering FREE SHIPPING (excluding expedited shipping) on all orders Monday, April 21 through Friday, April 25! When you get a chance this busy Easter weekend, be sure to start making out your list of anything you might want or that you think might retire so you will be ready to take advantage of this free shipping opportunity!

Free Shipping from Stampin' Up! April 21 - 25

Free Shipping from Stampin’ Up! April 21 – 25, 2014

Be a FAN on my Stamping With Karen Facebook Page where I can try to keep you updated and what’s available and what’s not and what’s going on during this busy time at Stampin’ Up!

Scalloped Tag Topper Punch Spring Basket

Scalloped Tag Topper Punch Spring Basket

Did you know you can make a lot more things with the Scalloped Tag Topper Punch than just tags? I’ve seen various creations but got the idea to make a Spring Basket using the Scalloped Tag Topper Punch. It’s available in the Stampin’ Up! Occasions Catalog along with the beautiful Watercolor Wonder Designer Series Paper.

To make the basket, I cut two strips of Daffodil Delight 2″ x 7 1/2″ and punched one end on each strip with the Scalloped Tag Topper Punch.  Score at 3″ from the scalloped top and fold. Those will be the ends of the basket and you can adhere the bottom pieces together.

Scalloped Tag Topper Basket Base

Cut two pieces of Daffodil Delight 2″ x 5 1/2″.  Score 1/2″ at each end. These pieces will be the front and back sides of the basket. If you need to, make a brace to put in the center with a 1″ x 4″ piece scored at 1″ at each end and glue inside the basket.

The handle is a piece 1/2″ x 8 1/2″. I added a piece of Whisper White 1/2″ Stitched Grosgrain Ribbon to the top of the handle using Tombow Multi-Purpose Adhesive. You can see how the handle is inserted and adhered inside in the photo below.

Decorate your basket however you like!  If you want to stamp on it, be sure to do it before assembling!  I added a layer of Island Indigo card stock to the basket and then the Watercolor Wonder paper on top of that. I made the flower with the Pansy Punch. It was just the right size and I punched several flowers out of the sheet of Watercolor Wonder paper that had shades of yellow and blue on it to get a variation in color. A retired Printed Designer In Color Brad held the flowers in place. Then I foofed them up and down and all around to give them some dimension.

You could also make a paper box the right size and just use the tag punched with the Scalloped Tag Topper Punch at the ends. So many different ways to make these great papercrafting projects!

Scalloped Tag Topper Punch Spring Basket Side

The Scalloped Tag Topper Punch is one of my favorite items in the Occasions Catalog because it would sure be difficult to make that pretty scallop at the top by hand! Go shop at my Stampin’ Up! Online Store today and find your favorite products!

Eggstra Spectacular Easter Pop-Up Box Card

Eggstra Special Easter Pop Up Box Card

The only thing more fun than stamping is stamping with friends and making an Eggstra Spectacular Easter Pop-Up Box Card! That’s what I got to do the other day and here is one of our creations! I wanted to show them how to make this very popular style of card, the pop-up box card. Although I knew I wanted to make this style of card, I hadn’t made a sample for them, so I had to just “wing it” as we went! I wasn’t even trying to make a “great” card. I just wanted to make one with them so they would know how to do it.  But I think this one turned out pretty cute! The pop-up box card is basically a simple card, it just has the look of being a difficult one.  That’s what I love about Stampin’ Up! and stamping – there is nothing that is too difficult for a beginner to do as long as they have the materials and tools and someone or some way to show them how to do it.

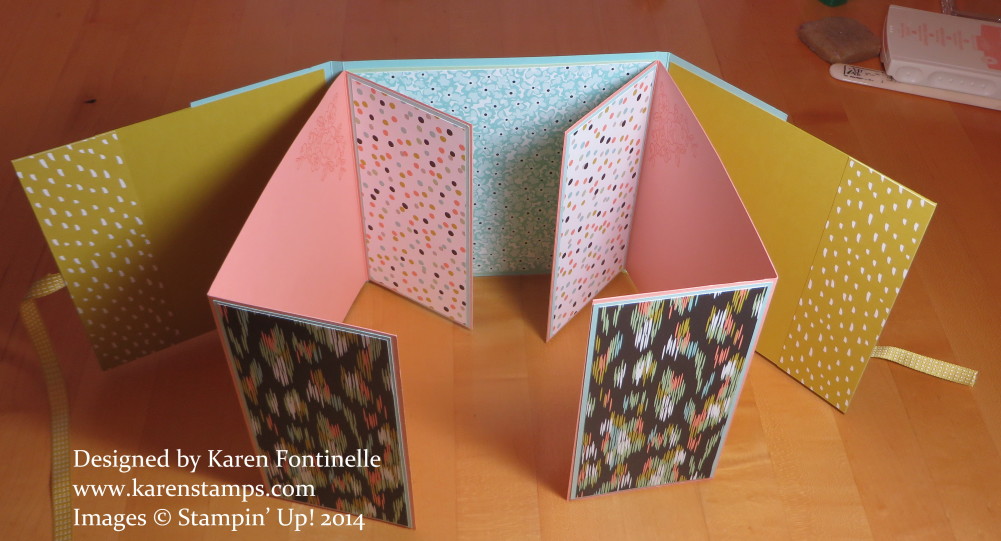
The basic instructions for making a pop-up box card like this one are simple.  Start with a half sheet of card stock as with any card. Score across that 8 1/2″ width at 2″, 4″, 6″, and 8″. That leaves a narrow 1/2″ edge on the end which will become the tab that adheres the box together. Turn the half sheet of card stock longways on the Simply Scored Scoring Tool or on the Stampin’ Trimmer and score at 2″ to make the box flaps. Now cut from the edge of the paper up to the 2″ scored line to cut apart those flaps. Now also cut off the 1/2″ tab even with the flaps, leaving the bottom portion, so that the box can be assembled. There will not be a bottom to the box, only the flaps at the top that will fold outward. Fold on all the score lines and assemble the box. Also cut two pieces to go inside the box to hold the pop-up images. They should be two pieces cut 1″ x 3″, and scored at 1/2″ and 2 1/2″ (or 1/2″ at each short end) so that those braces can be adhered inside the box spaced evenly apart. They are a little tricky to get glued in there, but you can do it.  I like using the Tombow Multipurpose Adhesive so I can move it around to get it placed evenly and correctly.

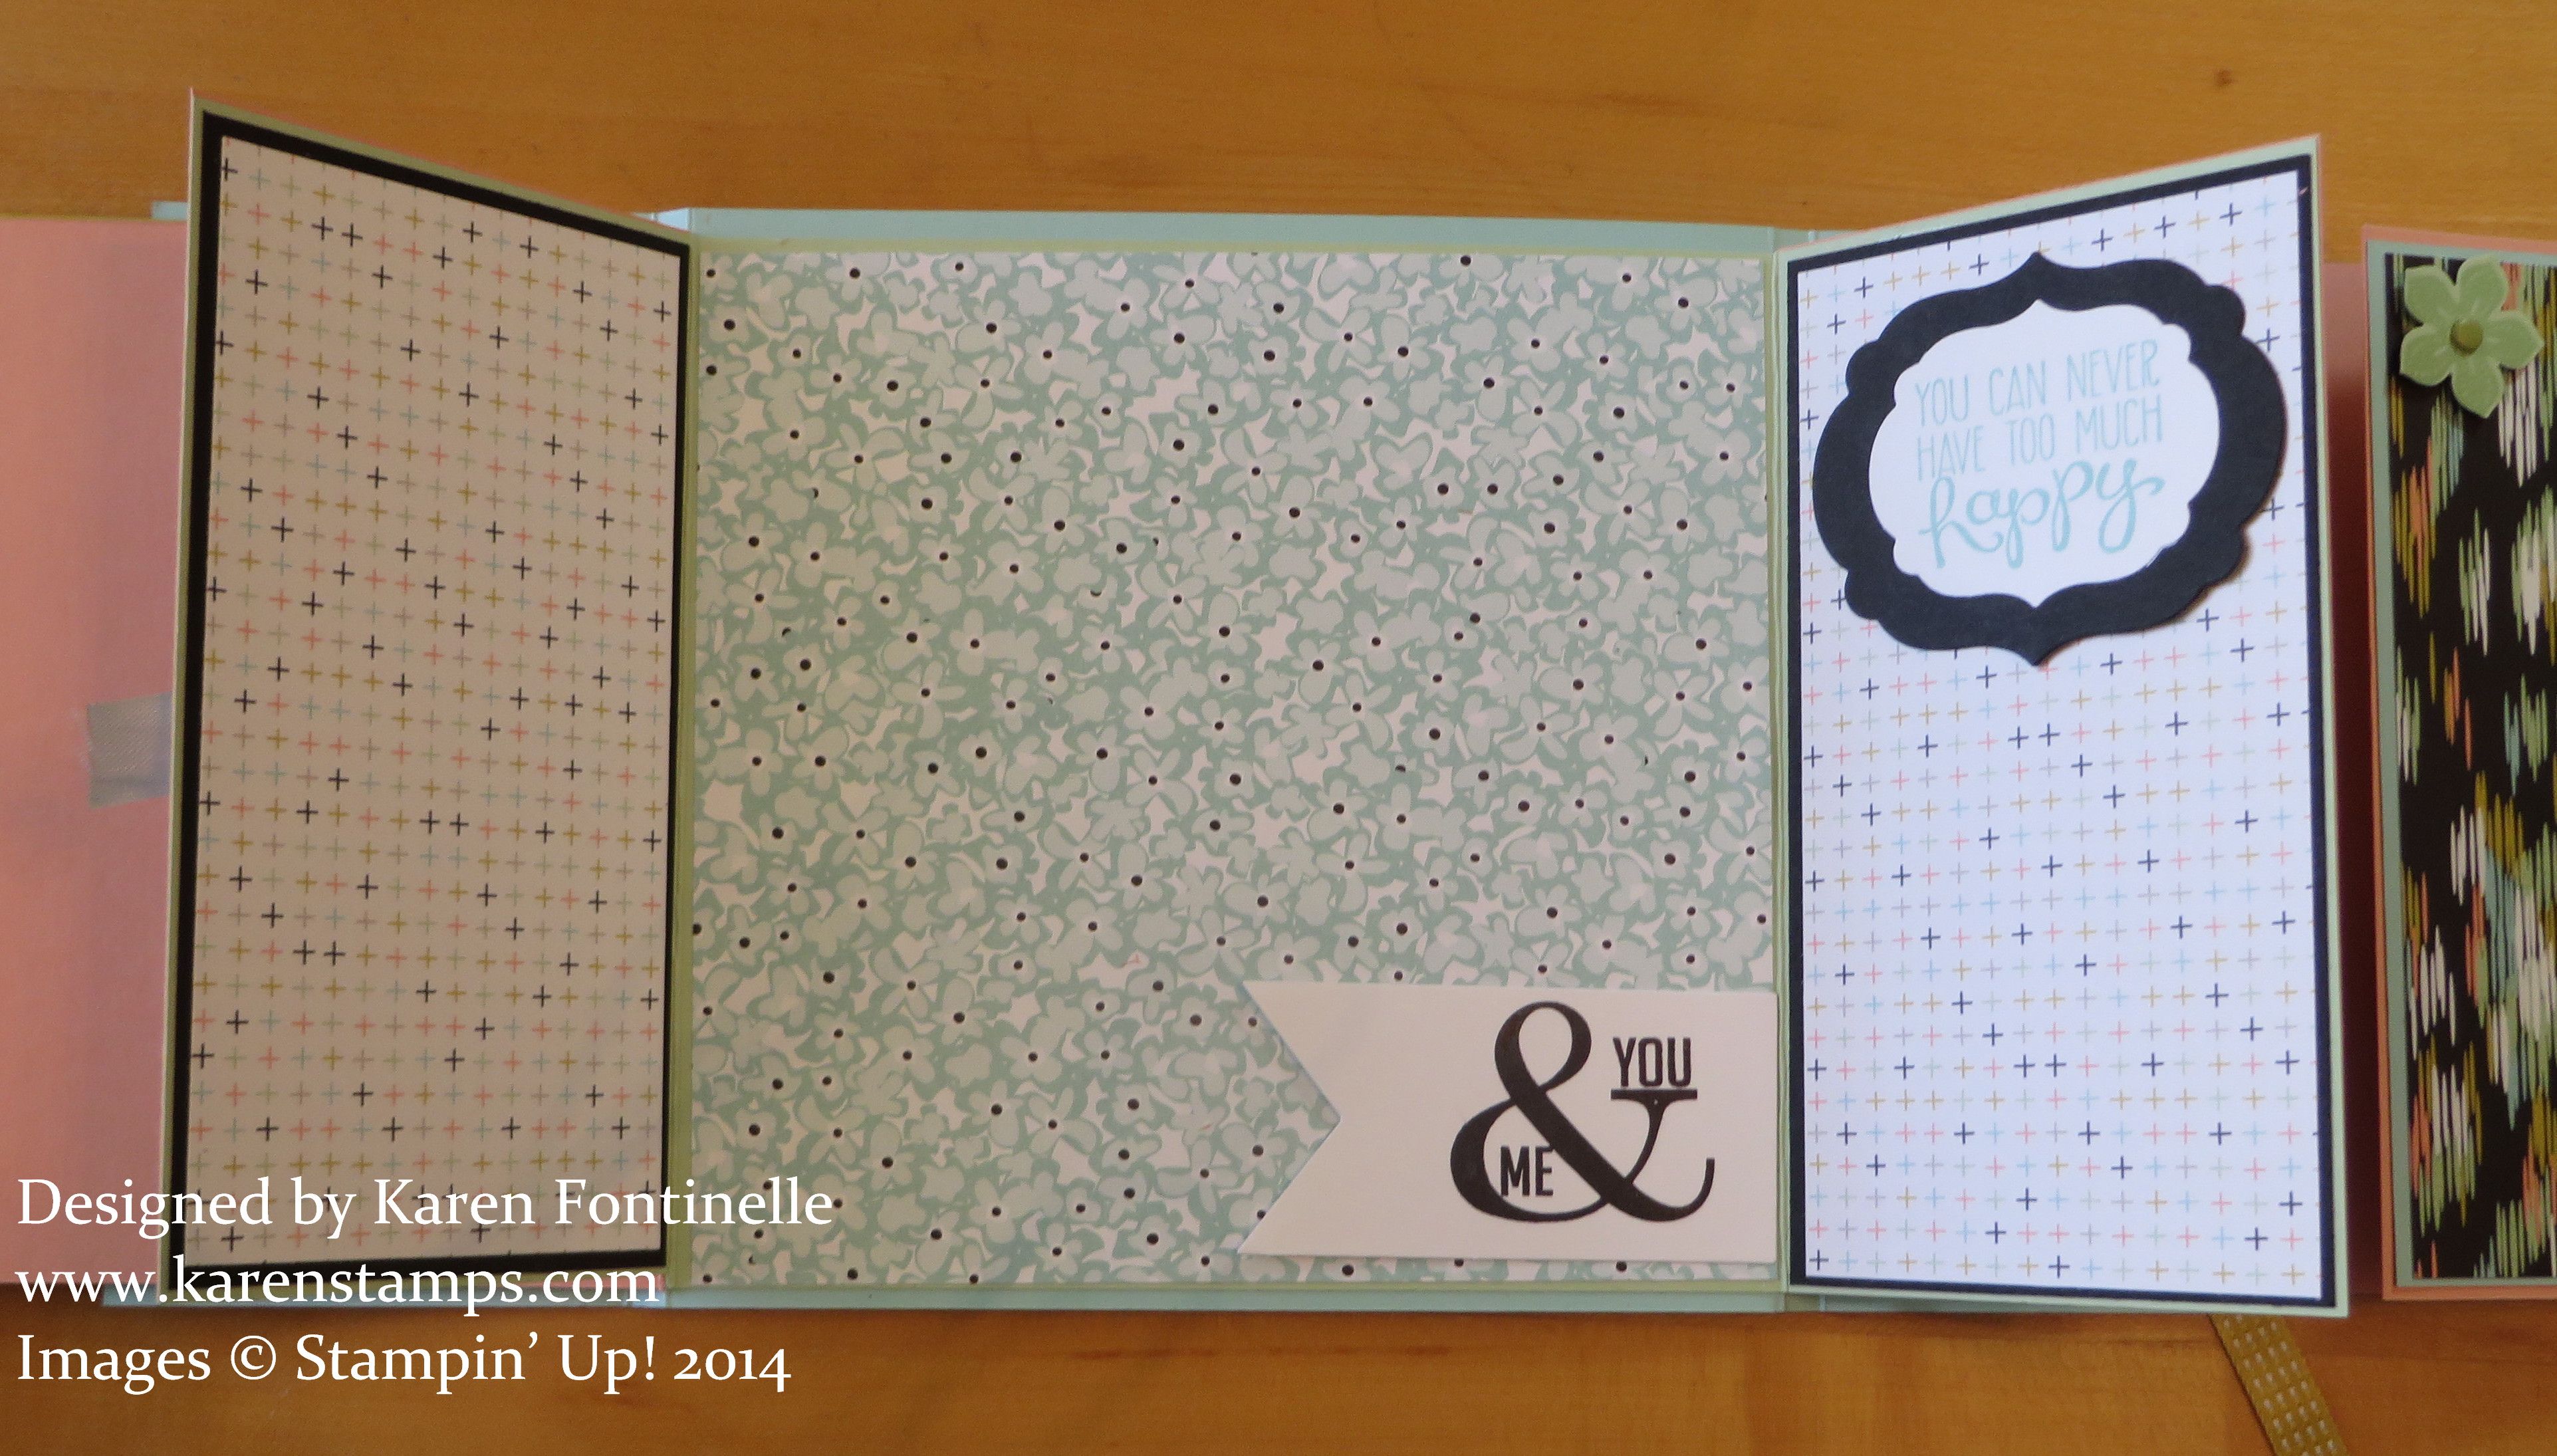
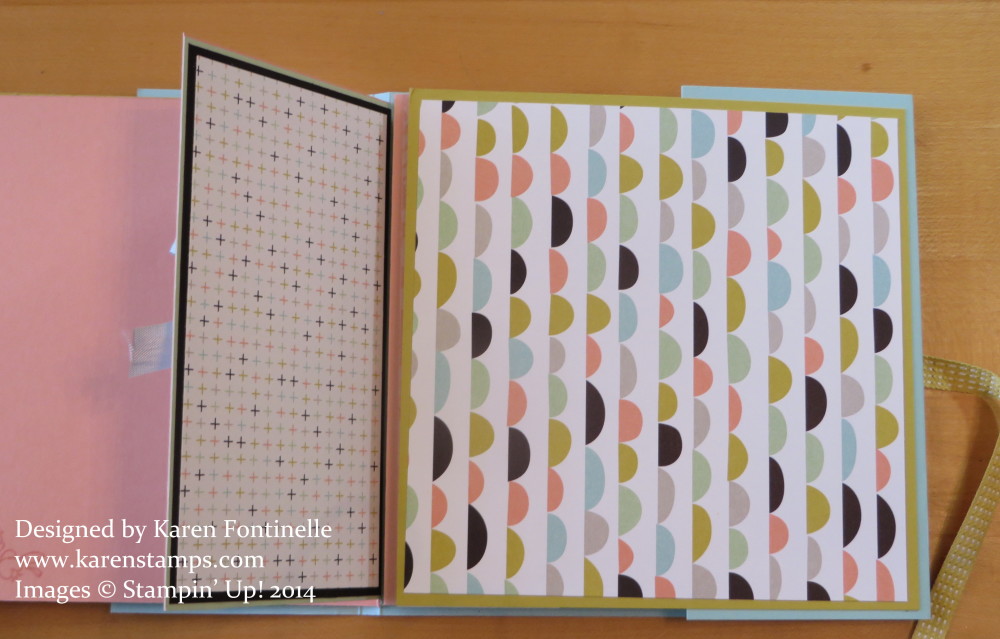
Decorate the outside of the box first with either stamped images or designer series paper or card stock or leave plain. It’s all up to you! Once you have the basic box assembled, you can adhere whatever stamped images or punch art or greetings you want for your card to the inside braces and to the outside of the box flaps. If you want the folded card to fit inside a certain size envelope, be sure that any items you adhere inside the card do not “hang out” past the edges of the folded card. This size card as made here will fit inside a Stampin’ Up! Medium Whisper White Envelope (my favorite envelopes in the whole world, by the way!)

The stamp set I used on this pop-up box card is called Eggstra Spectacular, a cute Easter stamp set in the Stampin’ Up! Occasions Catalog. The little lamb is stamped with Black Stazon ink and colored in with Stampin’ Write Markers. It was then just cut out by hand with Paper Snips. The Easter eggs were stamped with various colors of ink. The Extra-Large Oval Punch was too large to punch them out, much to my chagrin, as was the smallest Oval Framelit, so it was just easiest to use Paper Snips to cut them out by hand. I couple printed flowers were cut out of the Sale-A-Bration Sweet Sorbet Designer Series Paper to add something extra besides the Easter eggs.

The little flowers on the flaps are punched with the Petite Petals Punch in the Occasions Catalog and some Petite Petals flowers are stamped on the sides of the card. The designer paper used on the flaps are small squares of the Birthday Basics Designer Series Paper. A Bundle can be purchased with the Petite Petals Punch along with either the wood- or clear-mount stamp set. The center of each flower is from the Punch Pack. And for extra measure I added a Candy Dot to the center of each flower!

When you want to send a special card to a special someone, this pop-up box card fits the bill and is easy enough to make. Use the Eggstra Spectacular stamp set for an Easter-themed card or whatever stamp set fits the occasion!

Shop at my Stampin’ Up! Online Store for any of your stamping and papercrafting needs!

Eggstra Special Easter Pop Up Box Card Inside

Stampin’ Up! All Wrapped Up Bundle Livestream

If you missed it last night, you missed a fun new event from Stampin’ Up! It was free and for anyone to watch! Donna Griffith, a Stampin’ Up! home office employee, presented LOTS of projects using the All Wrapped Up Bundle in the Sale-A-Bration Brochure! It was a live stream, shown at various times for various time zones, even in French and Spanish.  Donna always has great projects to show us at Stampin’ Up! Convention, Leadership, and other events! Not only was there the live stream of Donna explaining her projects but also a lively chat box going on the side! I’m sure that all of us who watched hope they will do this again!

Here is the third live stream of the evening for North America.

And to see photos of just the projects, click HERE for a .zip file.

Stampin Up! Weekly Deal March 25 2014–Shimmer and Glimmer!

Stampin Up! Weekly Deal March 25 2014

Check out the latest Stampin’ Up! Weekly Deals for this week, March 25 through March 31! If you like shimmer and glimmer, this is the week for you!  Both the Champagne Glimmer Paper and Silver Glimmer Paper are on sale! These are some of my favorite Stampin’ Up! products! The glimmer of the beautiful sparkly paper often adds so much to your project!  We have all loved it ever since Stampin’ Up! started carrying the glimmer paper!  You can even “watercolor” with reinker on the Silver Glimmer Paper to make it a different color if you like that! Be sure to stock up if you like some pizzazz to your cards and projects while you can save a little bit of money! Check out all the other offerings as well!

Remember, they all count toward Sale-A-Bration, which will be over before we know it!  Sale-A-Bration is Stampin’ Up!’s biggest promotion and ends March 31!  That is next Monday, last day! Last day to spend $50 and choose a free product from the Sale-A-Bration Brochure!  Remember, your original purchase doesn’t have to come from the Sale-A-Bration Brochure.  There are suggested Bundles in there if you need suggestions to get to $50 (perhaps for a beginner) but you can purchase any current Stampin’ Up! products and then choose your FREE product from the Sale-A-Bration Brochure. Who doesn’t want free stuff?

Shop at my Stampin’ Up! Online Store any time for the best in papercrafting products, take advantage of these Stampin’ Up! Weekly Deals, and with a $50 purchase earn a free product during Sale-A-Bration this week!

Join Paper Pumpkin for Papercrafting Fun and Free In Color Markers

Paper Pumpkin Papercrafting Kit Boxes

If you don’t have a stack of Paper Pumpkin boxes, then you’ve been missing out on all the fun every month! Every month a new kit for a quick and easy papercrafting project! Usually you have leftover materials you can use on another project. Follow the Stampin’ Up! directions or reinvent the project to suit yourself.

Paper Pumpkin is for you if:

  • You like to do a papercrafting project now and then but can’t design one yourself.
  • You like to make things but you don’t really have that many supplies.
  • You don’t have much time for yourself to devote to crafting but if you could make a quick, cute project in about 30 minutes, you would enjoy it.
  • Sometimes you would like to do something fun with a friend or loved one and if you could just pull out two projects all ready to make, you would be happy.
  • You get excited when you get a package in the mail!
  • You’ve got tons of supplies, but if someone is going to put a project in a box all ready to go for you, it would be great!

If you join Paper Pumpkin, Stampin’ Up!’s papercrafting kit that comes in the mail once a month, you will get your own pretty red box in the mail once a month with a project all ready to go, except for adhesive.  Join before March 31 and get a free set of In Color Markers (worth the price of the kit itself $14.95).  Try it risk free, no obligation, cancel when you are ready before the 10th of any month to stop that month’s subscription.  Or just pause it if you want to take a break and start up again the next month or the next after that. A monthly subscription is only $19.95 which includes shipping!

Join Paper Pumpkin by clicking this link HERE.  Your markers will come with your Welcome Kit with a free clear block for stamping.  After the first month you will receive the same kits that everyone gets that month.  You can still sign up after March 31, but why not do it right away and get the FREE Markers!

Make a Leprechaun Hat for St. Patrick’s Day

Leprechaun Hat

For some St. Patrick’s Day fun, make a cute leprechaun hat. This is an easy craft that would be fun to do with your child perhaps. Start with a toilet paper roll or part of a paper towel roll. Make yours as tall or short as you like. Cut a piece of green card stock that will fit around your roll. Mine was a toilet paper roll and I cut a piece of Garden Green card stock 4″ x 6″ to fit around it. That gave a slight overlap in the back. For the top of the hat, I punched a circle with the 1 3/4″ Circle Punch. Just add  a little bead of glue around the top rim of the roll to adhere the top of the hat. For the bottom, the hat brim, just punch a circle with the 2 1/2″ Circle Punch. You could even fill the hat with some candy or other treat before adhering to the bottom circle. For the hat band, I cut a 1/2″ strip of Basic Black card stock and wrapped around the hat. For the buckle, I punched a square with the 1″ Square Punch in Daffodil Delight card stock. The easiest way to make it look like a buckle is just to adhere a small piece of Basic Black card stock the same width as the black band in the center of the yellow square. Now it looks like a buckle without having to cut the slits. You could stamp a little something on all the paper before putting the hat together but I just punched some stars from the Champagne Glimmer Paper or you could use the Gold Foil Sheets.

St. Patrick’s Day is March 17 so it’s time to be making some fun little party favors or decorations!

Don’t forget about the Weekly Deals at Stampin’ Up! that will end for this week on Monday, March 17th. Easy to remember –  the same as St. Patrick’s Day!

Stampin' Up! Weekly Deal Mar 11 2014

Let’s Get Digital with My Digital Studio During Sale-A-Bration

Let's Get Digital Bundle

Don’t forget about the My Digital Studio products during Sale-A-Bration! My Digital Studio is the digital papercrafting software from Stampin’ Up! You can make way more than just scrapbook pages digitally. This is the Let’s Get Digital Bundle offered in the Sale-A-Bration Brochure as a suggestion to get to the $50 price point to earn a FREE Sale-A-Bration product. After purchasing this, or any other current Stampin’ Up! products or My Digital Studio products, you can choose a FREE Digital Ensemble during Sale-A-Bration (more stuff to play with on My Digital Studio!) or any other free product in the brochure.

Here is a video that gives you an inside peek at making a card in My Digital Studio. One of the things you will see is recoloring a stamp, one of the newer features! Closer to the beginning of the video you will see a color put behind a see-through word in order to change the background color. You can send layers forward and backward to achieve what you want. The best way to learn My Digital Studio is to get in there and play! It’s all pretty intuitive and you will learn it all in no time!

You can try My Digital Studio free for 30 days, although at a price of only $19.95 I feel confident you will like it when you try it and you should just go ahead and purchase the MDS software, either as a download (recommended) or the disc. Let me know if you have any questions.

)