Tag Archives: Christmas ornaments

Traditions of Christmas Ornaments Card

Traditions of Christmas Ornaments Card

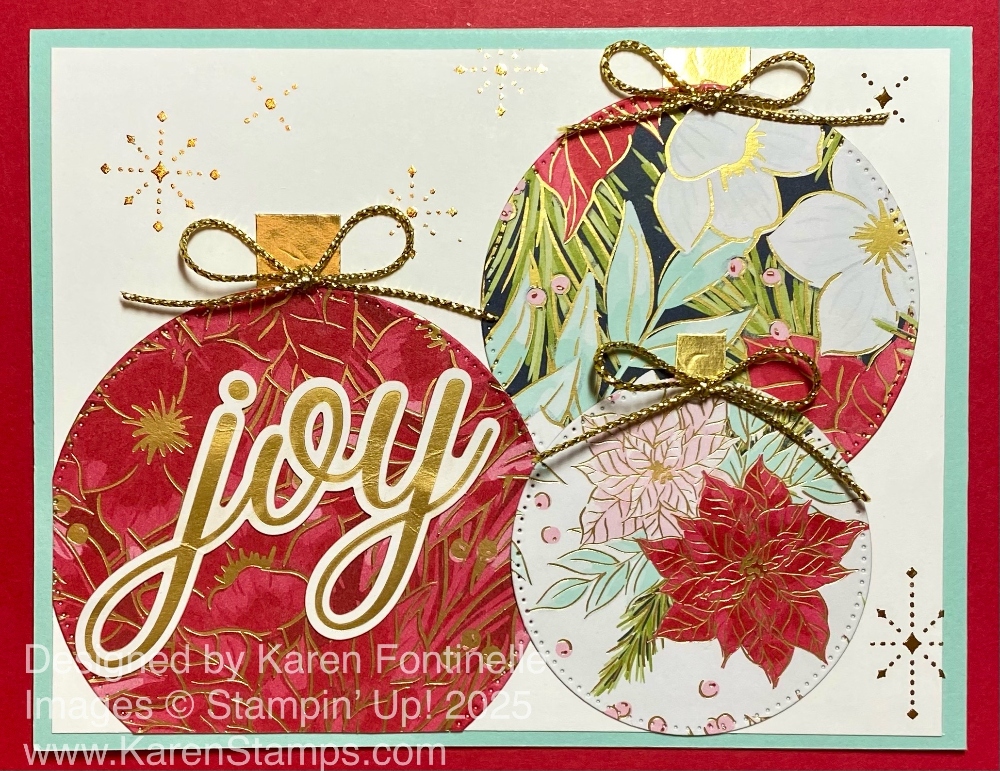
This Traditions of Christmas Ornaments Card is made with beautiful holiday designer paper cut in circles to look like Christmas ornaments. As long as you are diecutting, go ahead and cut out various size circles out of whatever paper you are using and you will have extras to play with and make additional cards.

This card base is Pool Party with a layer of Basic White for the background. I used the beautiful Traditions of Christmas Specialty Designer Series Paper. It was easy enough to take scraps of paper and cut it into as many circles as I could fit different size dies on it. Then you have both sides of the designer paper to use as far as patterns you like so it’s easy to make some beautiful ornament shapes. I used the Stylish Shapes Dies for this. After I had a lot of circles cut out, I just played around with pattern and size to design the card.

For the ornament hanger at the top, I simply cut little pieces of Gold Foil to make that gold cap on top of each ornament. Then I dug around in my bins of retired ribbon and found just a short piece of this gold cord that was just enough for me to tie a gold bow on each ornament. I adhered each bow with a Mini Glue Dot.

The blank white space around the ornaments looked too bare, but at first I wasn’t sure what I would like, maybe just some sparkly gems. But then I thought of the Metallic Textures Rub-Ons which just seem like magic to me! I love cutting out pieces of the designs and just rubbing it with my finger, after removing the backing paper, to transfer to the cardstock. I thought these designs filled in the space nicely.

For the greeting, I chose the word “joy” out of the Greetings For All Ephemera Pack. I love and have used this ephemera pack a lot. It has beautiful greetings of all sizes for your holiday cards and projects as well as scrapbook pages. This gold foil “joy” seemed to fit perfectly on this ornament and it looks good in that position on the card.

Sometimes you don’t know what you are going to come up with when you start designing a card. Even when you have an idea, by the time you try out different colors, papers, and greetings you might end up with a card completely different than your original idea. Or maybe you didn’t have an idea but just working with the elements your creativity comes alive!

Remember, the Stampin’ Up! Black Friday Sale begins tomorrow, Tuesday, November 25 and lasts through December 1. Be sure to shop early to get your choices before anything runs out!

Christmas Ornaments Kit Stampin’ Up! Kits Collection

Christmas Ornaments Kit Stampin' Up! Kits Collection

Finally, I got my Christmas Ornaments Kit in the Stampin’ Up! Kits Collection made! I’ve kept the box out ever since it arrived weeks and weeks ago, and yet it didn’t get made until the pressure was on here at the last Christmas minute! The kit makes nine ornaments, three each of three designs, which I posted in the photo above. Unfortunately, the kit is “currently not available” in the Online Store, but maybe you already have the kit and haven’t made it. This is your reminder to get out that kit and sit down and enjoy making the ornaments! Or if you are too busy, get it out right after Christmas when you have more free time and make the kit. Then you’ll have them ready for next year!

The kit is called Christmas Ornaments, but you could use these for fancy gift tags on packages! If you were hand-delivering a card or mailing a card inside a package, maybe you could use this ornament as a card front! Then the recipient can take it off the card and use it themselves as an ornament or decoration.

Someone suggested jazzing up these ornaments a little bit! I plan to do that this afternoon in my “spare time”! Just as with the Paper Pumpkin Kits, people always think of other creative ways to use the kit and make “alternate” projects with the contents. So even though you are given directions and a video, you can still make your project differently, however you want to make it! Some of the suggestions I saw were adding a bit of gold or maybe some Wink of Stella glimmer. Paint on a bit of white for a snowy look on the pinecones. Add a greeting or another Christmas image on the ornaments. Six red bows are included in the kit but you can add your own bows to the other three ornaments if you wish. Just play around with the kit and do what pops into your head to make it your own!

The only difficult part of this kit is tying on the gold thread onto the gold hoop. The hoops are very nice, by the way. Strong and good quality. Use the included glue dots to put glue dots where the gold thread is going to go. You will see a little bump on each hoop, some barely noticeable, so you might want to wrap the thread around those areas if you can. Be sure to watch Sara’s video assembling the kit to see how she does it. You can watch it again and again or pause it to follow along with each step. Or just go wild and crazy and do it however you like, as I’ve said!

Watch the video below about the kit. As I said, if you have the kit but haven’t made it yet, now is the time!

Here is the kit in the Online Store that you can check out and keep an eye on in case they get more in stock.

While you are there, check out the other Kits in the Kits Collection! You can purchase a kit for yourself or get an extra one to make with a friend or loved one (I hear lots of grandmas do this for their grandchildren!). Maybe you just want to purchase a kit as a gift for a friend! Lots of variety to choose from! Enjoy!!

Do You Have Any Shiny Brite Vintage Ornaments?

Shiny Brite Vintage Ornaments

You might be surprised to hear I have not completely finished my holiday decorating, but finally yesterday I came across my Shiny Brite box of ornaments. While I can’t vouch that they are all Shiny Brite ornaments, I do know they are “vintage” (which means from my childhood!).

The other day I came across an article about Shiny Brite ornaments and their history that I found quite interesting. I was pretty sure that I had an old box that said Shiny Brite. I even see a written “10 cents” on the side of the box! I know these ornaments hung on our family’s Christmas tree every year. Now I put them all in a glass bowl as a decoration rather than hanging them on a tree.

Shiny Brite Ornaments in Bowl

The ornaments are even in a vintage crystal bowl! Maybe I should add some greenery too. Besides my big tree in the family room, full of ornaments, I have my dad’s small tree that he started putting up when it was too much work to put up his big tree, but I have certain small ornaments on it and these are a little large. So I think a bowl, where they won’t fall off a tree limb, is maybe a safer place and makes a nice table decoration.

Here’s the box. Like I said, I can’t say for sure all these ornaments came in this box, but some ornaments must have!

Shiny Brite Ornament Box

If you are interested in these old ornaments and perhaps have some yourself, please read this article I came across on Facebook. (I don’t know how to embed part of the article like I used to know how to do so I’m just putting this link!)

Happy Christmas Decorating!