Monthly Archives: April 2014

An Easy Easter Card for You to Make

Easter Egg Card

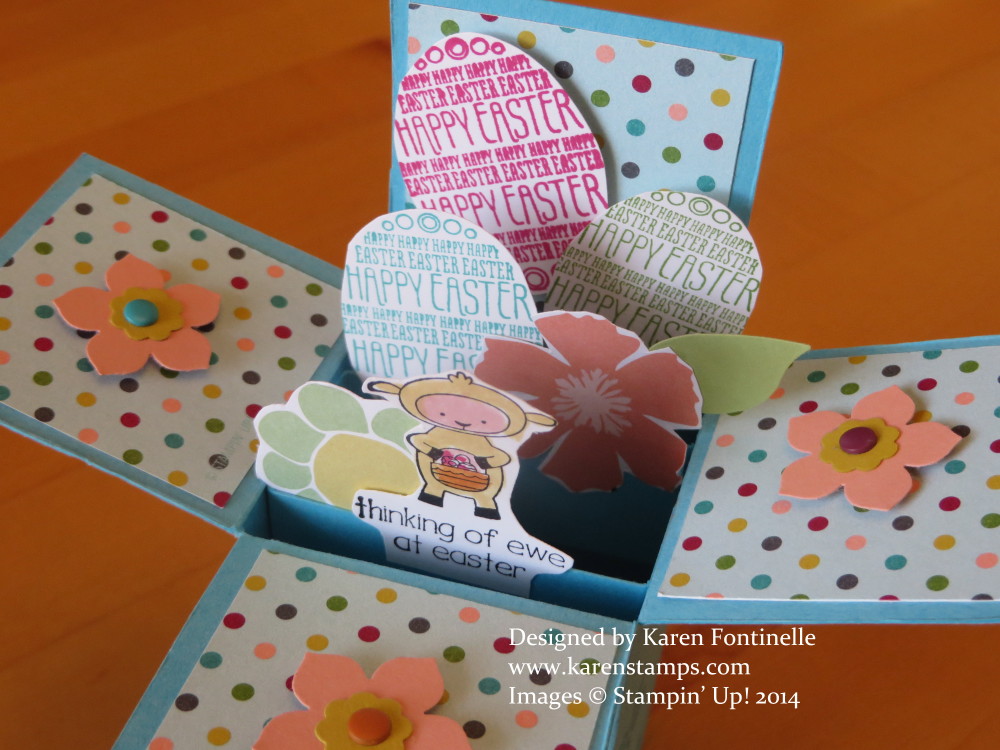
Next Sunday is Easter so it is time to be making some easy Easter cards. For this card, the easy way to make Easter Eggs is to punch designer series paper with the Extra-Large Oval Punch. I chose the Watercolor Wonder Designer Series Paper to use because of the lovely colors and even the variations in shading, which is often how dyed Easter eggs come out when you make them. You can choose any pretty paper you like. For the strip of grass, I used my new Fringe Scissors and then pulled it a little back and forth with my fingers to give it some texture like grass. Then just arrange the paper Easter eggs however you like, perhaps adhering some flat on the card layer and popping some up with Stampin’ Dimensionals. I stamped the Happy Easter greeting in the upper corner with Tangerine Tango ink with a stamp from the Teeny Tiny WishesLove that stamp set, if I haven’t said that already in other posts!  It always has something I can use, and if just the stamp is too small for your card, you can always layer it on some punched pieces to make it appear larger.

Now lest you think an experienced Stampin’ Up! Demonstrator can stamp easily with no mistakes, I’ll tell you the story of the butterflies! After I stamped the Easter greeting and turned it over to apply adhesive, somehow it got a smudge of Tangerine Tango ink on it!  And I already had the eggs glued on and everything. Sometimes a good tip is to do your stamping first so in case you mess that up, you haven’t ruined the whole card. So in order to cover my two little smudges of ink in the wrong place, I punched out a piece of Daffodil Delight card stock with the Elegant Butterfly Punch and layered it with the smaller butterfly, punched with the Bitty Butterfly Punch out of a scrap of Watercolor Wonder DSP and added the Pearl Jewel AccentsThen for fun I punched another Bitty Butterfly from the Watercolor Wonder DSP, added some pearls and stuck him on another Easter egg!  Ink smudge fixed!

If I had it to do over, I would have probably put another egg or two on the front of the grass, not all of them behind the grass.  But I still like this card a lot the way it is!

Before the Easter Bunny comes to hide the eggs in your yard, you might want to check for any poison ivy in the yard that someone could get into! Why do I say that?  Because over a month ago my husband was raking leaves in the backyard by the back fence and apparently got some poison ivy oil on him. I guess he suspected it soon enough and was able to wash it off, although he did get a small blistery patch on the inside of his arm above his wrist but it went away pretty quickly. But then SOMEHOW I got it on my arm, maybe from the laundry, and have been battling it ever since, even having to go to Urgent Care one weekend when we were out of town for a stronger dose of steroid. That worked great and it went away – but as soon as that medicine was out of my system, the itching started again and the rash came back. I think it is mainly my body having an allergic reaction to getting poison ivy for the first time. It took awhile, but my husband finally identified a plant by the fence where he had been raking leaves that is most likely the poison ivy. Why is poison ivy growing in our backyard??!!! So don’t let your Easter egg hunt be ruined by any poison ivy in your yard!!

For any stamping supplies you need, please visit my Stampin’ Up! Online Store HERE. Remember, there are lots of other occasions coming up, like graduation, Mother’s Day, and weddings!

Eggstra Spectacular Easter Card

Eggstra Spectacular Easter Card

Easter is late this year, but as fast as time goes by, it will be here soon! The Eggstra Spectacular stamp set can help you make an easy Easter card that looks lovely and delicate. The card base is Coastal Cabana. I really liked this pattern of paper in the Retro Fresh Designer Series PaperIn fact, I love it on this card!

After die-cutting the two labels with the Labels Collection Framelits, I decided to use the Festive Paper Piercing Pack to make a pierced border around the background label. Doing the paper-piercing sometimes really adds a nice touch sometimes! The Very Vanilla label is stamped with the bunny from the Eggstra Spectacular Stamp Set with Coastal Cabana ink to make it monochromatic. For the bunny’s cottontail I used a White Pearl Jewel AccentAnd to finish off the card, I used the Very Vanilla Seam Binding Ribbon, which was perfect! I thought the Very Vanilla stamped layer needed a little something so I just drew some lines with my Coastal Cabana Stampin’ Write Marker around the edge.

Yesterday I could NOT get a card made with this same stamp set and paper! I stamped upside down, I couldn’t “omit” the words on the stamp without getting excess ink in the wrong place – just everything I tried to do went wrong!  But today, this card came together perfectly! So even Stampin’ Up! Demonstrators have bad stamping days sometimes!

I hope you enjoy this card.  If you need any stamping supplies, just visit my Online Store HERE.


Stampin’ Up! New Weekly Deals for April 8-14

Weekly Deal April 8 2014

Here are the new Weekly Deals from Stampin’ Up! for the week of April 8 – 14. If I didn’t already have them, I would grab the Punch Pack, a set of little punches that are oh so handy for various things. The one punch has a little scalloped edge circle that is great for using as the center of flowers. You could really use any of them for that or even use just the punch itself as an itty bitty flower.

Here is a card I made last year using the Itty Bitty Scallop Punch in the Punch Pack.

Itty Bitty Punch Pack Easter Cross

Be sure to check out all the Weekly Deals! If you already have the Secret Garden stamp set, now’s the time to get the coordinating Secret Garden Framelits. And of course who doesn’t want more Baker’s Twine and ribbon?

Just go to my Stampin’ Up! Online Store to shop today!

Peachy Keen Retro Fresh Card

Peachy Keen Retro Fresh Card

Who do you know who is “peachy keen” and would love a handmade card? “Peachy Keen” means very good or excellent. Use the Peachy Keen stamp set from Stampin’ Up! and the Retro Fresh Designer Series Paper to make this quick and easy card.

Just cut some strips of designer paper, wider one for the center strip, slightly narrower on each side, shorten the lengths and you have a colorful background on the Brown Sugar card base. Stamp the “Peachy Keen” greeting on Very Vanilla card stock and cut out with the Labels Collection Framelits and the Big Shot. Also die-cut a layer behind the Very Vanilla from Tangerine Tango, one of the coordinating colors of the Retro Fresh Designer Paper.

And for a little extra pizzazz, add some arrows that you can stamp and cut out with the On Film Framelits Dies.

You can also purchase the Peachy Keen Stamp Set and the On Film Framelits Dies as a Bundle in the Occasions Catalog and save 15%.

To shop, just go to my Stampin’ Up! Online Store HERE. Don’t forget to check the current Weekly Deals!

Scalloped Tag Topper Punch Spring Basket

Scalloped Tag Topper Punch Spring Basket

Did you know you can make a lot more things with the Scalloped Tag Topper Punch than just tags? I’ve seen various creations but got the idea to make a Spring Basket using the Scalloped Tag Topper Punch. It’s available in the Stampin’ Up! Occasions Catalog along with the beautiful Watercolor Wonder Designer Series Paper.

To make the basket, I cut two strips of Daffodil Delight 2″ x 7 1/2″ and punched one end on each strip with the Scalloped Tag Topper Punch.  Score at 3″ from the scalloped top and fold. Those will be the ends of the basket and you can adhere the bottom pieces together.

Scalloped Tag Topper Basket Base

Cut two pieces of Daffodil Delight 2″ x 5 1/2″.  Score 1/2″ at each end. These pieces will be the front and back sides of the basket. If you need to, make a brace to put in the center with a 1″ x 4″ piece scored at 1″ at each end and glue inside the basket.

The handle is a piece 1/2″ x 8 1/2″. I added a piece of Whisper White 1/2″ Stitched Grosgrain Ribbon to the top of the handle using Tombow Multi-Purpose Adhesive. You can see how the handle is inserted and adhered inside in the photo below.

Decorate your basket however you like!  If you want to stamp on it, be sure to do it before assembling!  I added a layer of Island Indigo card stock to the basket and then the Watercolor Wonder paper on top of that. I made the flower with the Pansy Punch. It was just the right size and I punched several flowers out of the sheet of Watercolor Wonder paper that had shades of yellow and blue on it to get a variation in color. A retired Printed Designer In Color Brad held the flowers in place. Then I foofed them up and down and all around to give them some dimension.

You could also make a paper box the right size and just use the tag punched with the Scalloped Tag Topper Punch at the ends. So many different ways to make these great papercrafting projects!

Scalloped Tag Topper Punch Spring Basket Side

The Scalloped Tag Topper Punch is one of my favorite items in the Occasions Catalog because it would sure be difficult to make that pretty scallop at the top by hand! Go shop at my Stampin’ Up! Online Store today and find your favorite products!

Eggstra Spectacular Easter Pop-Up Box Card

Eggstra Special Easter Pop Up Box Card

The only thing more fun than stamping is stamping with friends and making an Eggstra Spectacular Easter Pop-Up Box Card! That’s what I got to do the other day and here is one of our creations! I wanted to show them how to make this very popular style of card, the pop-up box card. Although I knew I wanted to make this style of card, I hadn’t made a sample for them, so I had to just “wing it” as we went! I wasn’t even trying to make a “great” card. I just wanted to make one with them so they would know how to do it.  But I think this one turned out pretty cute! The pop-up box card is basically a simple card, it just has the look of being a difficult one.  That’s what I love about Stampin’ Up! and stamping – there is nothing that is too difficult for a beginner to do as long as they have the materials and tools and someone or some way to show them how to do it.

The basic instructions for making a pop-up box card like this one are simple.  Start with a half sheet of card stock as with any card. Score across that 8 1/2″ width at 2″, 4″, 6″, and 8″. That leaves a narrow 1/2″ edge on the end which will become the tab that adheres the box together. Turn the half sheet of card stock longways on the Simply Scored Scoring Tool or on the Stampin’ Trimmer and score at 2″ to make the box flaps. Now cut from the edge of the paper up to the 2″ scored line to cut apart those flaps. Now also cut off the 1/2″ tab even with the flaps, leaving the bottom portion, so that the box can be assembled. There will not be a bottom to the box, only the flaps at the top that will fold outward. Fold on all the score lines and assemble the box. Also cut two pieces to go inside the box to hold the pop-up images. They should be two pieces cut 1″ x 3″, and scored at 1/2″ and 2 1/2″ (or 1/2″ at each short end) so that those braces can be adhered inside the box spaced evenly apart. They are a little tricky to get glued in there, but you can do it.  I like using the Tombow Multipurpose Adhesive so I can move it around to get it placed evenly and correctly.

Decorate the outside of the box first with either stamped images or designer series paper or card stock or leave plain. It’s all up to you! Once you have the basic box assembled, you can adhere whatever stamped images or punch art or greetings you want for your card to the inside braces and to the outside of the box flaps. If you want the folded card to fit inside a certain size envelope, be sure that any items you adhere inside the card do not “hang out” past the edges of the folded card. This size card as made here will fit inside a Stampin’ Up! Medium Whisper White Envelope (my favorite envelopes in the whole world, by the way!)

The stamp set I used on this pop-up box card is called Eggstra Spectacular, a cute Easter stamp set in the Stampin’ Up! Occasions Catalog. The little lamb is stamped with Black Stazon ink and colored in with Stampin’ Write Markers. It was then just cut out by hand with Paper Snips. The Easter eggs were stamped with various colors of ink. The Extra-Large Oval Punch was too large to punch them out, much to my chagrin, as was the smallest Oval Framelit, so it was just easiest to use Paper Snips to cut them out by hand. I couple printed flowers were cut out of the Sale-A-Bration Sweet Sorbet Designer Series Paper to add something extra besides the Easter eggs.

The little flowers on the flaps are punched with the Petite Petals Punch in the Occasions Catalog and some Petite Petals flowers are stamped on the sides of the card. The designer paper used on the flaps are small squares of the Birthday Basics Designer Series Paper. A Bundle can be purchased with the Petite Petals Punch along with either the wood- or clear-mount stamp set. The center of each flower is from the Punch Pack. And for extra measure I added a Candy Dot to the center of each flower!

When you want to send a special card to a special someone, this pop-up box card fits the bill and is easy enough to make. Use the Eggstra Spectacular stamp set for an Easter-themed card or whatever stamp set fits the occasion!

Shop at my Stampin’ Up! Online Store for any of your stamping and papercrafting needs!

Eggstra Special Easter Pop Up Box Card Inside

It’s April Fool’s Day….I Thought This Was an April Fool’s Joke!

Fine Print Greeting Cards Templates

Happy April Fools Day!  Happy April 1st! It wasn’t like I could think of an April Fools joke myself to put on my blog (at least not yet!), but then I saw Stampin’ Up! had the new Weekly Deals up as well as the new My Digital Studio Downloads as they do every Tuesday. There are only two new MDS downloads. When I saw the download pictured above, I thought, Stampin’ Up! came up with their own April Fools joke with this silly stamp set. But it’s real, and you obviously have to read the FINE PRINT! Click on the image above to go to the store page – and then click on the magnifying glass – and THEN click on the arrow to the side to click through each image so you can read the FINE PRINT!

Fine Print Close-up

Maybe these aren’t your type of greetings for your friends – but then again, maybe they are! The description says:

 Have fun on April Fool’s Day or any day with these quirky cards,
just don’t forget to “read the fine print” 

And here is the other CUTE My Digital Studio download for this week!

Eggstra Spectacular Stamp Brush Set

To purchase the My Digital Studio software or take the 30-day Free Trial, click HERE.

And here are the new Weekly Deals for April 1-7, 2014:

Weekly Deal April 1 2014

Sale-A-Bration ended late last night!  I hope you were able to order what you wanted to get some free products! Always sad to see Sale-A-Bration come to an end, but we always know there are good things ahead with Stampin’ Up!

Check my Stampin’ Up! Online Store for the Weekly Deals and more!