Monthly Archives: July 2010

My Digital Studio Owl Card

Naturally I wanted to play with my new My Digital Studio downloads, especially the new Two Step Owl Punch:

Two Step Owl Punch My Digital Studio Download 

copyright Stampin' Up! 2010

Isn't it cute, even as a digital download, and it's only $.95!

I started in My Digital Studio with a template already designed for me and then changed a couple of elements or colors.  It was easy and fun to do!

Owl Card-001 

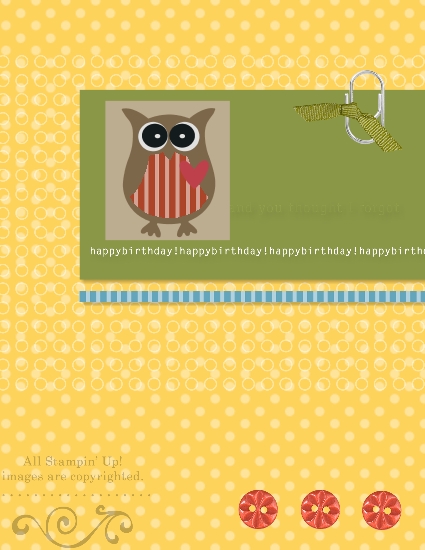
I could also design the inside of my card as well, even the inside left-hand page, which normally is blank in most cards.  But with My Digital Studio I could place whatever paper or stamp or accessory on it and have it look like a very fancy card!

The more you use My Digital Studio, the more you learn and the more you like it!


New Colors on My Digital Studio!

If you already own My Digital Studio, it's time to get your new colors!  All you have to do is update My Digital Studio to the current version and you get the new digital card stock, ink colors, and Patterns Designer Series Paper FREE! Click HERE to read about it on the Stampin' Up! website.  There have also been new downloads to purchase recently, and you can go to my Online Stampin' Up! Store to see the newest ones and purchase what you would like.

These are the very latest ones:

The latest group of digital downloads for My Digital Studio are now available!

Always Elegant Digital Kit

Wedding Sweet Stamp Brush Set

Paper Daisies Kit

Elegant Soiree Designer Series Paper

Item         Description         Price
119839 Always Elegant Digital Kit $9.95
121431 Wedding Sweet stamp brush set $3.95
121432 Paper Daisies Kit $3.95
121433 Elegant Soireé Designer Series Paper $4.95


There are also new punches available for download including the new Two Step Owl Punch!


If you don't own My Digital Studio, wouldn't you like to get in on the fun?! Watch the video and learn more about it!

The Circus Is In Town

The Ringling Bros. Barnum & Bailey Circus is in Houston, TX this week! I saw a story on the local news the other day about the elephants, and that plus this new Designer Series Paper Sunny Garden #119831 inspired me to make this card.  I used the Bigz Scallop Circle Die #113468 and cut a portion out to make the "bigtop" roof and then just a small square for the sides, cut a slit and turned back the "tent flaps" with a piece of Basic Black card stock #121045 behind it.  The elephants from Animal Stories #116716 are stamped with Basic Gray #109120 and one is cut out and adhered with Stampin' Dimensionals #104430 to pop up.  The words are from the stamp set Oval All #113790, punched out with the Scallop Oval Extra-Large Punch #119856 and mounted on the 2" x 1-3/8" Oval Extra-Large Punch #119859.

Circus Card 


On the bottom I sponged a little bit of Soft Suede ink #115657 and for the sky I used Pacific Point ink #111837.  I just grabbed a scrap of the Scallop Circle, put that down on my Whisper White background and sponged the edges, moving it around to make it look like clouds.  Nothing scientific about it, I just did it!  You can too!  

Card stock I used:  

Whisper White #100730

Crumb Cake #120953

Poppy Parade #119793


You can get all your stamping supplies for this project and more at my Online Store!  Shop anytime!


Dotted Scallop Ribbon Border Punch

Dotted Scallop Ribbon Border Punch 

In my box of new goodies from Stampin' Up! last night was this new Designer Series Paper, Sunny Garden #119831 and the new Dotted Scallop Ribbon Border Punch #119275.  I wasn't quite sure how I would use that punch, but after playing around today, this is what I came up with and decided to do the three strips layered.  I really like it!  The flowers are stamped with Watercolor Trio (Summer Mini p. 16), colored with the Stampin' Write Markers.  The colors I used were Pear Pizzazz, Daffodil Delight, Peach Parfait, Poppy Parade, and Concord Crush.

Do you have your new colors yet??  You can email or call me with your order or you can shop at my Online Store.


The New Stampin’ Up! Color Coach!

This is the new Color Coach #120148 from Stampin' Up! and you will want to have one!  It just looks good and is so versatile.  You'll see large swatches of color and on the back of each color are suggested color combinations.  There are even extra cards to help you with color theory and blank cards for you to record your favorite combinations of colors.

ColorCoach 


In Colors are included as well AND see the screw on the back??  You can take the pack apart to add new In Colors or remove old ones or even put the cards in the order you would like them.  If you prefer the colors be in order by Color Collection, you can sort them that way. 

ColorCoachback  

Just to challenge myself, I was going to choose a random card in the Color Coach, without looking, and make something with those colors, regardless of what they were!  It was Early Espresso and I chose to use the "Creative Combination" of colors in a project.

Here's what I made:

Friends Tag 

Stamps:  Artistic Etchings (p.125 IB&C), Vintage Vogue (p. 126)

Card stock:  Very Vanilla #101650, Marina Mist #119682, Early Espresso #119686

Ink:  Early Espresso, Tangerine Tango, Marina Mist

Accessories:  3/8" Twill Tape #119970, Stamping Sponges #101610, Stampin' Dimensionals #104430, Paper Snips #103579, Crop-A-Dile #108362


Be sure to put that new Color Coach on your new order!  

Click HERE to shop!


Stampin’ Up! Color Retrofit Kits

Stampin' Up! Color Renovation Kits 

Here's the best way to update your existing Stampin' Up! products in order to get the new colors without replacing products you already have.  Click on the above image to read the flyer!  You will see that there are some great deals here!

Click here to download the new Stampin' Up! 2010-2011 Idea Book & Catalog!

Click here to shop for all the new Stampin' Up! products on your Wish List!

Let me know if you have any questions!

4th of July Simply Adorned Charms

This morning I was rummaging through my jewelry box and in my holiday decorations trying to find my 4th of July "stuff".  I couldn't remember if I had a special 4th of July bracelet or not, but I found some red and blue cheap plastic beads I probably bought last year and my little 4th of July "crown"…some star garland and cascading curled ribbons down the back!…..that my friend and I bought years ago at a 4th of July celebration.  Then I happened to think of my Simply Adorned Charms from Stampin' Up!  All I would have to do is make a 4th of July insert and I'd have my own customized jewelry!

The charm I have is the middle sized one, the Simply Adorned 1" x 1 1/4" Rectangle Charm #116798 with the 24" Simply Adorned Chain #116800.

Here's the front!

CharmUSA 

And I love that there is a backside too!

CharmUSAback 

I just got out some stamps and punches and had some fun!

What I hope looks like fireworks in the front view of the charm is the medallion in the stamp set Charming #116519, with the center punched out with the Itty Bitty Shapes Punch Pack #118309.  The USA is stamped with the Rough Type Alphabet in the Summer Mini Catalog….the letters are just cut into little blocks by hand.  The star is cut from Brushed Gold cardstock. The red and blue strips are punched with the Pinking Hearts Border Punch #117649.

The backside of the charm I just stamped that same medallion from Charming in Real Red, Daffodil Delight and Pacific Point ink and punched out the three stars with the Star Punch (retired).  I think we need a punch with itty bitty stars!

I can't wait to wear my new 4th of July necklace to see fireworks tonight!!


Get Good Fireworks Photos for Your Scrapbooking!

IMG_9214 

I just love watching fireworks on July 4th or any time any place, and I'm sure lots of you do too!  I've tried to take photos of fireworks many times, and usually they don't turn out very well. But with my current camera (still a point and shoot) I'm getting closer to getting some good shots of the fireworks. Today, in my email from Photojojo.com, I was directed to some tips for taking good fireworks photos.  They have eleven great tips here. They strongly recommend using a tripod (as in "Bring a tripod, bring a tripod, bring a tripod.") and finding a good location early where you can look straight at the fireworks, not just up.    Some cameras even have a fireworks mode to shoot with (I'll have to check mine!). But you can read the camera-setting details for yourself.

A couple other suggestions I liked were:

  • Being near a body of water is good for the reflection of the fireworks (we usually are by a small lake in a park for our fireworks viewing!).
  • Include some buildings or landmarks which often add to the composition of the photo.
  • Turn your flash off!
  • Turn your camera for a portrait-oriented shot for a rocket's rise and explosion, but to capture multiple explosions, shoot in landscape.
  • Don't forget the best comes at the end…the Grand Finale….so save some space on your memory card for that!

And my own tip……don't forget to take some pictures of the people you are with, not just the fireworks!

And when you are ready to scrapbook those photos, a quick and easy way to do it is with My Digital Studio from Stampin' Up!  You can make an album to print out or a few pages, or a multi-media presentation to share with your friends and family.  Contact me to find out how to order or go to my Online Store.


Fun with Tote-ally Tess on Another Rainy, Flooding Day in Houston!

Thank goodness stamping does not require electricity!  It has been raining and raining and raining all day here in Houston.  The power went off before 10:30 am, and threatened to even before that, so what is a girl supposed to do with no computer or TV all day??  I got out stamps, ink and paper since I could see pretty well at my kitchen table by the window and made this card!

ToteAllyTess 

So Tote-Ally Tess and I had a pretty good time this morning.  I just kept stamping away until I was satisfied with how the card turned out.  To begin I consulted my new Color Coach #121620 to find a color combination I wanted to use and Sahara Sand, Regal Rose and Tempting Turquoise is what came up!  You'll love the new style Color Coach!

I also got to work on switching out some of my retired stamp sets and markers and cleaned up a few things.  Good day for that, even though I needed a flashlight now and then!  The power finally came back on at 4:00 pm although they say on the news (now that I can watch it) that thousands are without power.  Naturally ours came on just in time to cook dinner, but probably better than being out driving because there are so many spots that flood.  Now if I can just drive to the Park & Ride to pick up my husband!  They even had to set off some of the fireworks downtown today that were being set up for the 4th of July display because the bayou was getting high, just to be safe.  Wish I could have seen that!


Daffodil Delight Box #2

Happy New Stampin' Up! Year!  Yes, today is the day for the new 2010-2011 Stampin' Up! Idea Book & Catalog!!  Out with the old and in with the new! Right this minute Stampin' Up! is changing everything over online to the new catalog, so if you wait until this afternoon ( 1 pm Central time) you will be able to shop online and view all the new catalogs.

Here is a project I made with the new products!  I used the Big Shot (#113439) to die cut the Box #2 (#114518) out of the new card stock Daffodil Delight (#119683) and then decorated it with the Greenhouse Gala Designer Series Paper (#117167).  I used the same sheet, both sides, for the little band of paper around the middle and from the other side I cut out several flowers and leaves with my Paper Snips (#103579) (which make such cutting easy!).  You MUST put this Greenhouse Gala DSP on your first order from the new catalog because it is beautiful!  It will put you in a good mood just to look at it!  For a finishing touch, I added a little of the new 1/8" Taffeta Ribbon (#119254).  When I first saw this ribbon I wasn't sure I liked it because it is so very narrow, but when I used it today I just loved it!

Daffodil Delight #2 Box 

Such a fun little project that just brightens up your day to make it!  Think what it would do for someone if you put a little treat inside and gave it away!

Check back later when Stampin' Up! is up and running with new, new, new products!!!!