Category Archives: Valentine

Country Floral Lane Heart Punch Card

Country Floral Lane Heart Punch Card

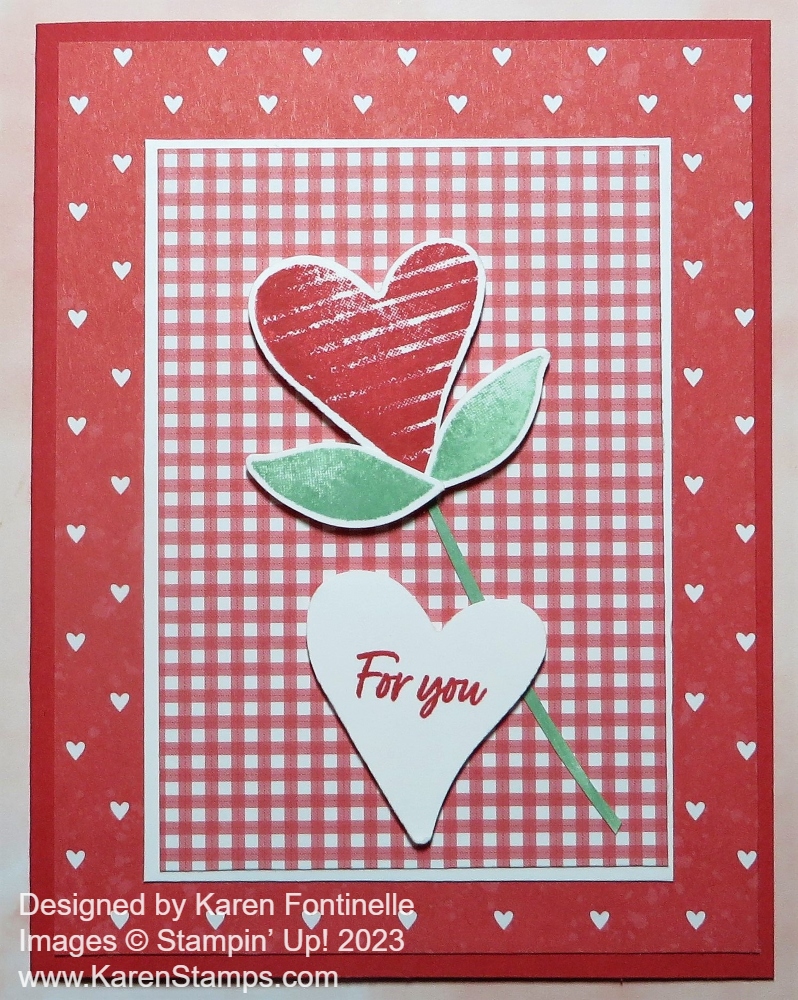
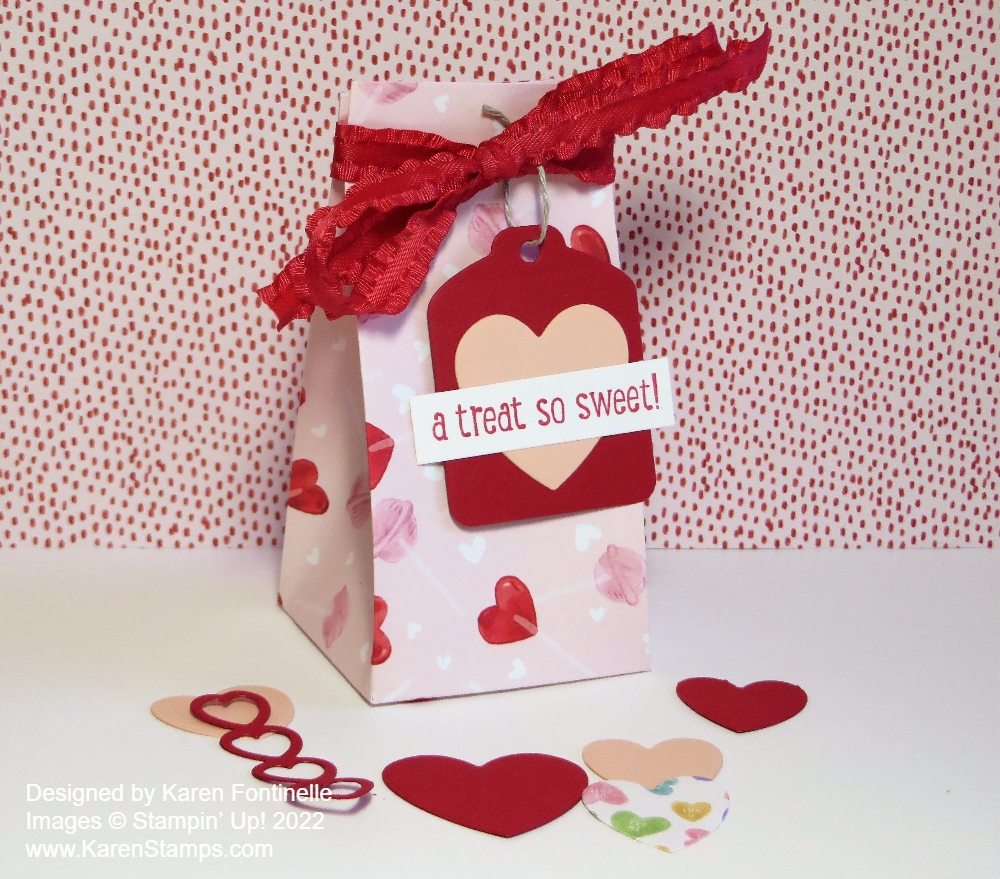
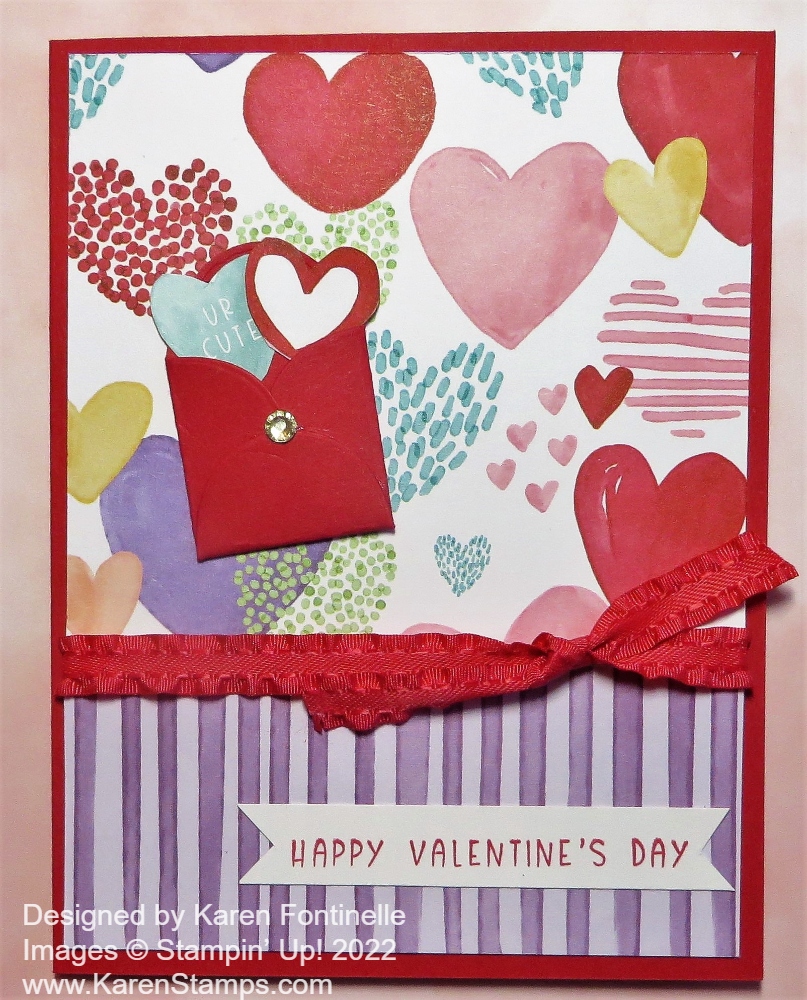
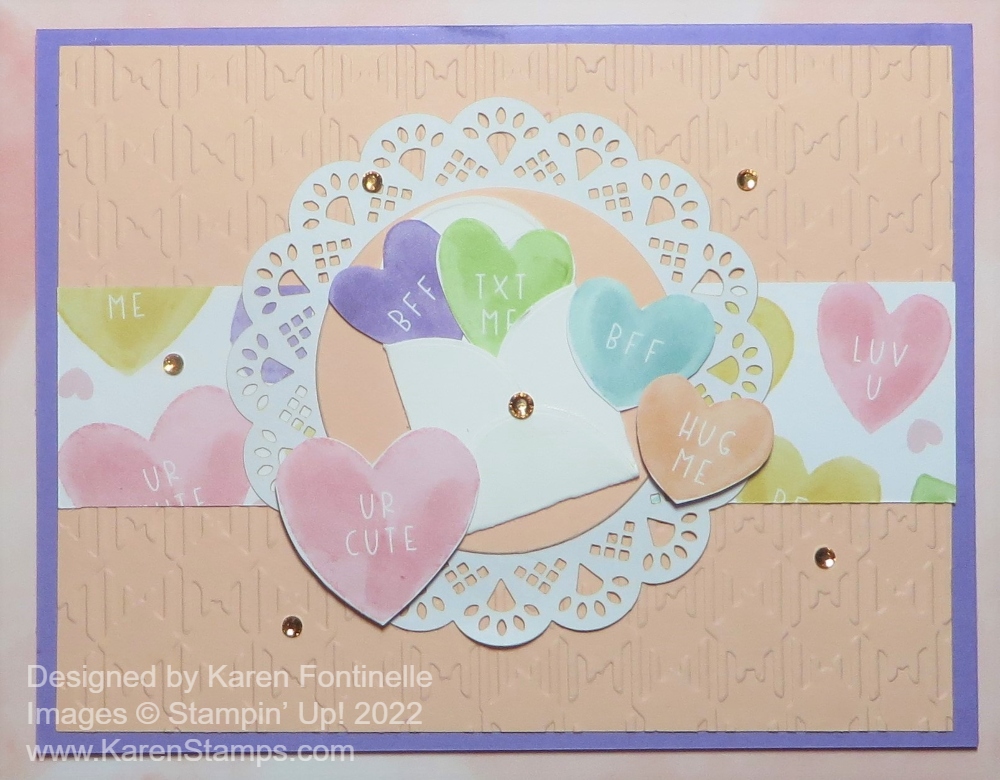
Is this Country Floral Lane Heart Punch Card a Valentine or an all-occasion card? I think it could be either one! Hearts aren’t just for Valentine’s Day so this could be a “Thinking of You” card…but it could be a Valentine! So make it whatever you like! Of course, you can change the greeting for your specific occasion!

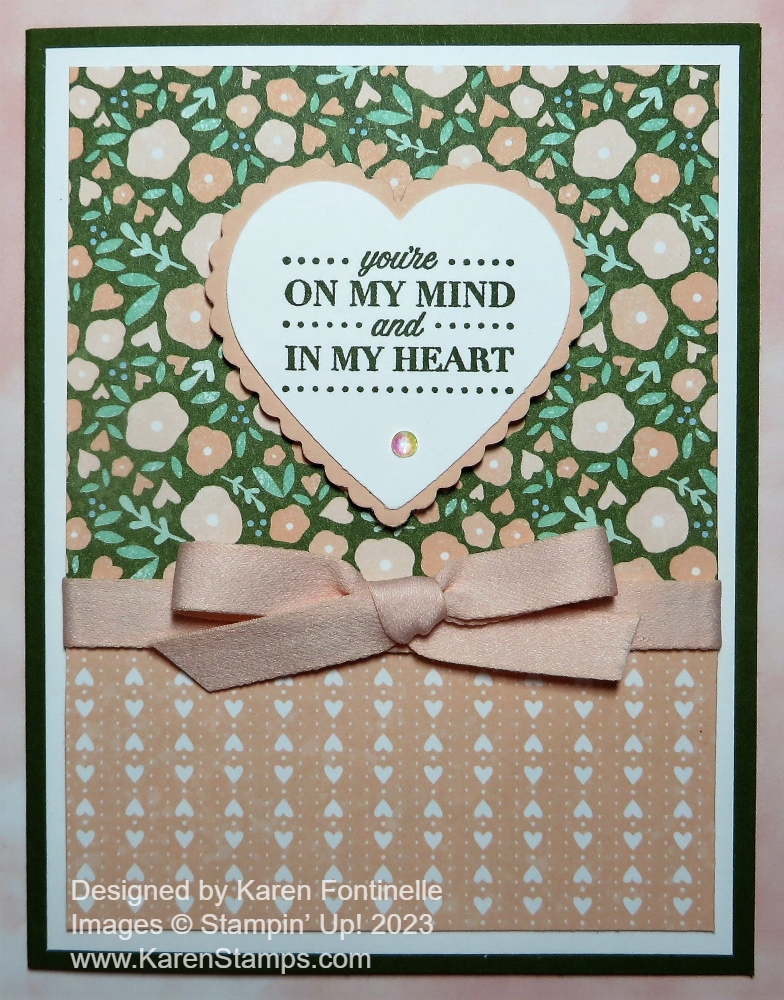
I chose a Mossy Meadow card base since that is one of the coordinating colors of the designer paper. Over that, I added a layer of Basic White cardstock to set off the designer paper a little better.

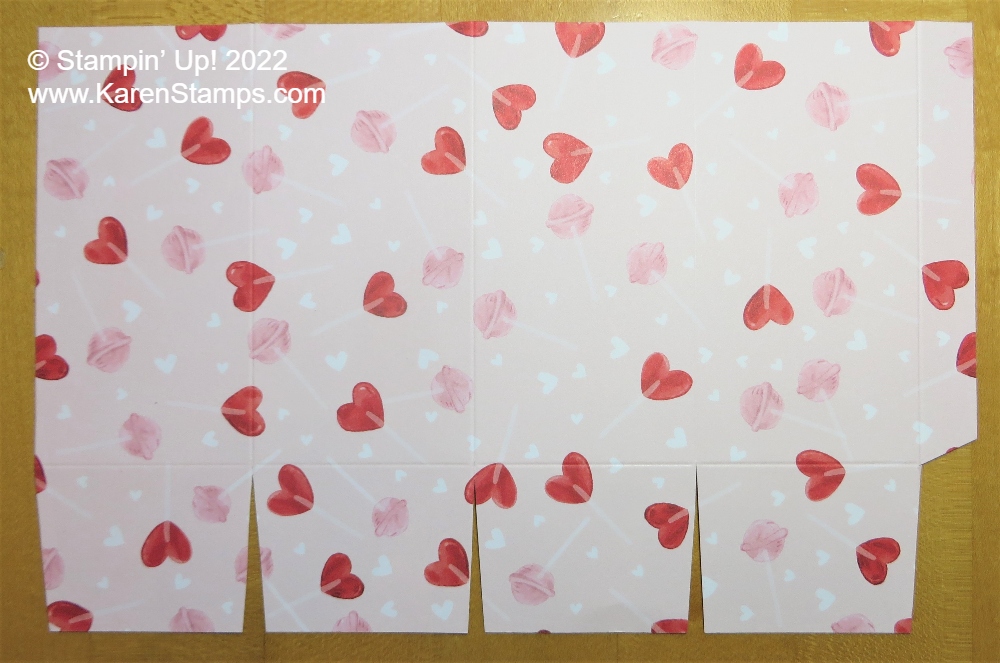
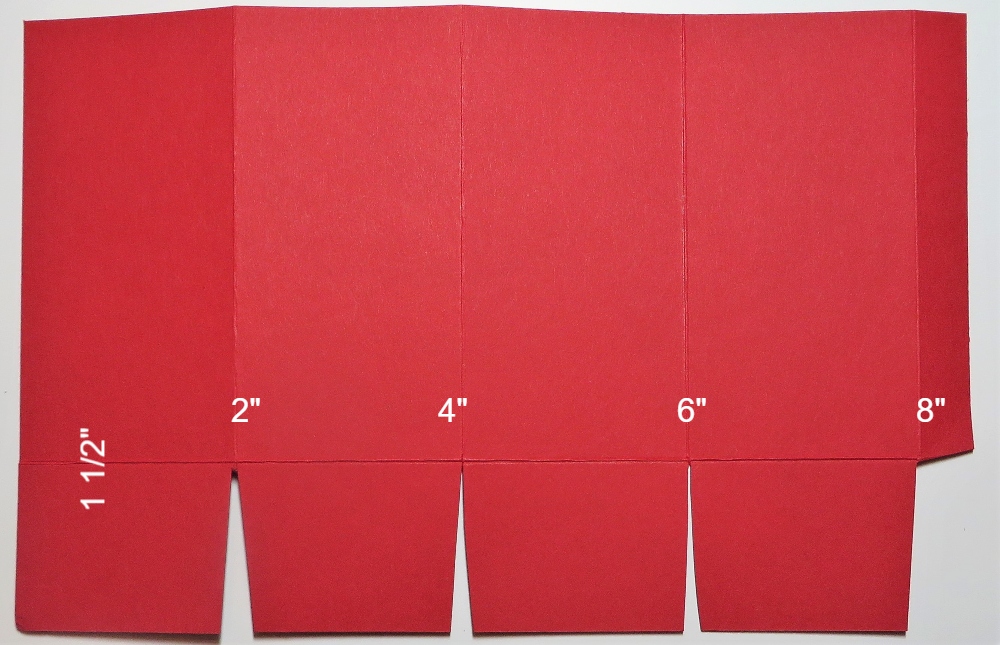
The paper is the Country Floral Lane Designer Series Paper in the Spring Mini. The papers aren’t strictly for Valentine’s Day so you can use them later in the year, too! For this card, I used the pink floral pattern with a dark green background on the top half of the card and the pink little hearts paper for the bottom portion. These two patterns are actually the two sides of the same sheet of paper! The top portion measures 3 3/4″ x about 3 3/8″. The pink hearts paper is 3 3/4″ x 1 3/4″. The pink paper overlaps the top portion just a tiny bit. Be sure to wrap the ribbon around to the back at the seam to cover the two papers meeting before you glue it down to the Basic White layer. The ribbon is the Petal Pink 3/8″ Soft Polyester Ribbon which is beautiful and really soft.

For the greeting, I found this one in the Celebrating You Stamp Set. It is stamped in Mossy Meadow ink on Basic White. Then punched out with the plain heart in the Heart Punch Pack with a Petal pink scalloped layer with the scalloped heart. These two punches come together in the Stampin’ Up! Annual Catalog in the Heart Punch Pack. If you missed out on the Country Bouquet Punch (it is due back in April!) these heart punches will be fun to use instead.

The heart is popped up on Stampin’ Dimensionals and I added a small Iridescent Rhinestone Basic Jewel on the point of the heart. I think it is the perfect finishing touch!

SHOP STAMPIN’ UP! ONLINE HERE!

Country Floral Lane Valentine Candy Bars

Country Floral Lane Valentine Candy Bars

These Country Floral Lane Valentine Candy Bars are a very old project I have been making all of my stamping years! It is so easy and so fun! You can use any size of candy bars and decorate for any occasion, as simple or as fancy as you like!

I got these “regulation size” chocolate bars in a 6-pack at the grocery store. You could use the very small snack-size bars or you could use the giant-size candy bars. The brand, size, and type doesn’t matter either with a project like this. You only need to be able to wrap some paper around the candy bar or even a bag of candy.

My measurements don’t really matter to you because it all depends on the size of YOUR candy bars. But if you want a starting measurement, for my candy bars I wrapped around a 5 1/2″ x 6″ piece of cardstock, then a piece of designer paper, about 4 1/4″ x 6″ on one and 3 1/2″ x 6″ on the other. Six inches provides a fairly wide overlap for the back so you could make that a little shorter if you needed to save paper.

On the pink candy bar, I first stamped some flowers in the Country Bouquet Stamp Set using Versamark ink on the Petal Pink cardstock just for a little interest on the top and bottom. Then I wrapped around a piece of the Country Floral Lane Designer Paper. I suggest just lightly wrapping it around and not scoring it according to any measurements. Each candy bar and wrapper may be different, there is some thickness to it, and you don’t want the wrap to be too tight that you can’t pull out the candy bar or too loose. After I wrapped the cardstock around the candy bar, I held it in place as tightly as I wanted it and actually ran my Bone Folder along the sides which gave a pretty nice crease.

To decorate the pink candy bar, I used the Country Bouquet Punch to punch out the two hearts and leaves directly from the Country Lane Floral Designer Paper. As I write this, this punch is not available and will not be until April. If you want to use that design on the paper, just cut out the hearts and leaves by hand. I used the Real Red & Burlap Ribbon Combo Pack to wrap around the length of the candy bar with the Burlap Ribbon, then tied at the top with the Real Red Ribbon. This gives the recipient a “handle” to pull out the candy bar.

The Sweet Sorbet candy bar is wrapped with Sweet Sorbet cardstock and then a layer of the Country Gingham 6″ x 6″ Designer Series Paper. This paper is cute and so versatile to use on many projects. At this moment it says, “Low Inventory” so if you want it, order it right away!

To decorate this candy bar, I stamped three hearts with the Country Bouquet Stamp Set and punched out with the Country Bouquet Punch, Again, if you don’t have it, just cut out the hearts by hand. I also added two greetings from the same stamp set plus the little hearts stamped inside one of the hearts. That center heart is popped up on Stampin’ Dimensionals. I used the Black & White Gingham Ribbon to wrap around and pull out the candy bar.

As I said, this is a fun project! Even children can do it! If you want to see the small, Snack Size candy bars decorated, here is a Halloween example.

If you need any supplies for any projects, remember Sale-A-Bration is still going on during February and just the other day Stampin’ Up! added more choices of products that you can earn with a $50 or more purchase. Check out all the choices HERE.

SHOP STAMPIN’ UP! ONLINE HERE!

Country Floral Lane Valentine With Heart Punch Pack

Country Floral Lane Valentine With Heart Punch Pack

With all the excitement over the Stampin’ Up! January-April 2023 Mini Catalog (the Spring Mini), we often forget about the Annual Catalog. It’s easier to look at the newest catalog and all the shiny new products. But now that it is time to make Valentines, I remembered the Heart Punch Pack in the Annual Catalog! It’s a shame the Country Bouquet Punch will not be available in time for Valentine’s Day, but maybe you have the Heart Punch Pack you can use instead (or other past heart punches and dies).

This Country Floral Lane Valentine With Heart Punch Pack card is an easy card to make. It starts with a card base of Petal Pink cardstock. I added a layer of designer paper in the Country Floral Lane Designer Series Paper, the Petal Pink with little white hearts.

The hearts are punched with the Heart Punch Pack. This is two heart punches, one with scalloped edges that can act as a layer underneath the plain heart. It’s great to have the two punches for layering and for the two designs. The scalloped heart is Petal Pink and the plain is Basic White. A greeting is stamped with Petal Pink ink from the Country Bouquet Stamp Set.

To help the heart stamp out I die cut a Basic White square from the Stylish Dies. You can use any square shape. The two hearts are adhered together, then popped up on Stampin’ Dimensionals.

But before I adhered the hearts to the square I added some White 1/4″ Crinkled Seam Binding Ribbon back and forth behind the heart. I usually like to put down some Stampin’ Seal on the back so I can stick down the ribbon and then add Dimensionals to help hold it down as well as to pop up the piece.

Trying to keep the card simple, but wanting just a little something else to add to the card, I added a frosted Heart Pearl. In this package are three “colors” of pearls – Glossy White, Milky White, and Pearl White. I just put the heart at the bottom of the heart and then stopped myself from adding any more! It’s so much fun to add some embellishments to a card!

This is just an easy, basic Valentine. Change the colors, the paper, or even the greeting to make more cards!

SHOP STAMPIN’ UP! ONLINE HERE!

Country Floral Lane Punched Red Hearts Valentine

Country Floral Lane Punched Red Hearts Valentine

This Country Floral Lane Punched Red Hearts Valentine uses a little bit of several things for this card in the Country Floral Lane Suite in the Spring Mini Catalog 2023. (As I write this, this Suite is back-ordered until mid-April because the Country Bouquet Punch unfortunately is unavailable until then, as well as the Bundle. The ribbon combo will be available in about three weeks. But other items are available individually.)

This card has a Sweet Sorbet card base with a Basic White layer. Just add some designer paper and a little stamping and you have a Valentine! Each side of the Basic White layer has a 1/2″ x 5 1/4″ strip of the Country Gingham 6″ x 6″ Designer Series Paper.

In the middle of the card, I punched five hearts from the cute print with little white hearts in the Country Floral Lane Designer Series Paper. Since these modern hearts have a slight curve to them, if you want some hearts to curve in the opposite direction, just punch from the other side of the paper! With this paper, pay attention to the pattern so you don’t get the hearts upside down! Just play around with how you like the hearts placed.

Next, I did a little stamping. The center white heart is punched out and then stamped (or you can do it the opposite way!) with a greeting in the Country Bouquet Stamp Set. You can punch out the heart itself first or stamp the heart outline and even the greeting inside it and then punch it out. I wish there was a larger heart for layering, but there isn’t so I just punched out a Sweet Sorbet cardstock heart and let it peek out over the top of the white heart. It adds a little something but nobody would notice the entire heart isn’t layered underneath. The white heart is popped up with Stampin’ Dimensionals.

For some risky stamping (could have messed up the whole card!), I stamped the little outlines of two hearts around in some of the empty spaces on the card using Sweet Sorbet ink. Fortunately, it all worked out! No messes! For a little bling, I added some Rhinestone Basic Jewels.

I forgot to take a photo, but on the inside of the card, I stamped “Happy Valentine’s Day” on a layer of Basic White and then punched out two hearts – one with the gingham like on the side of the front of the card and one with the tiny white hearts like the hearts on the front of the card and just layered them side by side on the lower right-hand corner. That makes the inside very cute!

Time to make Valentines! February is almost here! Not everything has to be red, white, or pink so use your creativity!

SHOP STAMPIN’ UP! ONLINE HERE!

Country Bouquet Punched Hearts Valentine

Country Bouquet Punched Hearts Valentine

If you like punching, this Country Bouquet Punched Hearts Valentine is for you! Just grab some cardstock or designer paper and start punching hearts to your heart’s content! January is just about over (who would have thought?!) and February will be here next week so it’s time to be making lots of Valentines!

This card uses Shimmery White cardstock for both the card base and the layer. I could have added a colored layer underneath the Shimmery White layer, but sometimes I like the white-on-white look. I love the Shimmery White cardstock because it really does have just a tiny bit of shimmer that you can see up close.

Then I chose several colors to use for the hearts. I used Flirty Flamingo, Blushing Bride, Highland Heather, Pool Party, So Saffron, and Soft Sea Foam. Some hearts I used from one side and some from the other to get them going in different directions. The Country Bouquet Punch punches a large heart but also a smaller one at the bottom so I also got a collection of small hearts. That gave me the idea to fill in the spaces with small hearts! There still was some empty space that I thought could use something. I got out the matching Dark Stampin’ Blends and used the bullet tip to make three dots randomly around in the empty spaces. You wouldn’t have to do this step but it just added a little extra color.

I used a greeting in the Country Bouquet Stamp Set, which you can purchase as a Bundle with the Punch. It is stamped with Flirty Flamingo ink on Shimmery White. I diecut it with a banner die in the Stylish Shapes Dies. Then to have a little extra layer without covering too much of the card, I diecut the smaller banner and layered the greeting on top. The whole thing is popped up on Stampin’ Dimensionals.

And why not add a few Heart Pearls on the card with punched hearts all over it?! It’s almost always good to add a little bling or sparkle!

Hope you like this valentine idea that you can make easily with the Country Bouquet Punch!

SHOP STAMPIN’ UP! ONLINE!

Love Cats Valentine Card

Love Cats Valentine Card

This Love Cats Stamp Set in the Spring Mini is just a cute stamp set you should have! It’s just a basic stamp set – no dies, no matching designer paper, no ribbon, no anything else – just a stamp set for you to simply stamp and use your creativity to develop something as simple or as fancy as you want! Valentine’s Day will be here sooner than we can imagine so it’s time to get going on some Valentine cards although you could use these cat stamps for just regular cards, too!

This card has a Real Red card base (my favorite color!). The Basic White layer is stamped with cats in Smoky Slate ink. I would say “randomly” but since the stamp is pretty big, it was a little difficult to get the cats spread out all over the cardstock as I like to do with other smaller stamps for backgrounds. But this was the idea I had in my head so I went with it. When you do this, always fill in the edge spaces even with a partial stamp.

Next I stamped a cat in Smoky Slate on a scrap piece of Basic White and cut it out by hand to place somewhat how I have the cat on this card. But it didn’t stand out so I stamped another cat in Memento ink in black and I like that better. I actually placed him on the Basic White diecut circle so that his tail would align with the Smoky Slate tail stamped on the card front. You may or may not be able to do this, I wouldn’t worry about doing it, but for my card it didn’t look like an extra tail sticking out from the cat! The circle is die cut with one of the Stylish Shapes Dies and layered on a scalloped Layering Circles die in Real Red. I also very carefully inked up the three little hearts with a Real Red Stampin’ Write Marker and stamped those above the cat. This piece is popped up on Stampin’ Dimensionals after a piece of Real Red ribbon in the Real Red & Burlap Combo Pack in the Spring Mini.

For the greeting, I stamped one in the set in Real Red ink on a scrap of Basic White. I thought about diecutting it in some way, but decided to just cut each word apart and adhere it to the focal point with the cat.

I wasn’t quite sure what to do with the stamped gray hearts – just leave them as is or color them in or what. I decided to color in the small gray heart with the Real Red Stampin’ Write Marker and added a few freehand small hearts randomly. They were easy enough to draw myself! Not being one to leave well enough alone, I colored a few Iridescent Rhinestone Basic Jewels with a Dark Real Red Stampin’ Blend marker and placed three of those jewels in some of the empty spaces on the background.

This card may sound like a lot of steps but you already have the design to copy so you only have to make it! Here is another Love Cats card I made using designer paper that you may like. You still have time to order this stamp set and have it in time to make Valentines. Even if you are not a cat lover, this set is too cute! Enjoy!

SHOP HERE AT STAMPIN’ UP! ONLINE!

Country Floral Lane Hearts Valentine Card

Country Floral Lane Hearts Valentine Card

It’s less than a month until Valentine’s Day so I guess it is time to get busy making some cards! This Country Floral Lane Hearts Valentine Card is pretty easy to make! As usual, it turned out a little different than my original idea!

This card is made with products in the Country Floral Lane Suite. The card base is Sweet Sorbet, one of the coordinating colors in the designer papers in the Suite. The little strip of hearts on the left side of the card is a pattern in the Country Floral Lane 12″ x 12″ Designer Series Paper. I adhered it to the Basic White cardstock but didn’t adhere it to the card base until I added the ribbon first.

For the hearts, I intended to stamp different colors of hearts but then I grabbed the Country Bouquet Punch and punched out the bottom row of hearts and leaves on the designer paper. I decided not to use the leaves that punched out from the paper, just the hearts. The top and bottom hearts are popped up on Stampin’ Dimensionals and the middle one is adhered flat on the card front.

I did do some stamping with the pair of little hearts in Sweet Sorbet ink. After attaching the White 1/4″ Crinkled Seam Binding Ribbon to the card and tying on a bow, I adhered the card front to the card base. At first, I wasn’t sure how a greeting was going to fit on this card, but I stamped the “Happy Valentine’s Day” greeting in the Country Bouquet Stamp Set on an already die-cut banner from the Stylish Shapes Dies. It just fit! I adhered it with Stampin’ Dimensionals across the middle of the card. Then, yes, I had to add three Iridescent Rhinestone Jewels for a little sparkle!

There you have it, my first Valentine card of the year! It’s time to get started!

SHOP STAMPIN’ UP! ONLINE HERE!

Country Bouquet For You Card

Country Bouquet For You Card

Once again, the Stampin’ Up! catalog was the inspiration for this card. I noticed a sample on page 8 in the new Stampin’ Up! Spring Mini that is really a candy bar treat holder, but I made this Country Bouquet For You Card instead of a treat holder.

This card uses the two kinds of designer paper in the Country Floral Lane Suite plus the Country Bouquet Bundle. If you want it “all”, as they say, just order the Suite Collection (160390)! That saves you from entering all the product numbers!

The card base is Sweet Sorbet with a layer of the paper with tiny white hearts in the Country Floral Lane Designer Paper. Then I added a smaller layer of the Sweet Sorbet gingham pattern in the Country Gingham 6″ x 6″ Designer Series Paper. It is 2 7/8″ x 4 1/8″. To help it stand out a bit, I adhered that gingham paper to a layer of Basic White that is 3″ x 4 1/4″.

The heart and leaves in the Country Bouquet Stamp Set are stamped with Sweet Sorbet and Mint Macaron inks then punched with the new Country Bouquet Punch. You can purchase the stamp set and the punch in a Bundle and save 10%. You can swipe some green ink on a scrap of Basic White and then cut out a stem or just cut it out of cardstock. The heart and leaves are popped up on Stampin’ Dimensionals. The stem is adhered flat on the card.

The plain Basic White heart is just punched out and then stamped with a greeting in the Country Bouquet Stamp Set. This card could be a Valentine or it could just be an all-occasion card to send a happy greeting to a friend or loved one.

You can keep this card simple as is, or add some jewel embellishments of some kind or more hearts or whatever you like!

This Country Floral Lane can definitely be for Valentine’s Day but it can easily be for any cards. Check out this card I made on the first day of the Spring Mini.

Buy the Suite and add a little more and get TWO $50 Level free products during Sale-A-Bration or choose a special $100 Level free product! You will be all set for making valentines to send! Maybe instead of making a card like this Country Bouquet For You Card try making a treat holder like the sample in the catalog!

SHOP STAMPIN’ UP! ONLINE HERE!

Brand New! Love Treats Kit Collection

Love Treats Kit Collection

Send something sweet and thoughtful to those you care about with the new Love Treats Kit!

Available starting today, December 7, 2022, the Love Treats Kit is the best way to send something heartfelt to a friend! With 20 completely customizable treat packages, you can fill this season with love. The treat boxes are perfect for sending candy, a small note, or anything else that shows your appreciation. This kit also includes a unique love-themed stamp set, perfect for multiple projects this season! You get everything you need to make a homemade craft for those you love!

DETAILS

This month’s kit includes: 

  • 20 treat boxes measuring 3″ x 2″ x 15/16″ (7.6 x 5.08 x 2.3 cm)
  • One photopolymer love-themed stamp set
  • One Basic Gray Ink Spot
  • Different die-cut stickers with heart designs
  • Coordinating colors include Petal Pink and Soft Succulent
  • Building the 20 treat boxes takes less than 60 minutes to complete

Watch this video to see the kit in action!

This is not a Paper Pumpkin Kit. This kit is in the Stampin’ Up! Online Store under “Kits Collection”. Order a Kit on your regular Stampin’ Up! order. Get extras and make them with friends!

SHOP STAMPIN’ UP! ONLINE HERE!

Blessings of Home Floral Bouquet Valentine

Blessing of Home Floral Bouquet Valentine

Although this card has the title of Blessings of Home Floral Bouquet Valentine, it could be a valentine but it could be a wedding card, anniversary card, or engagement card. Change the greeting for a birthday or “thinking of you” card. Flowers can be for almost anything!

I actually wanted to make a card that could be a valentine without hearts like all the other ones I made. I chose this bouquet stamp in the Blessings of Home Stamp Set in the Spring Mini Catalog. I used my Stamparatus to stamp the image on Basic White because I wanted to make sure I got a good impression. As it turned out, it was okay but I re-stamped it which was easy to do with the Stamparatus just to make it a tiny bit darker.

I looked through the Heart & Home Designer Series Paper and decided on this green leafy background which I thought would look good against the bouquet of flowers. The card base turned out to be Melon Mambo cardstock after I colored the flowers. The first layer on the card base is Basic White embossed with the Pretty Flowers Embossing Folder. The designer paper is cut smaller so the embossing shows at least a little bit around the margins.

Can you guess what the flowers are colored with? Almost always I use Stampin’ Blends Markers, but I was in the mood for something different and tried the Watercolor Pencils! We have two different packages of Watercolor Pencils. I used some colors from both boxes. When you color with Watercolor Pencils, you likely will want to use a Blender Pen to smooth and blend the colors. You can actually just kind of scribble in some color and then use the Blender Pen, which is moist, to move the color around and smooth it out. You can’t work it too much or you will rub and moisten the Basic White paper too much. Just a light and quick touch are all you need. Watercolor Pencils always take me back to my early days in Stampin’ Up! when we used Watercolor Pencils a lot and I loved using them with the Blender Pen! Now we have more things for coloring and I think they get forgotten, but they are fun and easy to use.

Stampin' Up! Watercolor Pencils

The whole flower bouquet was die cut with one of the Flowers of Home Dies. You can purchase the stamp set and dies together in the Blessings of Home Bundle and save 10%.

The greeting is stamped in Melon Mambo ink and is from a stamp in the Blessings of Home Stamp Set. It is die cut with one of the Rectangle Stitched Dies. It fits just underneath the floral bouquet, which is popped up on Stampin’ Dimensionals®. For a little sparkle, I adhered three Iridescent Rhinestone Basic Jewels.

Whether you use this card for a Valentine or some other occasion, using the Blessings of Home Stamp Set will guarantee you a pretty card!

Stampin’ Up! Online Store HERE!

Sweet Talk 2-4-6-8 Valentine Gift Bag

Sweet Talk 2-4-6-8 Gift Bag

If you want a quick and easy little Valentine treat or gift bag, this Sweet Talk 2-4-6-8 Valentine Gift Bag is perfect and easy to make! It’s a great way to keep using that cute Sweet Talk Designer Series Paper for Valentine’s Day and even afterward for other occasions and projects.

Once you hear about and learn about stamping and papercrafting, you probably will pretty quickly learn how to make a 2-4-6-8 bag! It’s a basic thing that’s been around as long as I have been stamping! There are variations if you would like a different size so you can always change it up.

Cut a piece of designer paper or cardstock 8 1/2″ x 5 1/2″ for this sample. Score at 2″, 4″, 6″, and 8″. Then turn the paper lengthwise and score at 1 1/2″ to make the bottom flaps. If your paper has a pattern and direction to it, be sure you are scoring it so the images will not be upside down!

Sweet Talk Gift Bag Unassembled

Once the paper is scored, cut the bottom flaps apart with scissors. I like to angle my cut just a tiny bit, not cutting directly on the score line. Sometimes this helps the flaps fold together a little better without that extra paper. That last little 1 1/2″ x 1/2″ piece is cut off, as you can see in the photo above.

Here is a good diagram with all the lines marked.

Diagram 2-4-6-8 Box

Crease all the folds and see how the bag will go together. The adhesive will go on that 1/2″ area on the end. You can use Tear & Tape or Multipurpose Liquid Glue. The glue gives you a little maneuvering time if you need it! Just fold the opposite side over to the narrow flap where the adhesive goes and make sure you have everything straight. You can do this with the paper flat on the table. Then fold the flaps in at the bottom, using a little bit of adhesive where the paper flaps meet. I like to stick my Bone Folder (the rounded end, not the point) down inside the bag and press it around to make sure they are all adhered well.

After everything adheres well and your bag is assembled, pinch in the sides to bring the top together. Often I punch holes in the top through which to run my ribbon to hold it closed, but this time, I just wrapped some Real Red 3/8″ Mini Ruffled Ribbon tightly around the top. You can add a Mini Glue Dot to hold the ribbon in place if you need to. I tied a bow.

To decorate, I die cut a tag from the Sweet Hearts Dies and tied it onto the red ribbon with a bit of Linen Thread. I added a pink die cut heart to the tag and stamped a greeting on a narrow strip of Basic White cardstock. The greeting is from the Banner Year Stamp Set.

Once you know how to make a 2-4-6-8 bag (or box) you are ready to go! You can make them for any occasion, out of cardstock, stamped or unstamped, or designer paper. Decorate as you choose for the person or the occasion. Here is another Valentine 2-4-6-8 gift bag I made two years ago! You can search for other 2-4-6-8 bags on my blog. There are many!

You can even leave the top open and have it be like a box or make a little lid for it. So many choices. I hope this Sweet Talk 2-4-6-8 Valentine Gift Bag will give you ideas for what you can make yourself!

SHOP STAMPIN’ UP! ONLINE HERE!

Sweet Talk Little Envelope Valentine Card

Sweet Talk Little Envelope Valentine Card

I was still in the mood for making a few more valentines, and I got lucky designing this Sweet Talk Little Envelope Valentine Card. I might have thought it up myself, but it turned out the paper size just made this card into what it is! I planned to use my favorite sheet of paper in the Sweet Talk Designer Series Paper which is the top of this card with all the hearts. The other side of that paper is this purple stripe, which I used on this card in my previous post. As it turned out, when I cut my designer paper and cut the length at 5 1/4″, the piece that was left over on the length was this purple stripe piece! Instead of making the whole card front the hearts paper, I added the striped section at the bottom and I really liked it!

Usually, to cover the seam between two papers, I like to add some ribbon. On this card, I added the Real Red 3/8″ Mini Ruffled Ribbon and just tied on an extra piece in a knot, rather than a bow. I was keeping it simple! I adhered this piece to the Real Red card base.

Since there was a die cut that forms that little envelope lying on my table, I decided to just use it! The die in the Sweet Hearts Dies cuts out the envelope and also makes the score lines so all you have to do is fold it up! Add just tiny bits of glue when the paper is going to meet so you keep the envelope “open” if you want to stick in some hearts or something.

I adhered the envelope to the card and then found two cut-out hearts to insert. One is a conversation candy heart from the designer paper that is just cut out by hand and the red and white heart is cut out from the paper sheet with the candy box designs and little bitty hearts. I added a Rhinestone Basic Jewel to the front of the little envelope.

The greeting is stamped in Real Red ink from the Sweet Conversations Stamp Set just on a scrap strip of Basic White Cardstock. I flagged the ends just by cutting with my Paper Snips.

This was an easy card to make, and I say, when you come across a design you like or color combination, or paper combination, go for it! Make several! It was one of those days that after I made this card, I just started making a bunch of similar cards. Some had the same paper combination, some had a different focal point on the front….whatever I came up with! It was so much fun!

If you are still making valentines (or haven’t started yet!) just go for one basic style and as your creativity develops in the moment, change up the paper or the greeting or the embellishments or flip the card from vertical to horizontal. Just play and have fun!

SHOP STAMPIN’ UP! ONLINE HERE!

Nuts & Bolts Valentine For a Girl

Robot card IG

If you envisioned the Nuts & Bolts Stamp Set to be only for making cards for boys, I decided to be “woke” enough (LOL!) to think why not a Nuts & Bolts Valentine For a Girl! I certainly know girls and women work in the field of robotics and science, so why not use this stamp set and card designs for everyone?!

I got the idea for this card from one I saw online when I was looking for ideas. This Demonstrator, Angie Pyjas, made her card into a shadow box so at first, I passed it up, but then I realized I could just use her card for inspiration for a card front. I even simplified her design a little bit, but it was the striped purple paper and the punched hearts that caught my eye!

That striped paper is in the Sweet Talk Designer Series Paper that I love so much! As you can see, once Valentine’s Day is over, use the “other side” of the themed side of the papers which are more generic. You can use these stripes for anything! To go with the striped paper, I used Highland Heather for a card base with a layer of Basic White. The sample I was “copying” used a robot that was cut out and the hearts lower down. I thought I was going to copy that, but I found a scrap of this robot already stamped on a Layering Circle Die. I decided why not use that and see how everything fits?

The robot is colored in with Stampin’ Blends markers. I always get the gray colors mixed up so I don’t remember which ones I used, maybe all of them, plus some Basic Black. I wanted this robot to have a little “feminine” color to it, so instead of light pink, I used Flirty Flamingo that I thought might show up better. I just scribbled on some Flirty Flamingo here and there and blended it with one of the grays, maybe Light Smoky Slate. This robot initially had solid Flirty Flamingo “shoes” or feet but I blended those, too. The gear flower is colored with Highland Heather.

The greeting is stamped on Basic White and punched with one of the punches in the Heart Punch Pack and layered on a Highland Heather scalloped heart in the same punch pack.

I just played around with the placement of everything on the card front and decided the stamped circle would fit and look fine without cutting out the robot! Then I placed the hearts in the upper left of the circle. I added a tiny bow with the White 1/4″ Crinkled Seam Binding Ribbon. I also added some In Color 2021-23 Jewels for some bling. I think I need one more jewel on there so I have an odd number!

As you can see, this Nuts & Bolts Stamp Set is fun for everyone! I liked using this striped paper for a Valentine, but it could have been a birthday card instead of a valentine.

SHOP STAMPIN’ UP!

Nuts & Bolts Heart Robot Valentine

Nuts & Bolts Heart Robot Valentine

I just got this Nuts & Bolts Stamp Set recently in the Spring Mini Catalog and one of the first valentines I made was this Nuts & Bolts Heart Robot Valentine. This is just a cute stamp set that I couldn’t resist, plus something a little different. I only wish I had two elementary-age little boys who needed to make a pile of valentines for their class parties! Ah, the good old days!!

This little robot stamp set is cute and fun to work with! There are three robot stamps to choose from. You can stamp the robot in one color to match the card or stamp and then color it in with a variety of techniques. For this card, I stamped the robot holding a heart with Memento Ink and then colored him with several different Stampin’ Blends markers. I thought about using my Watercolor Pencils, though, for something different, but the Blends are hard to resist! I pulled out Gray Granite and Smoky Slate plus Basic Black and used probably all of them here and there. To add a little interest to the robot, I used some Pumpkin Pie orange for a little rust and blended it in. You could even use other fun colors for your robots!

I did cut the robot with one of the Layering Circles Dies plus the Real Red layer with one of the scalloped circle dies. I didn’t have a heart diecut the right size so I just used circles!

The card base is Basic Gray with a layer of Real Red. The top layer is Basic White. I stamped the X and O in the Sweet Conversations Stamp Set all across the white cardstock, making my own designer paper! I love to stamp like that! I used one of the lighter grays.

The sentiment is in the stamp set, of course. I happened to have a strip of Basic White that was just the right width, then I trimmed the ends and punched the banner ends with the Tailored Tag Punch. You can use the top point of that tag to make those flagged ends. Really easy!

AFTER I adhered the saying to the card, I decided it didn’t stand out enough so I took my Real Red Stampin’ Blend marker and drew on the edge of that greeting! Pretty risky but it worked! I didn’t mess it up! Since we were talking about nuts & bolts, I used two gold Gilded Gems on each end of the greeting. I think they kind of go with the robot!

Check out the photo below for the rare peek inside the card! I added a Basic White layer stamped with another of the Nuts & Bolts sentiments in the set and another robot. This robot I didn’t color in, just stamped in one of the gray inks. Since I tried stamping the two little hearts and got an extra ink line off to the side, I had to fix it. I simply covered the boo boo with some die cut hearts from the Sweet Hearts Dies! There are no mistakes in stamping!

Nuts & Bolts Heart Robot Valentine Inside

You still might have time to order this Nuts & Bolts Stamp Set or anything else you need for making valentines, but if you don’t get it in time, you can use these cute robots for birthdays or other fun cards!

SHOP STAMPIN’ UP! ONLINE!

Sweet Talk Conversation Hearts Valentine

Sweet Talk Conversation Hearts Valentine

It’s time to be busy making valentines to send or give out! Valentine’s Day is coming up in about ten days so here is an idea you can use, the Sweet Talk Conversation Hearts Valentine. This is a fairly simple card to make if you like to do some embossing and diecutting.

The card base is Highland Heather, one of the coordinating colors with the Sweet Talk Designer Series Paper. It has a layer of Petal Pink cardstock that is embossed with the Gingham Embossing Folder. I can’t say that this looks like a “gingham” design, but whatever it is, it is fine and makes for a good textured background with no special theme so you can use it on almost anything.

For the focal point of this card, I used one of the Heart & Home Doilies but turned it over to the “other” side, which is white. Maybe not as white as our Basic White cardstock, but not the colored side. So you can get double use out this pack of doilies that have three colors in the package. Underneath the doily, I added a strip of the cute Sweet Talk DSP, the pattern with the conversation hearts, like the popular candy.

In the center of the doily, I found a Layering Circle die that fit in the center for a contrasting background. The cute little envelope is a diecut from the Sweet Hearts Dies. It even makes the score lines for you so it is easy to fold and assemble.

The conversation hearts are cut out from one of the sheets in the Sweet Talk DSP. You could also stamp them with the Sweet Conversations Stamp Set. You can diecut the hearts from the paper or just trim them by hand as I did. Sometimes that is quicker and easier. I just cut out an assortment and placed a couple as if they were inside the envelope and the rest scattered around. I let the hearts act as the greeting on the card and I can still stamp “Happy Valentine’s Day” inside the card. For some sparkle, I added several Champagne Rhinestone Basic Jewels. I have found these rhinestones to be very versatile to use on lots of cards. The color and sparkle goes with a lot of other colors and designs.

On the inside of the card, put a layer of Basic White so you have a lighter place to stamp or write a message. Stamp a few hearts inside or adhere some of the little conversation hearts! Something like that is always a nice surprise for the recipient! Try this Sweet Talk Conversation Hearts Valentine and if you don’t own the paper, just cut plain hearts out of your cardstock and make some similar design!

SHOP STAMPIN’ UP! AND SALE-A-BRATION!