Easter Bunny Happy Easter Card

Easter Bunny Happy Easter Card

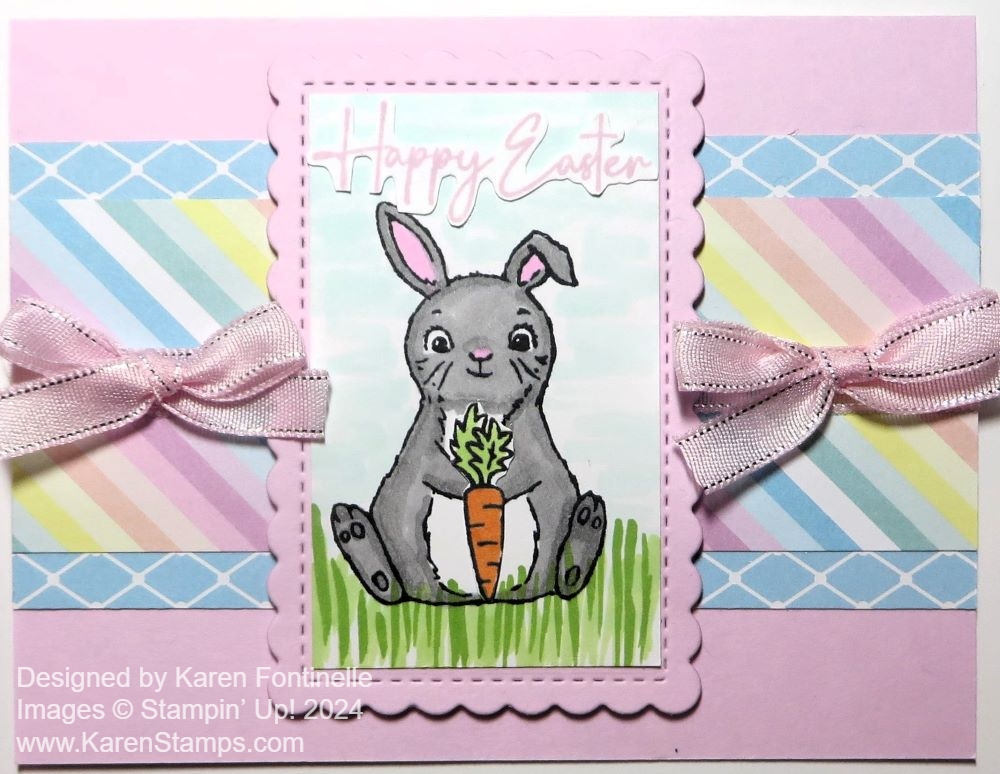
I’ve been into Bubble Bath the last few days and I can’t say I was before now, but I guess it is a good color for Easter! I didn’t even have a grand plan for making this Easter Bunny Happy Easter Card but it just came together when I already had the package of Bubble Bath cardstock out along with the Lighter Than Air 6″ xx 6″ Designer Series Paper. Since this paper got lost in my stash for a while, I have missed out on using it on other spring cards. The colors are so pretty and it’s not all about hot air balloons!

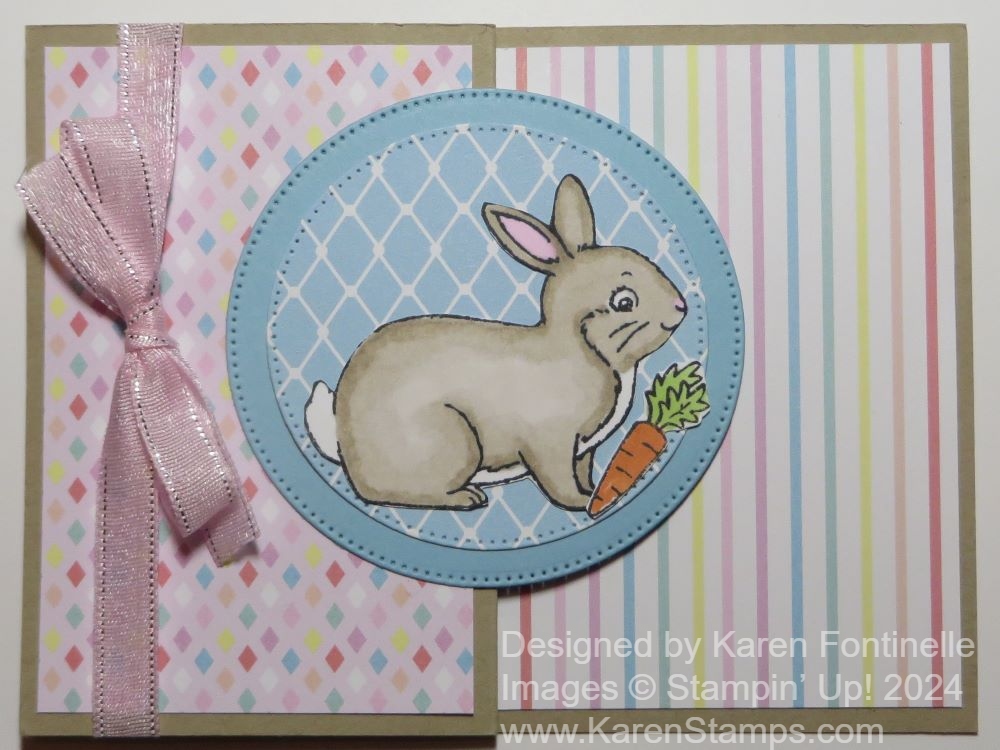
The card base is Bubble Bath, a very soft pretty pink. At times it looks like it has a purple tone to it. I simply took a strip of the diagonally striped designer series paper and laid it across the card. Then I saw that the Balmy Blue pattern would look good with the stripes at the top and bottom. The striped pattern is cut at 5 1/2″ x 2″. The blue strips are about 3/4″ inches wide and 5 1/2″ long. That gives you space for glue to adhere the blue pattern to the top and bottom of the striped paper with about 3/8″ showing. If you remember to tie some ribbon around the striped pattern before adhering to the card base, then you won’t have to adhere it down and cut off the ends on the edge of the card! On the other hand, now that I look at it, once I adhered the two bows to each side of the bunny, you can’t see the ribbon anyway! If you copy this and put bows on each side, you don’t need a ribbon going across the center of the card! The ribbon is the Bubble Bath color in the 3/8″ Sheer Ribbon Combo Pack.

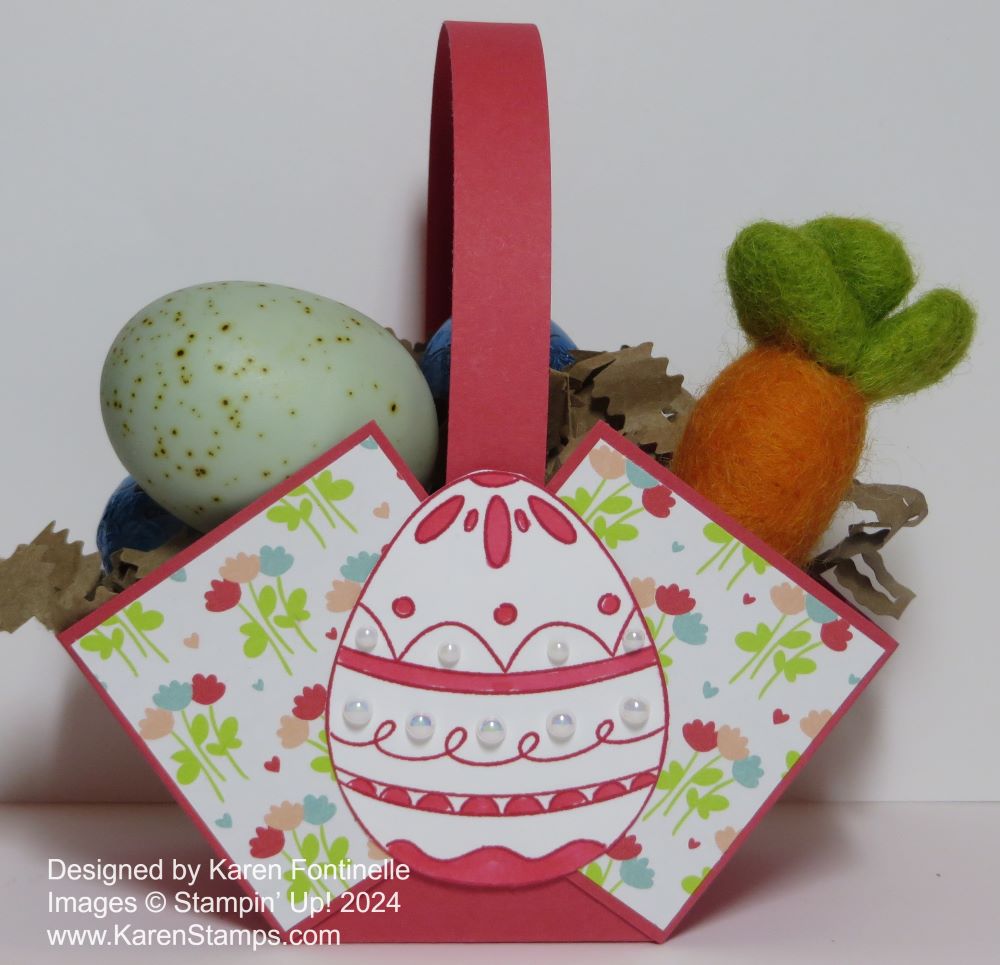
For the focal point of the card, I cut a scalloped rectangle in Bubble Bath pink with the Scalloped Contour Dies. By hand, I cut a Basic White rectangle to ft inside the scalloped rectangle. It’s a “smidge” less than 2″ wide and 3 1/4″ long.

On this Basic White piece, I stamped one of the bunnies in the Easter Bunny Stamp Set and colored him in with gray Stampin’ Blends (I think I used Smoky Slate.) and Bubble Bath pink for the inside of his ears. For the background, I just used a Pool Party Stampin’ Blend marker to just scribble in some blue-like sky. The carrot is stamped, colored, and cut out. I thought the bunny needed to be sitting in the grass, so I just lightly drew in blades of grass with the Light and Dark Granny Apple Green Stampin’ Blend Markers. This piece is popped up with Stampin’ Dimensionals.

There wasn’t much room for the greeting but I solved that problem! I stamped “Happy Easter” from the Excellent Eggs Stamp Set in Bubble Bath ink on Basic White. Then I just fussy-cut around the letters without trying to be perfect and adhered it to the card with tiny dots of Multipurpose Liquid Glue.

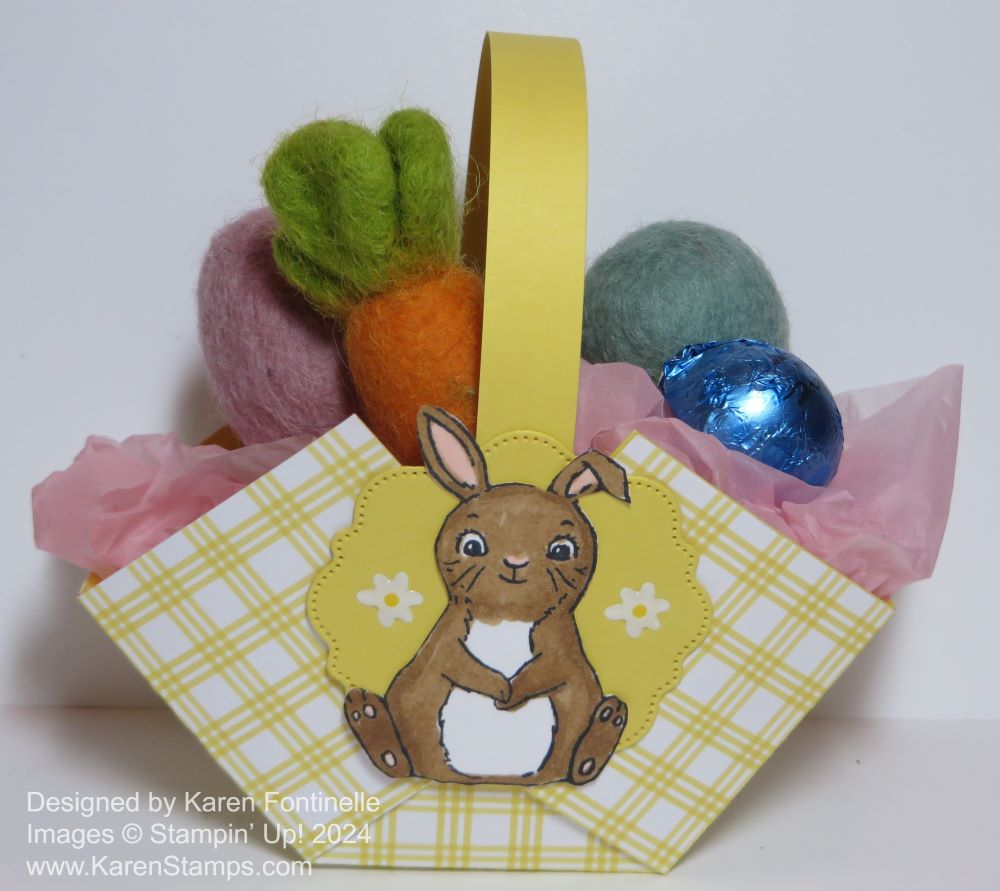
If you’d like to see another card I made last spring with the bunny and LOTS of carrots from the Easter Bunny Stamp Set, click HERE.

Both of those Easter/Spring stamp sets will be retiring in April. The Easter Bunny Stamp set will be discounted at 50% off starting April 9th. The pretty ribbon combo will also be discounted at 30% off. Be sure to check out the bargains on April 9th, but if there are products you really really want, it might be best to buy them right now lest they sell out!

SHOP STAMPIN’ UP! ONLINE HERE!

Easter Bunny Z-Fold Easter Card

Easter Bunny Z-Fold Easter Card

I often say Z-Fold cards are so easy to make yet look exceptional and special to the recipient! This Easter Bunny Z-Fold Easter Card was fun and easy to make with the Easter Bunny Stamp Set and Lighter Than Air 6″ x 6″ Designer Series Paper. My package of paper had gotten lost, and pushed to the back, and I often forget to use the 6″ x 6″ paper. However, when I found it and looked at it, I saw that the colors and patterns were perfect for Easter and spring cards! This paper will retire April 30 along with other Spring Mini Catalog products.

The card base is Crumb Cake and was cut at 4 1/4″ x 11″. Instead of cutting horizontally across a sheet of cardstock, it was cut vertically. I decided to put the fold on the side of the card and make it into a Z-Fold card. To make a Z-Fold card just fold the front of the card back on itself. Score the front of the card in the center vertically, then fold the right half back, essentially making a Z shape if you look down on the upright card.

To decorate the card I used the Lighter Than Air Designer Paper. The panel on the left is 4 1/4″ x 5 1/2″so I cut the designer paper at 4″ x 2 3/4″. The striped paper was also cute, so I cut that for the inside of the card at 4″ x 5 1/4″. I also added to the inside left panel the same designer paper that you see on the circle under the bunny.

Easter Bunny Z-Fold Easter Card Open

For the focal point of the card, I stamped a bunny from the Easter Bunny Stamp Set. This stamp set is so cute and useful for springtime cards, Easter, baby, and maybe animal cards for little children. It will be retiring from the Stampin’ Up! Annual Catalog by the end of April and beginning April 9th will be discounted 50%! There is also a coordinating Easter Bunny Punch, also retiring and will be discounted by 20%. The bunny was colored with Stampin’ Blends alcohol markers (Light and Dark Crumb Cake plus Bubble Bath pink for the ear) as well as the little carrot in the stamp set.

The diecut circles are the largest and the next smaller circle dies in the Stylish Shapes Dies. The smaller one is the Lighter Than Air DSP and the background circle is Balmy Blue cardstock. When you adhere a shape to the front of a Z-Fold card, be sure to only put adhesive on the half that attaches to the card front on the fold and not to the inside of the card.

On the inside, I diecut a Basic White circle with the largest Stylish Shapes circle die so that it would fit perfectly underneath the front Balmy Blue circle. You want it hidden underneath the front of the card so it is a little tricky to get it positioned perfectly. To do this, put adhesive on the back of the inside piece, and with the card open, place it face down over that front piece. Then carefully close the card so the inside piece will adhere to the inside of the card, lined up with the front of the card so it will not be seen.

The inside of the card is stamped with “Happy Easter” in Memento ink. I had already stamped and cut out the three Easter eggs to possibly use on the front of the card, but instead, I used them inside the card. It would have been easier to stamp them on the inside rather than cut them out!

For an embellishment, I tied a Bubble Bath pink ribbon and bow just around the front folded panel. This ribbon is part of the 3/8″ Sheer Ribbon Combo Pack. The other two colors are Azure Afternoon and Lemon Lolly. This ribbon will be retiring and will be discounted at 30%. I could have added a greeting on the front of the card also, but there wasn’t very much room for one and I had the main one on the inside. You could also add some sequins or gems to the card.

Check out this Easter Bunny Stamp Set, Easter Bunny Punch, and ribbon when they go on sale on April 9th plus the other retiring products from the Annual Catalog and the Spring Mini. Here are the lists of Last Chance Products. Also, if you need any Stampin’ Blend markers (check yours for any brush tips that don’t work very well anymore if you use them a lot and you might want to replace them) the price will be going up $1.00 per Combo in the new Annual Catalog.

Last Chance Products Spring Mini Catalog 2024

Last Chance Products Annual Catalog 2023-2024

Excellent Eggs Easter Treat Card

Excellent Eggs Easter Treat Card

This Excellent Eggs Easter Treat Card is one of those cards that I came up with so easily and I like it! The egg was already colored in and cut out from another stamping session where I must have made extras to use another time. Since it would be by itself, I thought it needed a smaller card. First I thought of 3″ x 3″ but if I were to mail it, 4″ x 4″ would fit in a regular-size envelope.

The card base is a 4″ x 8″ piece of Fresh Freesia cardstock to match the egg folded in half to make a 4″ x 4″ card. You can have the fold at the top or the side, as with any card. Mine is at the top. After I decided on Basic White for the background behind the Easter egg, it looked too blah so I embossed it! I used the Cane Weave 3D Embossing Folder for this 3″ x 3″ square of Basic White. After some deliberation, I layered a Bubble Bath piece of cardstock, cut at 3 1/4″ x 3 1/4″ underneath the embossed cardstock. That color of pink goes well with the Fresh Freesia since the Bubble Bath had purple tones in it.

After seeing where the egg would go, and finding that I did have some Bubble Bath ribbon in the 3/8″ Sheer Ribbon Combo Pack (which is retiring in April and will be 30% off!), I wrapped and adhered the ribbon around the white embossed layer to go behind the egg. After that I could adhere the white piece to the Bubble Bath layer and then onto the Fresh Freesia card base.

The Easter egg is stamped with Memento Ink from the Excellent Eggs Stamp Set in the Spring Mini. This stamp set will be retiring in April. I colored in the background of the egg with Fresh Freesia Stampin’ Blends, left the bunnies white, colored in the stones gray, and colored in a few pink flowers with green leaves. Use whatever color of Blends or markers to color your egg. The egg is popped up with Stampin’ Dimensionals over the ribbon. I also added two knots on each side of the egg with the ribbon. The little silver thread along the sides of the ribbon really adds a little sparkle to the card!

For the greeting, I stamped this one in Fresh Freesia ink from the Easter Bunny Stamp Set in the Annual Catalog. This stamp set is going to retire at 50% off in April which is a fantastic deal if you need some bunnies in your collection! Three different bunnies, a carrot, a butterfly, Easter eggs, flowers…everything you could need for cards even other than Easter. Bunnies always make cute baby cards! I stamped the greeting on a narrow scrap of Basic White, then flagged the ends and it fit perfectly on this small card!

You still have a little time to make a few Easter cards, especially if you aren’t going to mail them or if the recipient doesn’t live too far away! Who knows with the post office these days?

Two Little Easter Baskets For You

Easter Bunny Plaid Easter Basket

Next weekend is Easter, believe it or not! If you need some little Easter baskets for a little treat for someone, a dinner table favor, or just a little home decor, try this basic easy basket patterns! Decorate however you like once you know the way to make the basket!

I used the same pattern for both baskets. Just start with a 6″ x 6″ square piece of paper and score like a tic tac toe. Score at 2″ and 4″, then turn and score at 2″ and 4″. Cut on the two vertical score lines up to the horizontal score line. Do the same on the opposite side. See the diagram below. Cut a handle of about 8 1/2″ x 1/2″.

Easter Basket Pattern

Crease and fold all score lines. If you like, round all four corners. Or you can leave them as is. Form the paper into a basket and use brads or glue to hold the sides and handle together. The handle goes in between the two side flaps and the center flap. That hides it a little bit on the inside. (If you think of it ahead of time! Or it can just be glued to the inside of the basket.)

Decorate the basket with designer series paper or stamping or whatever you like.

For the basket in the photo at the top I cut a 6″ x 6″ piece of Daffodil Delight cardstock and the plaid pattern in the Bee Mine Designer Series Paper. I glued them together so the whole front of the basket would have the yellow plaid design.

After assembling the basket, I stamped a bunny in the Easter Bunny Stamp Set (retiring soon!) and colored in with Stampin’ Blends. For the bunny, I used Light Pecan Pie and Petal Pink for the ears. I cut out the bunny and layered him on a diecut from the Thoughtful Expressions Dies. It’s cute-shaped label with a stitched look around the edge. It will retire soon also. I also added two of the Adhesive-Backed Hearts & Flowers Embellishments.

Excellent Eggs Sweet Sorbet Easter Basket

For this basket I used Sweet Sorbet cardstock, but added the cute little flowered paper in the Bee Mine Designer Series Paper cut in squares to decorate each side, front and back. Since each square is 2″ x 2″, I cut the DSP at 1 7/8″ x 1 7/8″ .

The Easter egg is in the Excellent Eggs Stamp Set (retiring) and to keep it all simple, I stamped it with Sweet Sorbet ink, then colored in just parts of the egg with the Light Sweet Sorbet Stampin’ Blend marker. I cut out the egg by hand, although there are dies if you like. After adhering it to the basket, I added some Iridescent Pearl Basic Jewels in two different sizes. Very easy!

If you want to check out some other baskets I have made, look HERE and HERE.

You will be surprised at how easy these little baskets are to make. You can make them for other occasions, not just Easter or spring!

SHOP STAMPIN’ UP!

Get My Stamping With Karen Newsletter!

Red Mailbox for Mailing List Sign Up

Have you signed up for my Stamping With Karen Mailing List yet? If you like visiting my blog or if this is your first time here, please join us by signing up in the Mailing List Sign Up Box! It’s the red box over on the top right side of my blog or perhaps at the bottom of this post if you are on your phone. You will receive an email newsletter on the first Tuesday of each month with the latest Stampin’ Up! news and any special offers, plus at least one tutorial for a card or another project or tip.  

Each following Tuesday I send an email, again with some stamping idea or a review of some projects I have recently had on my blog, plus any news or reminders. Stampin’ Up! updates us on Tuesday mornings with any news or special offers, so Tuesday is a good time to get in touch with you!

If you like getting new ideas for stamping, then this is for you! These projects are exclusive to my newsletter. I don’t post them on my blog or online.

We’re a long way from Christmas, but when fall rolls around I begin sending my subscribers an extra email each week with an exclusive holiday project inside!  We start with cards, move on to gift ideas, and end up with tags and bags! Only my subscribers receive these newsletters each week leading up to the holidays so make sure YOU are signed up! And tell your friends! It’s something extra I like to do for my email subscribers as a thank you to them.

No obligation, of course!  As with any email, just unsubscribe it if it is not for you.

You can also follow me on my Stamping With Karen Facebook page HERE and follow me on Instagram @stampingwithkaren.

Keep on top of all things Stampin’ Up! and learn ways to use those great products in your papercrafting!  Sign up in the Mailing List sign-up box in the upper right corner of my blog or in the pop-up box! If you are on your phone, the red signup box may be at the bottom of this post.

Here is a link to sign up also. See you on Tuesday!

Cheerful Daisies Birthday Card

Cheerful Daisy Birthday Card

It’s been quite a while since I have used this daisy set, but I got the idea to make this Cheerful Daisies Birthday Card since it looked so springlike! I love the background paper in any case and putting a daisy on the front seemed like the right thing to do!

The card base is Basic White Cardstock with a layer of Daffodil Delight and then the layer of the Bee Mine Designer Series Paper in the Spring Mini Catalog. This paper will be retiring April 30. This pattern, with the Sweet Sorbet background with tiny little white daisies, is nice because there are no hearts or bees so it is easy to use. And I love the color, Sweet Sorbet, which is also retiring. Sad to see that one go! You wouldn’t have to add the Daffodil Delight layer under the designer paper. I just thought it brightened everything up even more by bringing in the yellow in the daisy centers on the paper.

I used the Cheerful Daisies Dies to cut out two pieces to layer to make up the one large daisy with a Daffodil Delight center. The leaves are Granny Apple Green Cardstock and are attached to a collection of different daisies. I just used a portion of that die on the Granny Apple Green Cardstock to cut out the leaves and stems. I decided to leave in the cutout veins of the leaves since I didn’t want the background paper to show through.

There was another die, too, that cut out that very fine foliage piece. It would be good to think ahead and use Adhesive Sheets before die-cutting very delicate pieces like that foliage. Then you wouldn’t have to try to put the tiniest drops of glue on the back of the stems.

After gluing the two layers of daisies together, I popped that daisy up with Stampin’ Dimensionals in the bottom corner of the card and adhered the leaves and foliage underneath.

The greeting is in the Cheerful Daisies Stamp Set. I stamped it in Sweet Sorbet ink and used the label die in the Cheerful Daisies Dies to cut it out. I think it fits perfectly in the space on my card. Sometimes you design a card and then don’t quite know where to put the greeting! I also added three of the Iridescent Foil Gems, two to the greeting and one farther down on the card. I love adding those little embellishments and had to stop myself from adding a couple more!

I’m happy to see that this Cheerful Daisies Bundle of stamp set and dies is in the new Annual Catalog, but not as a Bundle any more. Stampin’ Up! retires Bundles although the pieces of the Bundle may still appear separately. What this means is, in the new Stampin’ Up! Annual Catalog you will still be able to buy the stamp set and you will be able to buy the dies, but you will not save 10% buying the Bundle unless you purchase the Bundle by April 30 when the current Annual Catalog retires!

Also, even though the cute Bee Mine Designer Series Paper that I used is retiring, the Bee Mine Stamp Set and Bee Builder Punch are carrying over into the new Annual Catalog, but again, not as a Bundle. I’m happy we can continue to use that fun punch!

Remember, the 2022-2024 In Colors and all their papers and accessories are retiring so if you need any of those colors, be sure to stock up. I wish they weren’t retiring as I like those better than the ones we got last year! But we will be excited for the next new In Colors!

Check my blog post HERE for the retiring lists of products in the Spring Mini and the outgoing Annual Catalog!

SHOP STAMPIN’ UP!

A Card For the First Day of Spring

Delightful Floral Let's Celebrate Card

Today is the first day of Spring 2024 and I think this card works well to celebrate! I hadn’t used this paper in a while but I loved the beautiful flowers! I started off thinking I would make a card with a solid background, a white daisy, and a butterfly. This is what developed instead! You never know where your creativity will take you, especially with the beautiful papers Stampin’ Up! provides us!

The card base is Bubble Bath and has a fold at the top for a change. The designer paper is Delightful Floral which you can find in the Online Exclusives. I had forgotten where it came from but it wasn’t in the Annual Catalog! I’ve always loved the pretty flowers and even the small floral prints in this paper.

I used a small floral print for the front layer of the card. The Deckled Circle diecut of designer paper was already cut out in the package of paper and it worked on this card. I found a group of flowers I liked and fussy-cut them with my Paper Snips. They are popped up with Stampin’ Dimensionals and adhered over the circle.

The greeting is stamped with the Sentimental Park Stamp Set in Berry Burst ink. I really like the font with this card. I stamped it on a scrap strip of Basic White and then I just flagged the left side.

The butterfly is from the Paper Butterfly Accents package. These are several different styles of butterflies which can be colored with ink or markers or left white. For this butterfly, I used a Small Blending Brush and Highland Heather ink. The butterfly’s body I colored with a black marker. It is adhered with Multipurpose Liquid Glue.

For some sparkle to celebrate the first day of Spring, I used several Iridescent Foil Gems across the front of the card.

You could change up this card in a variety of ways. Maybe use a more solid color of designer paper in the background. Use some Vellum behind the flowers or use more flowers. Once you get the designer paper out, your mind will start creating!

Happy Spring!

Stampin’ Up! Retiring Lists Posted!

Last Chance Products April 2024

They are here! The lists of Last Chance Products retiring from both the Stampin’ Up! Annual Catalog and the Spring Mini (Jan – April 2024 Mini Catalog) are here! It’s a shame to see some favorites go, but there are always new products on the horizon!

From April 9-30, you can stock up on your favorite products and save up to 60% on essential craft supplies! NOT ALL PRODUCTS WILL BE DISCOUNTED! A selection of Last Chance Products will only be available while supplies last.

Put on your reading glasses or zoom in to read these lists. The print is always tiny.  

Stampin' Up! Annual Catalog 2023
Click Catalog for List

Click HERE for Annual Catalog Last Chance Products

Spring Mini 2024 Catalog Cover
Click Catalog for List

Click HERE for Mini Catalog Last Chance Products

I’ll leave you with that today!

It’s March 18th! Catalog Last Chance Lists!

March 18 on Calendar

It’s That Time Again!

It’s impossible to believe we are at this point in the year! Time flies when we are having fun stamping and savoring our Stampin’ Up! catalogs! But it is time for a new Stampin’ Up! Annual Catalog (almost!) and the January-April 2024 Mini Catalog (Spring Mini) is getting close to going out. The Stampin’ Up! Annual 2023-2024 Catalog will retire April 30, 2024 and the Spring Mini as well!

That means that Stampin’ Up! will release the Last Chance Lists for both catalogs today at 1:00 PM MT (Stampin’ Up! time!). Demonstrators will be able to view the upcoming Annual Catalog online today also, so the Stampin’ Up! website will be buzzing with excitement!

3:00 PM Eastern Time

2:00 PM Central Time

1:00 PM Mountain Time

Noon Pacific Time

When I get the Last Chance Lists I will post them here. Hang on! Products will be available while supplies last once these lists hit the streets! You can order in the morning if you want to beat the rush and get whatever you’ve got to have before the crowd rushes in!

Stampin' Up! Annual Catalog 2023

Spring Mini 2024 Catalog Cover

Oldies But Goodies For St. Patrick’s Day!

A Fun St. Patrick's Day Card Idea

This is an oldie but goodie for St. Patrick’s Day! I thought maybe you’d enjoy seeing some past projects for St. Patrick’s Day that you can make with something you already have in your stash or substitute something new to update it!

This first card at the top is made with the fabulously popular Owl Punch from at least seven years ago! If you were around then and have the Owl Punch you know how many things creative people came up with to make with it, such as this little leprechaun! Click the photo or click HERE to go to that blog post.

St. Patrick's Day Gift Bag and Tag

This little gift bag and tag would be easy to duplicate with current products. Just make a little 2-4-6-8 bag and then a tag. Make a black pot with whatever you have and add some gold sequins for gold coins!

St. Patrick's Day Bloomin' Love Heart Card

This card I made with the beautiful Bloomin’ Heart Thinlit Die back in 2016! That’s going back aways to when we had “thinlit” dies! I loved this die, though, and it was great for wedding cards and other occasions, especially if we made it with glimmer paper. This one I colored with green ink (Cucumber Crush! Remember that?) and an Aqua Painter. If you don’t have this thinlit, cut out your own paper heart in green and decorate with a few flowers for a nice St. Pat’s card.

St. Patrick's Day Glittery Shamrocks Card

This is an easy St. Patrick’s Day card to duplicate! Just cut out or punch out some hearts and a stem to make shamrocks and put a happy greeting on it. Do a little splattering with ink or markers.

If you are Irish or just celebrating anyway,

have a Happy St. Patrick’s Day!

Heartfelt Hexagon St. Patrick’s Day Card

Heartfelt Hexagon St. Patrick's Day Card

If you want to make a St. Patrick’s Day card for someone, this Heartfelt Hexagon St. Patrick’s Day Card shows you how to make one with what you have! I wanted to make a St. Patrick’s Day card but wasn’t quite sure what to use. I knew hearts made good shamrocks. One of the first stamp sets I came across was the Heartfelt Hexagon, and it had a little heart stamp in it! At that point, I decided to make my own designer series paper for the card!

The card base is Granny Apple Green cardstock. The “designer paper” layer is Basic White stamped randomly all over with hearts and pretty foliage! First I used the little hearts to stamp with Granny Apple Green ink all over the card, going in different directions. I left some spaces because I knew the greeting would cover up some space anyway. When you are doing random stamping like this, be sure you stamp off the edges and maybe the corners. You don’t usually need every image to be fully on the card. To make the shamrock after stamping the hearts, I just drew in a little stem with the Dark Granny Apple Green Stampin’ Blend Marker.

Then I took a chance and stamped the foliage sprig in the Heartfelt Hexagon Stamp Set as best I could fit it in between all the hearts. I think it’s because the foliage stamp is so delicate it fits in fine and adds more green for St. Patrick’s Day!

The greeting is stamped from the Heartfelt Hexagon Stamp Set. I stamped the border first on both Basic White and Granny Apple Green, and then the greeting in the center of the Basic White. I punched out both with the Heartfelt Hexagon Punch. If you don’t have this punch, just use whatever punch or die works for you. Or just cut out your own square or rectangle. I cut the Granny Apple Green hexagon piece in half horizontally to place under the top and bottom of the greeting piece to look like a layer to set it off a little from the rest of the card. After that was all layered, I popped up the greeting with Dimensionals.

After gluing everything down, I got the idea to use the Gold & Vanilla 3/8″ Satin Edged Ribbon underneath the greeting. Luckily the greeting was already popped up so I could slide a piece of ribbon underneath and flagged the ends. I was able to stick a Dimensional under each side to hold the ribbon down.

Since gold goes with St. Patrick’s Day, besides the ribbon, I also added some Pastel Adhesive-Backed Sequins in gold around the card.

Here’s another way to make a St. Patrick’s Day card with hearts from a little while back!

Happy St. Patrick’s Day March 17th!

Flowering Zinnias Thank You Card

Flowering Zinnias Thank You Card

On this card, I used both sides of the Flowering Zinnias Designer Series Paper to show how beautiful these papers are and how you can use just a small floral piece and still have a bright and cheerful card. This Flowering Zinnias Thank You Card could be used for many occasions by just changing the greeting!

The card base is Lemon Lime Twist, a color I don’t think I have used all that often but it sure is pretty on this card. The layered designer paper is cut at 5 1/4″ x 4″ as usual. If you turn this pretty lattice design over, you get the colorful zinnias!

For the focal point of the card, I cut a piece of the zinnias paper at 1 3/4″ x 3 1/4″. This size fit perfectly inside the Everyday Details Diecut. The holes around the border make for a new look than we’ve had. To help those holes show up, I cut a piece of Basic White cardstock that was the same size as the Lemon Lime Twist diecut piece. You can cut it a smidge smaller on all sides so nothing hangs out from under the Lemon Lime Twist piece or make sure you trim it with scissors if it does. This Basic White piece that I cut is 2 1/4″ x 3 1/4″.

The greeting is in the Simply Zinnia Stamp Set in Lemon Lime Twist ink. Then it is diecut with the smallest label in the Everyday Details Dies. That die is the perfect size for many greetings that we use! As I write this, those dies are unavailable but will be back in stock the week of March 25. They must be popular!

The center panel with the zinnias is popped up on Stampin’ Dimensionals or you could adhere it flat to the card. Then the greeting has Dimensionals under the right side but the left side is adhered flat to the zinnias.

For some embellishment, I tied a double bow with the Lemon Lolly twine in the Baker’s Twine Three Color Pack. I also used a few Lemon Lolly gems in the Adhesive-Backed Solid Gems.

I’m sure you won’t be disappointed with this Flowering Zinnias Designer Series Paper, even if you already have lots of flowers! Remember, you will find the whole Flowering Zinnias Suite Collection in the Online Exclusives!

SHOP STAMPIN’ UP! ONLINE HERE!

Get the April Paper Pumpkin Kit!

Paper Pumpkin April 2024 Kit Delicate Wings

Most everyone loves butterflies so this Paper Pumpkin Kit will be loved by most everyone! It’s time to tell you about the April Paper Pumpkin Kit and the Add-On dies that work for three months’ worth of kits!  Paper Pumpkin is the papercrafting kit that comes to you in the mail once a month!  I say it’s a gift you give yourself….or maybe even others, especially if you would like to craft with a family member or friend!

This April Kit is called Delicate Wings. Send elegant words of encouragement and support to those you love.  The photo above I can tell you is one card design with a pop-up butterfly and champagne foil behind it. It’s very elegant looking! Lots of champagne foil in this kit!

Kit Details:
· Makes 9 cards: 3 each of 3 designs with 9 coordinating envelopes
· Precut paper pieces and butterfly designs
· Champagne foil images, sentiments, and labels
· Coordinating colors: Lost Lagoon, Moody Mauve, Basic Beige, Basic Gray (Classic Stampin’ Spot), Basic Black, champagne foil
· Partial pop-ups to make your cards shine!


Express your gratitude and add something special to each of your crafting projects with the Thanks & Beyond Dies! Cut out a butterfly outline and a separate detailed piece that nests inside to create a partial pop-up feature. You can also add the sentiment to any card front or use the hexagon label for whatever you need. We love how these dies offer more options to not only April, May, and June Paper Pumpkin kits but also any other crafting projects. 

The Add-on details:
· Item number: 164397
· Name: Thanks & Beyond Dies
· Price: $12.00 USD
· Availability: available for purchase on the online store starting March 11 and while supplies last.
· Includes: 4 dies

Paper Pumpkin Add-Ons Apr May June 2024

Subscribe to Paper Pumpkin TODAY so you’ll be all set by April!

A Little Latte Hello There Card

A Little Latte Hello There Card

If you are a coffee lover I know you will want some or all of the products in the A Little Latte Suite Collection, especially the A Little Latte Designer Series Paper I would say! This A Little Latte Hello There Card was made with the designer paper plus one stamped greeting from the Latte Love Stamp Set.

This card is easy to make! The card base is Early Espresso cardstock although you could probably use Pecan Pie instead if you liked it a little lighter. I added a layer of Calypso Coral to brighten it up. The designer paper layer I thought was fun for a background – coffee rings!! The colorful cups with their foam designs on top were just fussy-cut out of the designer paper pattern of cups. They are easy to cut out so no worries!

The greeting is stamped with Early Espresso ink and is in the Latte Love Stamp Set. It’s a little dark for me but it’s okay. I already had this diecut from the Everyday Details Dies in my Basic White cardstock so I used it. I’ve used it a lot lately, but it’s a good size, very handy! Once I knew where I wanted to place it on my card, I stagged the coffee cups around. The middle one is popped up on Stampin’ Dimensionals.

Fortunately, I remembered I had purchased the Adhesive-Backed Swirl Dots in the Suite. They come in three colors: Pecan Pie, Petal Pink, and White. Sticking on some little embellishment on a card is always a fun finishing touch!

Unfortunately, these pretty Swirl Dots are sold out currently but more are expected the week of April 15. Since that is an item in the A Little Latte Suite, that makes the Suite unavailable, but you can order everything else separately, just not in the Suite. Sorry for the delay. Sometimes products come back in stock sooner than we expect so check back occasionally.

Simply Zinnia Thinking of You Card

Simply Zinnia Thinking of You Card

A new very pretty Suite to create with is the Flowering Zinnias Suite which you will find in the Online Exclusives in the Stampin’ Up! Online Store. These Online Exclusives products are not in any catalog but you will find them online. Some may be reordered when they sell out and some may not so grab the ones you like best when they come out!

This Simply Zinnias Thinking of You Card card was made with the Simply Zinnia Bundle and the Flowering Zinnias Designer Series Paper. That paper has some of the brightest and strongest colors and many flowers. However, I used “the other side” of one of the papers for this card since I wanted more of a generic background for my flowers.

The flowers are stamped from the Simply Zinnia Stamp Set in Memento Ink and then colored in with Stampin’ Blends. I used all different colors so choose whatever combinations you like! You can even use different colors, not just the Light and Dark colors in the combo. After coloring them, I cut them out with the die in the Simply Zinnia Dies.

The card base is Basic White with a layer of the Flowering Zinnias DSP in a striped pattern. The flowers are popped up on Stampin’ Dimensionals. The greeting is stamped in Melon Mambo from the Simply Zinnia Stamp Set. I found this skinny die in the Sending Dies Set which fit perfectly! It is popped up with Mini Dimensionals going across the flower stems.

For a little embellishment, I added three Iridescent Foil Gems on the background. Currently, the Simply Zinnia Stamp Set and the coordinating Sequins in the Suite are unavailable. The stamp set, though is due back in stock the week of March 25, but check back early. Sometimes products show up sooner than expected.

Check out all the new Online Exclusives in the Online Store!