Category Archives: Halloween

Last Minute Halloween Treat Ideas!

These Halloween treat ideas may be from years past, but they still work! Use your current paper and things or use your old retired things you are hoarding! 🙂 The trick or treaters won’t care!

Halloween Candy Bars

This is one of my favorite ideas and simple enough to do. Just wrap a chocolate bar in designer paper! Maybe add some ribbon or a tag if you are making it for someone special. You can use any size of candy bar!

Triangle Halloween Treat Box WIth Ghosts

These triangle boxes are so easy to make and I have made them for lots of occasions! Read my blog post HERE with directions.

Cute Halloween Treats

I always love making treats with chocolate nuggets! Just cut a strip of cardstock at 1 3/4″ x 5 1/2″. Score the paper at 2 1/4″ and 3 1/4″. This makes a little space so it will sit flat and so it will hold a nugget inside. OR just cover nuggets with strips of designer paper and put in a bag or box! A 1″ x 3″ strip should do it!

Witch's Boot with Candy

This witch’s book has been quite a favorite! Save a toilet paper roll or a paper towel roll and cut it down, wrap with designer paper, and add the triangular boot bottom! It’s easier than it looks. Directions on this blog post HERE.

Halloween Witch Trick or Treat Candy Treat Box

Nothing wrong with just making a little box or bag out of designer paper or cardstock and decorating it for Halloween! This one is from five years ago but you can update it easily! Read the blog post HERE.

Those are just a few ideas to spark your creativity for parties or trick or treaters Monday night! Have fun!

Witchy Home Decor

Witchy Home Decor

It’s time for some Witchy Home Decor! ‘Tis the season for decorating your home! Only 10 more days until Halloween! If you need a cute little decoration for your home or a little gift for someone, you’ve got to make something like this votive candle holder! It’s easy and you can make one in any style you like!

Look around your house and find a small votive holder that you almost certainly have in your house somewhere. If you don’t have an official votive holder, maybe you have a glass jar or a small glass vase. Then decide on what kind of decoration you want on the front of it.

I used the Best Witches Stamp Set, which I love for Halloween. I stamped the witch and her broom with Memento ink on Basic White cardstock and colored her in with Stampin’ Blends alcohol markers. You can choose whatever witchy colors you like! Or if you don’t have or don’t want a witch, use a pumpkin or black cat or whatever you have. Wrap a piece of designer series around the votive. Make it whatever width you want. Either you can join the ends in the back or you can join the ends in the front and then cover it with your main image. The witch I had to cut out by hand with Paper Snips because this stamp set has no dies.

Here’s one I made last year with the Cute Halloween Designer Paper. I just wrapped a ribbon around the glass votive holder instead of designer paper and I decorated each side. So easy and so much fun!

When your creation is finished just put a small candle inside, or better yet, a flameless votive for safety. You can change out the decorations on your votive holder for every season!

Rustic Harvest Fall Gourds Card

Rustic Harvest Fall Gourds Card

If you are looking for an easy card to make for fall or even Thanksgiving, this Rustic Harvest Fall Gourds Card is a little different with the fall gourds and pumpkins. Change the greeting for whatever sentiment you want to express.

The card base is Garden Green cardstock. This card was cut at 4 1/4″ lengthwise down the middle of a full sheet of cardstock, then scored at 5 1/2″. I intended to make it a top-fold standing card, but the design on the paper seemed like it should go horizontally so I just gave in! The horizontal card opens on the side instead of the usual vertical style.

I loved the gourd design and hadn’t used it yet. I chose the green swirly paper as a margin on the top and bottom of the gourd design. Both patterns are in the Rustic Harvest Designer Series Paper. I cut the green swirly designer paper at 1″ x 5 1/4″. The gourd paper is 3 1/2″ x 5 1/4″.

In my Tuesday newsletter, I talked about a tip to color designer paper, shared by Patty Bennett, if you weren’t entirely happy with how it looked as is. So on this gourd paper, I added some more orange color to the pumpkins and some green to the leaves, plus a little green and brown to the acorns. I used my Stampin’ Blends alcohol markers to add this color. I’m sure you could use Watercolor Pencils or some other coloring method if you wanted to. I thought it was pretty as it was, but I like the added color even better.

To assemble this card, I first adhered the green swirly DSP to the top and bottom of the card leaving a normal margin, then I adhered the gourd paper on top of that.

The greeting is stamped from the Full of Love Stamp Set in Garden Green ink. I die-cut it with a small banner in the Stylish Shapes Dies. I designed it so the greeting would be way over to the right side of the banner so I could have it even with the left side of the card and I cut that side straight off. I popped up the greeting with Stampin’ Dimensionals. For a finishing touch, I added one of the new embellishments, available starting Nov. 1st, in the Fitting Florets Collection. They are the Gold Adhesive-Backed Swirls. I thought this one gold swirl was just perfect to add in this space and great to be flat for easier mailing.

This Rustic Harvest Designer Series Paper is perfect for fall for any cards in general but especially if you wanted to send cards for Thanksgiving or cards in this season of gratitude.

Shop Stampin’ Up!

A Halloween Witch in the Pumpkin Patch Card

This A Halloween Witch in the Pumpkin Patch Card is one that I had fun making and kept adding more and more to it! You could make something similar but with a lot less detail! You have to like coloring if you make this same card although you could use something other than Stampin’ Blends if you wanted to.

The card base is Pumpkin Pie with a layer of Basic Black. You wouldn’t have to use the extra black layer, but I think it helps the card front to stand out.

The real story of this card is the card’s front layer! It is a piece of Basic White. Of course, the basic information is easy….just stamp the images, cut out and color, place everything and adhere! The witch is from the Best Witches Stamp Set. She is stamped in Memento Ink and colored with Stampin’ Blends. I chose some colors that are a little different so just play around with your markers! This witch obviously has a little too much blush on her cheeks! After coloring the witch, I looked for the die set to cut her out, then remembered that there aren’t any dies! So I just cut her out with my Paper Snips! She is popped up on Stampin’ Dimensionals and even a few Mini Dimensionals.

The first pumpkin I stamped and diecut with the Rustic Pumpkin Dies. It’s the pumpkin on the left that I set down low and trimmed off the overhanging bottom of the pumpkin in order to make it smaller. Then I stamped the pumpkin on the far right and planned to overlap that one with the die cut pumpkin. But then I thought, why not mask that pumpkin and stamp another one behind it?! I used various oranges and maybe some yellow and green on these pumpkins.

To give the witch some way to stand a little higher, I stamped the group of flowers in the Hello Harest Stamp Set in the left corner of the card. I colored the flowers and put some brown down around the flowers to look like ground and dirt for the witch to stand on!

For the sky, I stamped the little stars, colored them in with Dark Daffodil Delight, and then played around with the sky. I ended up using Smoky Slate first in just a scribbly way, then adding some other colors, like Petal Pink, Balmy Blue, and maybe some Pale Papaya. I think it ended up looking a little bit like a Halloween sky!

For the greeting, which I didn’t even think I had room for, I stamped “Best Witches” from the Best Witches Stamp Set on a scrap of Basic White. Then I just trimmed it by hand, cutting pretty close to the letters and cutting apart the words. I really like the way it fits on the card! I also had that stamped and colored little frog in the stamp set and the die-cut bat laying on my table so I stuck those on also! I really think the stamp sets that you can kind of build a little scene with are fun to play with!

If you like to color and make a Halloween night scene in the pumpkin patch, give this card a try!

SHOP STAMPIN’ UP! ONLINE HERE!

Hello Harvest Pumpkins Card with Banner

Hello Harvest Pumpkins Card with Banner

This Hello Harvest Pumpkins Card with Banner turned out differently than the idea I had in my head when I started, but that’s what happens when you start looking through designer paper or different colors of paper or stamp sets. You never know for sure what you will come up with!

The card base is Soft Suede, after trying a multitude of different colors of cardstock! Then there are two layers of the Rustic Harvest Designer Series Paper. The yellow Crushed Curry pattern adhered to the Soft Suede card base is the reverse side of the layer of black and white acorns pattern! I had another black & white striped paper picked out to be the background layer but I liked this acorn pattern better. The acorn layer is 3 1/2″ x 4 3/4″ because I wanted more of the yellow to show.

The pumpkins are made with the Rustic Pumpkin Dies using Pumpkin Pie cardstock. These dies have a texture that transfers to the cardstock. I found that the texture would show better if I ran them through twice. The large pumpkin is made with the extra narrower piece adhered to the center of the large pumpkin piece. I also sponged some Pumpkin Pie ink around the edges of the pumpkin pieces and on top of the textured areas. For the little pumpkins, I die cut a narrow piece and then just trimmed it down, top and bottom, to make the two little pumpkins! The stems are diecut from Soft Suede. The vines are diecut from Shady Spruce and Granny Apple Green on the small pumpkins. I also sponged the little pumpkins but added some green ink because sometimes pumpkins have some variations of color on them.

The banner is stamped on the Crushed Curry Rustic Harvest paper, the same as the card layer. I first stamped the banner on Pumpkin Pie and sponged it but it was too much. The Crushed Curry banner looked better. Normally I don’t like things placed cockeyed, but since the large pumpkin is kind of tall and the banner is kind of large, I decided to place it at an angle in the corner! Sometimes you have to craft dangerously! Try something new!

Here is another fall card I made with the Rustic Harvest DSP with pumpkins. So many pretty patterns of paper for fall.

Shop Stampin’ Up! Online HERE!

Paper Pumpkin Spooky Treats and Ghost Card

Paper Pumpkin Spooky Treats and Ghost Card

Here are the Spooky Treats I made from the September Paper Pumpkin Kit plus one Ghost Card I made with the cute ghost stamp and greeting in the Kit! I just loved this Paper Pumpkin Kit and can’t wait to make more of the treat boxes and maybe more “alternative” ideas! I’m thinking about ordering more kits! They will be so fun for Halloween!

Paper Pumpkin Kits are a papercrafting subscription kit you receive in the mail once a month. It is “usually” cards but some months, especially for the holidays, it might be something different. Everything you need is in the kit and with your first kit on your subscription, you receive a special acrylic block. Even the ink is included in a small square ink spot plus adhesives! There is even a video you can watch on your phone or computer so you can see how the kit goes together if you prefer. There is no obligation to continue for any certain amount of time and you can always skip a month if you choose. You can subscribe HERE!

The Spooky Treats Kit made the three treat boxes you see in the photo above. I love that the box is so easy to crease and fold and assemble into the box. That’s where the video comes in handy for the first time or two! And then you decorate the “sleeve” that wraps around the box and it’s all ready for you to add treats later or a small gift! You could make your own sleeve for another holiday or occasion if you wanted to. Do anything you want with your Paper Pumpkin Kit!

For the card, I used a card base of Basic Black with a layer of black and white polka dot paper in the Perfectly Penciled Designer Series Paper. You could also use the Black & White Designs Designer Series Paper in the Holiday Catalog. I stamped the ghosts on Basic White cardstock, Orchid Oasis, Tahitian Tide, and Parakeet Party, then cut them out by hand. The Happy Halloween greeting is in the Paper Pumpkin stamp set in the kit and is stamped with Orchid Oasis ink, then die cut with one of the Stylish Shapes Dies. The ghosts are popped up on Stampin’ Dimensionals. Very fun and easy to make! The kit makes these three versions of treat boxes, six of each!

You might assume that you are too late to get this cute kit, but while supplies last, you CAN purchase the full kit in the Stampin’ Up! Store or the refill if you already have the kit with the stamp set and ink. The only catch is that you must be a Paper Pumpkin subscriber to purchase the kit or the refill.

SPOOKY TREATS PAPER PUMPKIN PAST KIT

SPOOKY TREATS PAPER PUMPKIN REFILL

The only catch is that you must be a Paper Pumpkin subscriber in order to buy any of the Past Kits or Refills, but you will want to be a subscriber so that you receive the October Kit! Be sure to subscribe by October 10th to receive this Ho Ho Ho Kit!

‘Tis the season to make your own Christmas cards with the Ho Ho Ho Paper Pumpkin Kit! This kit contains whimsical designs of Santa and his reindeer in a classic Christmas color palette which is sure to match various styles of holiday décor and look great on mantles everywhere. 

Each kit contains enough supplies to create 9 festive cards—3 each of 3 designs—and 9 coordinating envelopes. These cards are sure to bring a warm holiday spirit. 

And word from the North Pole is that this kit coordinates with next month’s Paper Pumpkin tag kit and the special add-on product! With so much coordination between products, you’ll have a breeze at creating a cohesive look for all your holiday gifting needs. Make this season the most wonderful time of the year for your loved ones—and for yourself!

Sounds like SO much fun to me! I can’t wait!

JOIN PAPER PUMPKIN!

Warm Welcome Trick or Treat Halloween Card

Warm Welcome Trick or Treat Halloween Card

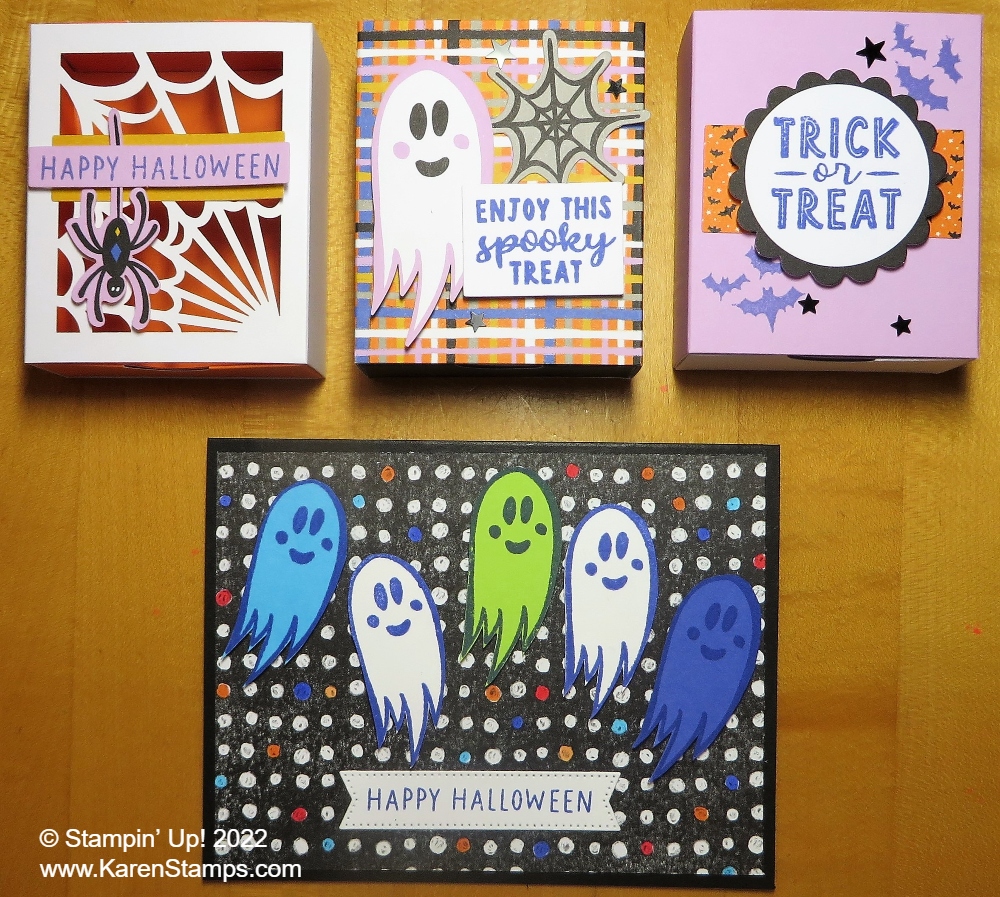
You may not recognize this open door stamp or the kitty, but they are from an early release of a stamp set and dies that will be coming in the January-June 2023 Spring Mini Catalog! They are out early because they will be used in the Stampin’ Up! Virtual Card Making Day Event next Saturday, October 1st! I wondered if I could turn it into a Halloween card along with the Scary Cute Stamp Set and I ended up making this Warm Welcome Trick or Treat Halloween Card! We have lots to discuss here!

This new stamp set is the Warm Welcome Stamp Set. There are also the Warm Welcome Dies, but you can only purchase the stamp set and dies together in the Warm Welcome Bundle right now. I don’t know if they will go away after World Card Making Day or what will happen, so if you like this Bundle, whether you are participating in WCMD next Saturday, I would go ahead and order this Bundle! There are lots of stamps and lots of dies so this will be a fun set to play with!

The Stampin’ Up! WCMD virtual event is FREE for EVERYONE next Saturday! The Bundles they will be working with and demonstrating are the Cottage Wreaths Bundle, the Cottage Rose Bundle, and as I said, the Warm Welcome Bundle. And if you purchase one or more of these Bundles, add the Iridescent Pearl Basic Jewels (item 158987) to your order after you have a Bundle in your cart and you will get the Jewels FREE! If you would like to register so you can be notified about the event, register HERE, but it is not required at all. You don’t even have to stamp along, own these stamp sets, or anything. You can just WATCH! If you miss the live event, you can watch the replay. Read all about this Virtual Event HERE.

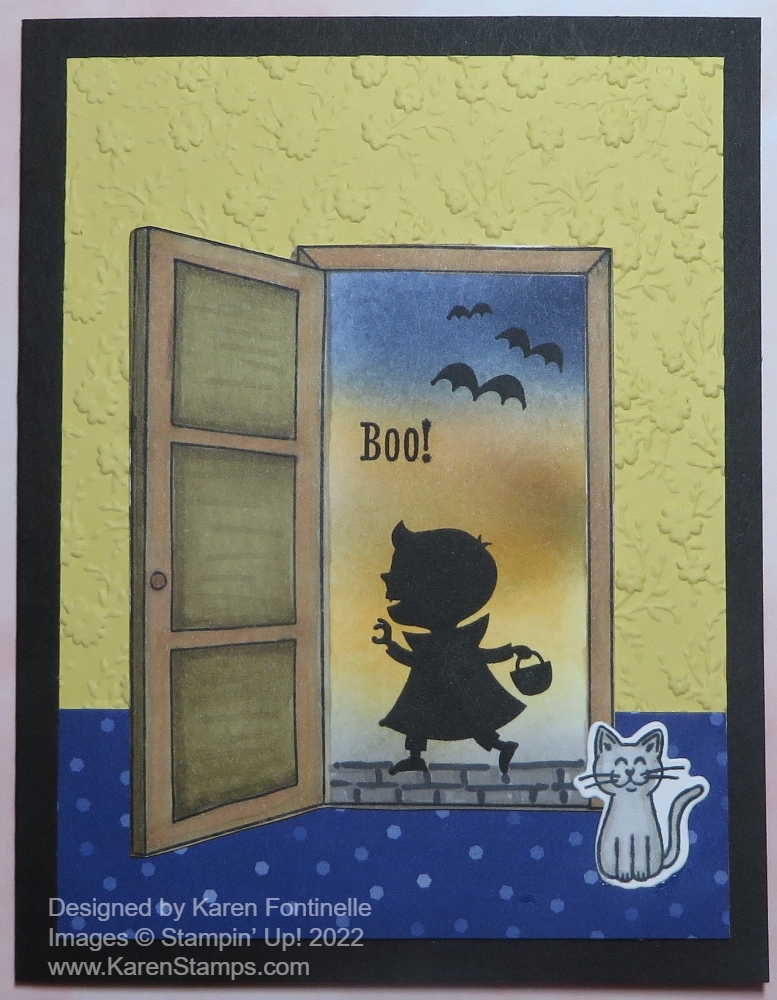
To make this card, I started with a Basic Black card base and a layer of So Saffron. As it turned out, I had this Ornate Floral (retired) embossed piece in the package of paper and I thought it looked like wallpaper inside a house, so I used it. You could use another embossing folder, stamp a piece of cardstock, use a piece of designer paper, or simply leave the cardstock plain.

I stamped the door and frame (one stamp) with Memento ink and die-cut it. Since I wanted it to look like the front door had been opened and therefore you would see the outdoors with the trick-or-treater at the doorstep, I masked the edge of the door so I could add color inside the frame for the Halloween sky. To do this masking, I used the brand new Stampin’ Up! Masking Paper! It worked like a charm. It was the first time I used it! I just cut narrow strips the length of three sides of the door (top and sides) so that when I added the color, it wouldn’t get on the door frame. When you peel off the backing of the Masking Paper there is adhesive to hold it in place and is easy to pull off when you are finished masking whatever you are covering up. I used a Blending Brush to just add several ink colors to look like a Halloween sky. I used Night of Navy, Crushed Curry, Pumpkin Pie, and some Basic Gray at the bottom. There are other color combinations you could use! Just play!

The door and frame are colored in with multiple colors of brown using Stampin’ Blends! I started with Light and Dark Crumb Cake but then I played around adding darker shades of brown and used some of the Natural Tones markers, too. As I said, just play!

The blue piece at the bottom of the card is meant to look like a carpet inside the house. It’s one of the patterns in the 2022-2024 In Color 6″ x 6″ Designer Series Paper. I just cut a 1 3/4″ strip of it. Perhaps I should have glued the door right at the top edge of the carpet!

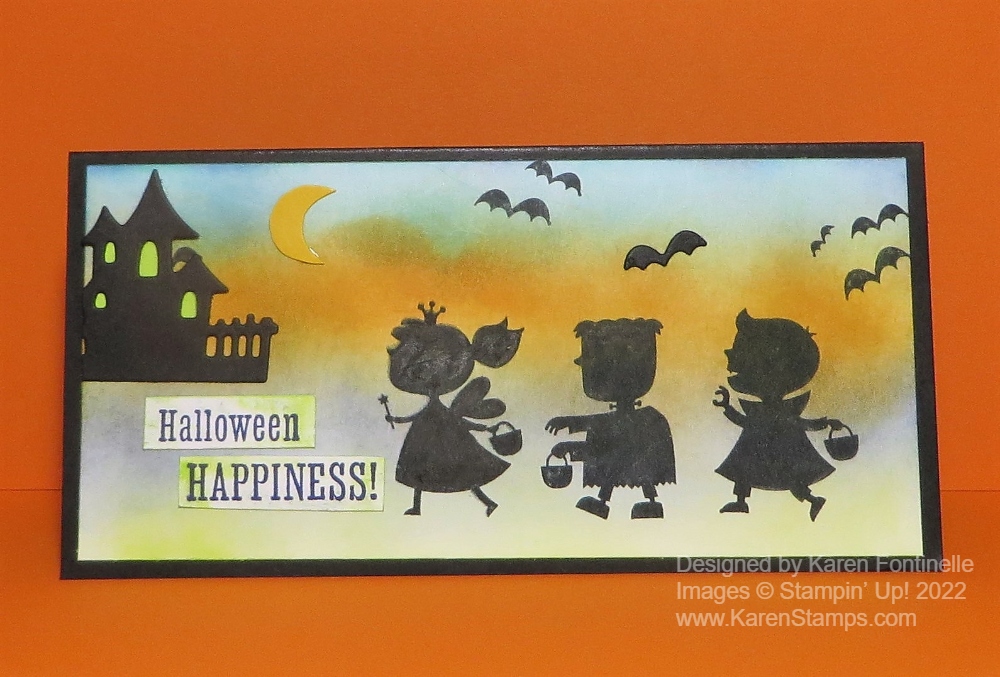
It would be a good idea to stamp the little trick-or-treater in the doorway before adhering to the card. I got lucky and the stamping still worked okay, but I did use the Stamparatus so that I could re-stamp it if the image didn’t turn out dark enough. The embossed paper underneath didn’t cause a problem; that’s what I was worried about. You usually want to do all the stamping before assembling the card so if you mess up, the whole card isn’t ruined! The “Boo!” and bats are also in the Scary Cute Stamp Set with the trick-or-treater. The cute little cat is in the Warm Welcome Bundle as well. I colored him with Stampin’ Blends.

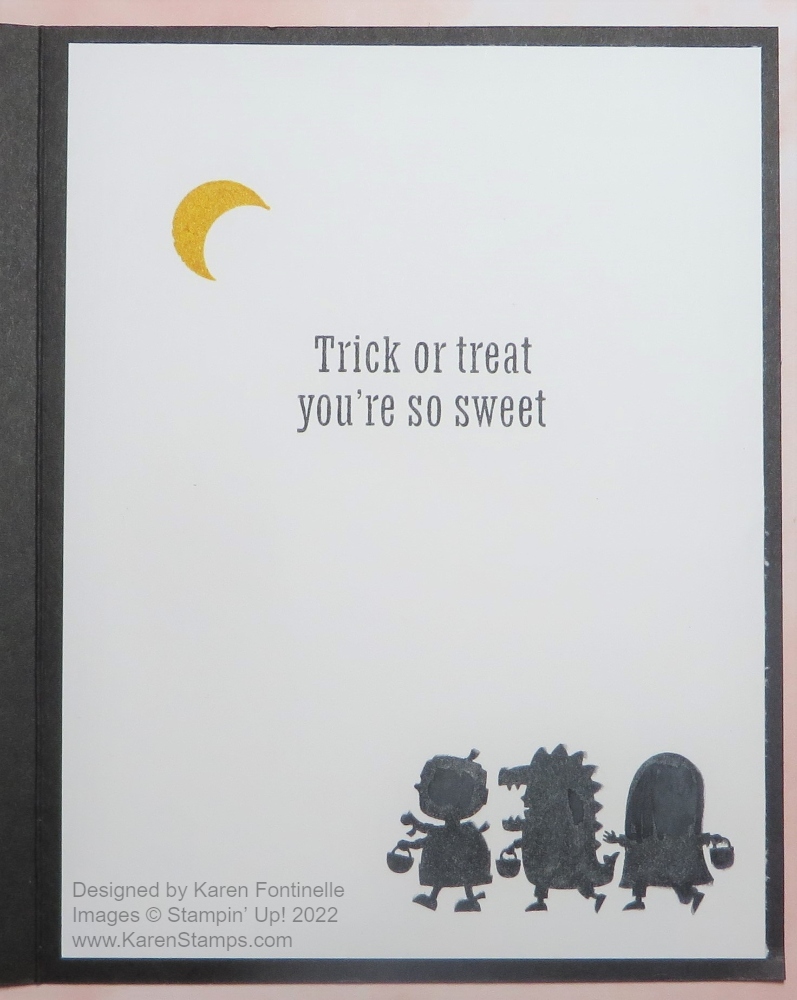
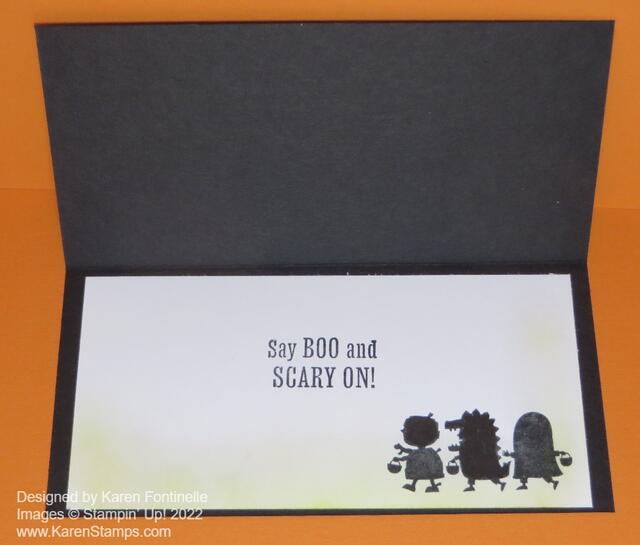
On the inside of the card, I added a Basic White layer stamped with a greeting in the Scary Cute Stamp Set, plus the group of three trick-or-treaters and a moon!

Warm Welcome Trick or Treat Halloween Card Inside

Be sure to mark October 1st on your calendar for World Card Making Day and plan to watch or stamp along with the Stampin’ Up! Virtual event! You can use similar stamp sets you might already own, or as I said before, just enjoy watching the stamping! A few days before the event, a link will be added to this page. Return here and click the Join Event link to participate. The time will be 2:00 – 5:00 PM Mountain Time. Enjoy!

Scary Cute Halloween Happiness Card

Scary Cute Halloween Happiness

It was a busy weekend, but I felt like making a fun Halloween card and this Scary Cute Halloween Happiness Card came about! Only two weeks left in September if you can believe that! Halloween will be here before we know it! I like the look of this little girl out trick-or-treating and the greeting “Halloween Happiness” because happiness for kids in the fall is dressing up and going out trick-or-treating and filling their bags with candy and treats!

The card base is Orchid Oasis (but the Parakeet Party green for the background for the photo makes it look like that might be good for the card base with a LAYER of Orchid Oasis! The Orchid Oasis has a layer of Pumpkin Pie and a strip of the dark star pattern in the Black & White Designs Designer Series Paper. I added three rows of three colors in the Glitter Washi Tape Pack across the designer paper. Love the Glitter Washi Tape! There are four colors in the pack you can choose from or use all of them! Perfect for Halloween or really any festive occasion!

The Scary Cute Stamp Set and the Scary Silhouettes Dies come together in a Bundle which saves 10% if you want both. The stamp set is cute in itself, but with this set I think you will also want the dies as they are so different and fun for Halloween! You get the interesting frame with the tree branches, bats, a black cat, and a seemingly haunted house! The stamp set has cute silhouettes of several different trick or treaters and fun sentiments for Halloween cards and projects!

I die cut the frame out of Basic Black and the background out of Parakeet Party. I just glued the frame over the background and stamped the girl on the background. I did use my Stamparatus to get a good stamped image over three times, maybe I needed to reink my ink pad better! If you ever have an image that doesn’t stamp as well as you would like, you often can use a marker or reinker to lightly fill in the areas that didn’t stamp well. I also stamped the Halloween greeting in the lower corner of the card. The bats are adhered at the top of the card. For a little more sparkle besides the washi tape, I added some yellow Glossy Dots in Daffodil Delight.

We’re about to embark on the fun part of the year for crafters and papercrafters with all the holidays coming up! Start early and enjoy the process. Make some Halloween or fall cards to send to friends and family and surprise them when they find “real mail” in their mailbox! Here is another fun card I made with the Scary Cute Bundle but just blended some colors in the background, stamped the figures in black, and added die cut bats and the haunted house!

You’ll find the Scary Cute Bundle in the Holiday Mini Catalog so use this Scary Cute Halloween Happiness Card as an example of what you can make with it!

SHOP STAMPIN’ UP! ONLINE HERE!

Best Witches and Frogs Halloween Card

Best Witches and Frogs Halloween Card

I was in the mood for some coloring and I even thought I would try for different colors on this Halloween witch. In the end, I don’t think I strayed too far from typical Halloween colors except for her Melon Mambo dress! This Best Witches and Frogs Halloween Card is one you make just to have fun coloring and playing!

I started off using the Best Witches Stamp Set and stamping the stamp with the witch and her cauldron on Basic White cardstock with Memento ink. I colored her with a bunch of different Stampin’ Blends. You can see some of the colors I used in the photo below. I also used some of the Natural Tones markers for her face and hands and the logs for the fire. I also stamped a frog but decided to cut him out separately, and then I decided on stamping and cutting out some more frogs!

Coloring Best Witches

After I had the witch stamped and colored in with her cauldron, I diecut the image with the largest circle in the Stylish Shapes Dies. I wanted to layer it on a scalloped circle in the Layering Circles Dies, but it wasn’t large enough so I just cut out two square layers, Basic Black and Pumpkin Pie. The black one is 3 1/4″ x 3 1/4″ and the Pumpkin Pie is 3 1/2″ x 3 1/2″. I used the Black & White Designs Designer Series Paper with the black stars as the layer on the Starry Sky cardstock card base. Before adhering the designer paper, I wrapped around some ribbon. I colored the White 1/4″ Crinkled Seam Binding Ribbon with the Dark Pumpkin Pie Stampin’ Blend. Just do it on top of a piece of scrap paper and run the side of the brush tip of the marker along the ribbon, holding it down at one end with your finger. Give it a little bit of time to dry completely or even rub a tissue along it to remove any ink that hadn’t dried yet. I tied the bow separately and adhered it with a Mini Glue Dot.

Back to the stamped and die-cut witch piece. I colored underneath with a bit of light gray marker. For the sky, I thought I would try Soft Pastels in various colors. I started off picking up some chalk color with a Blender Pen but then I just scribbled on various colors for the Halloween night sky and softened them with the Blender Pen. You have to be a bit careful to not make the paper pill up from having too much moisture or rubbing too much. But you can get away with a lot for a Halloween sky! After adhering this piece to the front of the card above the ribbon, I adhered the little frogs, two with Stampin’ Dimensionals and one flat on the card with the Multipurose Liquid Glue.

The greeting is in the Best Witches Stamp Set and is stamped in Pumpkin Pie ink and die cut with one of the Tailor Made Tags. I decided to tuck it under the bow so I added another Mini Glue Dot to hold the ribbon in place over the tag hole and put a frog partly on the end of the tag. That’s all there is to this fun Best Witches and Frogs Halloween Card!

SHOP STAMPIN’ UP! ONLINE HERE!

Scary Cute Slimline Halloween Trick or Treaters Card

Halloween will be here before we know it so get your new stamp sets and accessories in the Stampin’ Up! Holiday Catalog and start creating! On this Scary Cute Slimline Halloween Trick or Treaters Card, I couldn’t resist making a colorful spooky background with the trick-or-treaters heading up to the house for their treats!

This is a slimline card made with a Basic Black cardstock card base. The card base is a 6″ square that is scored in half at 3″ so when it is folded, the card will be 3″ x 6″. The layer on the front of the card is Basic White cardstock 2 3/4″ x 5 3/4″.

To make the Basic White cardstock look spooky for Halloween Night, I used the Blending Brushes to add all kinds of ink colors! I used some of the new In Colors. Well, maybe all of them except Sweet Sorbet. I also used some Pumpkin Pie and Crushed Curry. I only have three Blending Brushes but if you are careful to work from light to dark ink in similar colors and really rub off the excess ink after each color on scrap paper or Grid Paper, you can use each brush for several ink colors. When you are finished, just rinse them out at the kitchen sink! Be sure to rub off a little bit of ink before applying the Blending Brush to the project to avoid getting a dark blob of ink.

Next, I stamped the three separate trick-or-treaters in black Memento Ink as if they were walking around on Halloween Night going trick-or-treating with their little baskets. You need to have a juicy ink pad to get a good, dark impression of the image. The Stamparatus would work well for this so you could stamp it over and over if necessary. You can also fill in the areas that didn’t stamp heavily enough with a black marker if the blacks match pretty well.

The Scary Cute Stamp Set has some fun stamps and greetings in it. I stamped some of the bats up in the sky. I stamped the Crushed Curry cardstock with the moon stamp but I cut it out according to the shape and used the plain cardstock side because I liked the cardstock color better than the inked side.

The haunted house is a diecut and I already had that cut out. I decided to use it but away from the trick-or-treaters so it wouldn’t look like the wrong size. I adhered tiny pieces of Parakeet Party card stock behind the windows and after adhering it to the card layer, I trimmed off the excess side so the house would fit better.

For the greeting, I stamped the “Halloween Happiness” on Basic White but decided to cut the words apart so they would fit in the corner. They were stamped with the Starry Sky In Color Ink and then I added a little Parakeet Party ink around the edges with a Blending Brush just to make the words look a little spooky and fit the card just right.

On the inside of the card, I adhered a Basic White layer just like on the front of the card. I stamped the other stamp with the three smaller trick-or-treaters and a greeting from the stamp set. Then I used the Blending Brush and just a light layer of Parakeet Party ink. You could use any color you like.

Scary-Cute-Slimline-Halloween-Trick-or-Treaters-Card-Inside

This Scary Cute Stamp Set will be fun to use making Halloween treats and other projects as well! Here is a Scary Cute card I made the other day using the spooky frame die with the tree branches. Just get the Scary Cute Bundle of stamp set and dies and you will be all set for making a card like my Scary Cute Slimline Halloween Trick or Treaters Card or many others!

SHOP STAMPIN’ UP! ONLINE HERE!

Best Witches Portrait Witch Halloween Card

Best Witches Portrait Witch Halloween Card

Here’s a fun Halloween card to make, the Best Witches Portrait Witch Halloween Card. This little witch must have had her portrait painted and framed! I also wanted to use the new Glitter Washi Tape and figured out a way to use it on this card! I’ll explain how I made the very artistic background around the witch!

The card base is Basic Black with a layer of Highland Heather stamped with the stars in the Best Witches Stamp Set. You have to stamp very lightly with these small stamps so as not to catch an inky edge of the rubber. Luckily some of mine got covered up with the witch!

The witch is stamped on Basic White cardstock. I diecut the frame in the Fabulous Frames Dies out of Basic White and then used the center piece for the witch. Then I diecut the frame again out of Gold Foil to get the actual frame I was going to use.

I stamped the witch (one of two in the stamp set) in Memento Ink and colored in with various colors of Stampin’ Blends. Just play with whatever colors you like or even combinations of colors. For the background around the witch, I simply chose many light colors of Blends and just put little marks or scribbles all around. Then I took the Color Lifter and colored over all the marks in hopes of blending them a little bit. I was afraid I might be messing up my witch piece but I think it turned out to be an interesting background! You never know! Just play!

I applied strips of the Glitter Washi Tape across the middle of the card. After putting down the full length of the first color, I realized the tape would mostly be covered up and I didn’t want to waste it so I just put small pieces on each edge of the card, not all the way across. You can trim the ends off on the sides if you haven’t glued down the Highland Heather layer. After gluing down the gold foil frame, I adhered the witch portrait inside the frame.

The greeting is stamped in Highland Heather ink on a scrap strip of Basic White and adhered at the bottom of the card. I thought about cutting the words apart, but the greeting seemed to look okay as is.

If you like Halloween, check out the Best Witches Stamp Set and the others in the Holiday Mini Catalog! Maybe you will even earn FREE Sale-A-Bration products with a $50 or more purchase at Stampin’ Up!

Scary Cute Halloween Card

Scary Cute Halloween Card

It’s time to start thinking about Halloween! This is my first card using a new bundle in the Holiday Mini, my Scary Cute Halloween Card! This card is somewhat of a copy of a sample in the Holiday Mini on page 56. It looks like it was made into a shaker but I think maybe it’s a box or something with ribbon wrapped around it. My copy is actually a card but not a shaker.

The card base is Pumpkin Pie cardstock with a layer of the Black & White Designs Designer Series Paper. This paper is perfect for making Halloween cards but you don’t have to be restricted to that at all! I used the Scary Cute Bundle to make the images on the card. The spooky image of the tree branches in the frame is a die in the Bundle that I cut out of Basic Black, and I cut another Parakeet Party cardstock piece to be the spooky background piece. I added a little bit of ink with a Blending Brush but it doesn’t really show up. I should have used a darker green if I wanted to do that. The little boy trick-or-treating is stamped in Memento Black ink on the Parakeet Party cardstock.

To match the orange ribbon wrapping around the sample in the catalog, I colored the White 1/4″ Crinkled Seam Binding Ribbon with the Dark Pumpkin Pie Stampin’ Blend marker. Just put a piece of scrap paper underneath as you color the ribbon with your marker. Then I applied some Stampin’ Seal to the back of the framed piece and adhered the now Pumpkin Pie ribbon going back and forth, back and forth. Finally I popped up the piece on Stampin’ Dimensionals which would also help keep the ribbon adhered to the back.

The greeting is included in the stamp set so I stamped that on a piece of Highland Heather cardstock and diecut it with the banner shape in the Scary Cute Bundle. It is also popped up on Stampin’ Dimensionals.

Finally, there are cute little bat dies of three different sizes so I had already cut those out with the black frame. Then I just chose three and adhered them to the card. I might go back and add some sparkle with something.

This Scary Cute Bundle has lots of fun possibilities for Halloween cards, treats, and projects. Just play with it and discover lots of creative ideas!

Time To Get Spooky With Paper Pumpkin!

OK! Here is what I have been waiting for!! Halloween crafting!! Just look at this Paper Pumpkin box for September! I almost wanted to squeal with excitement when I saw the photo!

Get your Halloween crafting on with the Spooky Treats Paper Pumpkin Kit. This month’s kit includes everything you need to make 18 absolutely adorable (and just the right amount of spooky) treat boxes—that’s 6 each of 3 unique designs! No need to let the season creep up on you; subscribe and order your kit today.

ABOUT THE KIT
Name: Spooky Treats

This kit includes:

  • This month’s kit contains enough elements to create 18 treat boxes—6 each of 3 designs. This all-inclusive kit includes printed box bases and tops, die-cut paper pieces, adhesives, and more!
  • The Spooky Treats Paper Pumpkin Kit includes an Orchid Oasis Classic Stampin’ Spot!
  • This kit’s stamp set puts the TREAT in trick-or-treat with fun, Halloween-themed sentiments and designs. Embrace the spooky season with ghost, bat, spider, and star images.
  • This kit also includes a special peek-through box top on one of the box designs.
  • Finished box size: 2-1/2″ x 3″ x 1″ (6.4 x 7.6 x 2.5 cm)
  • Coordinating Stampin’ Up! colors: Basic Black, Gray Granite, Orchid Oasis, Fresh Freesia, Crushed Curry, Pumpkin Pie
WHAT IS PAPER PUMPKIN?

Paper Pumpkin is our monthly One-Stop Boxâ„¢ that offers a unique variety of paper projects for subscribers of any skill level to enjoy! These thoughtfully themed and all-inclusive craft kits encourage Stampin’ Up! customers to explore their creativity, try new techniques, and discover their potential in papercrafting. I say it’s a gift you give yourself, to find that special box in your mailbox each month, just for you! Try it! No risk or obligation to continue for any length of time! You can even skip a month when you need to!

JOIN PAPER PUMPKIN TODAY!

Best Witches Haunt It Halloween Card

Best Witches Haunt It Halloween Card

This Best Witches Haunt It Halloween Card is the first Halloween card of the season! It’s a little early, considering it is over 100 degrees these days here in Houston! I have to say some Halloweens here haven’t been all that much cooler either by October 31st! But weather aside, I wanted to try in my new Halloween stamp set, Best Witches and I was in the mood to color!

You’ll find the Best Witches Stamp Set in the July-December 2022 Mini Catalog or Holiday Catalog, as I like to call it (and type it!) on page 55. The stamp set has two cute witches, a toad, some stars, and some cute sayings! It’s just my kind of Halloween set!

To make this card, I used Granny Apple Green cardstock for the card base. Then I added a piece of Black & White Designs Designer Series Paper to the bottom half of the card. These will be fun papers to use for Halloween or any time. You can leave them black and white or you could color the white parts of the papers.

I stamped the witch in Memento Black and colored her in with Stampin’ Blends. I just chose whatever colors I wanted with no planning so just play and choose whatever colors you are in the mood for. I think I used Smoky Slate and Gray Granite on the witch’s hat, Daffodil Delight for the gold buckle, Fresh Freesia for the hat band, but Highland Heather for her dress. Her face is Ivory with a little pink blush on her cheeks, Petal Pink. Then I cut out the witch by hand with Paper Snips You wouldn’t have to but that was my original idea when I wasn’t quite sure what the background was going to be.

Stampin’ Up! says July is Watercolor Month so I thought I would do a little watercolor background on which to layer the witch. Since I was using Basic White which can’t handle very much water at all, I watercolored VERY lightly. I used the wide Water Painter to pick up just a little bit of ink in the lid of the ink pad with minimal water and just brushed across the paper very lightly. I used Daffodil Delight, Pumpkin Pie, and Gorgeous Grape. You can barely see it but, as I said, I didn’t want much water on the paper which could make the paper pill and look messy. Then I stamped with the small stars stamp in the Best Witches Stamp Set, in Daffodil Delight, on the background. I had also stamped at the top half of the Granny Apple Green with Granny Apple Green ink so that it would just be very light in the background to add a little interest and match the stars on the designer paper.

The Basic White paper was die cut with one of the Stitched Rectangle Dies. The witch is adhered flat on the paper although you could use Stampin’ Dimensionals to pop her up if you wanted to. The greeting is stamped in Memento Black and then cut apart just for fun. I think this would be a fun card to send to a girlfriend for Halloween! I love it! And for a finishing touch, I couldn’t resist adding a bow of Fresh Freesia ribbon in the corner. My other thought was to use Iridescent Rhinestone Jewels for a little sparkle but I did the ribbon for something different.

I love Halloween and I had so much fun making this card! It may barely be the middle of summer but you know time flies so if you enjoy Halloween, don’t hesitate to get an early start on fall. If you are having summer heat like we are, maybe making a fall or holiday card will cool you off! Certainly staying inside in the air-conditioning and stamping will keep you cool! I hope this Best Witches Haunt It Halloween Card will inspire you to think ahead a little bit to the fun days coming up!

SHOP THE HOLIDAY CATALOG ONLINE HERE!

Halloween Candy Bars

Halloween Candy Bars

It’s the day before Halloween but if you are still looking for a Halloween treat idea, these Halloween Candy Bars are one of my favorite ideas! And it couldn’t be simpler!

No matter what size candy bar you have, just cover it with paper and decorate! That’s it! These three are regular-size Hershey Bars that come six in a package. You could, on a very smaller scale, wrap the little Snack Size bars in paper for trick-or-treaters, keeping it very simple. And if you have one of the really big, giant chocolate bars, you can wrap that too for quite a spectacular gift! In fact, for Christmas, there is a funny poem that goes along with one of those big chocolate bars on the subject of Christmas fudge.

For these chocolate bars, I cut my paper at 5 1/4″ x 4 3/4″. The exact size might depend on your candy bar. You can use designer series paper or cardstock. On two of these candy bars, I used the Cute Halloween Designer Series Paper. On the first one, I just used the orange and black stripe paper and cut out ghosts and skulls from other patterns to glue on. On the third candy bar, I simply wrapped the designer paper with pumpkins and black cats around and added a greeting from the Cutest Halloween Stamp Set, and punched it out with the Tailored Tag Punch. I also punched two Basic Black pieces to layer underneath the Pumpkin Pie stamped greeting.

The middle candy bar is wrapped with Highland Heather Cardstock. You might want to kind of bend and soften the paper a little to make it easier to wrap around the candy bar. Just run it over a curved edge, like a table or something you have. Or just kind of loosen it up with your fingers. In the middle, I wrapped around a strip of the designer paper and tied some Black Glittered Organdy Ribbon around in a bow. Then I cut out a black cat and a pumpkin from one of the sheets of paper and layered them on a die-cut Layering Circle Die with a scalloped edge.

There was absolutely no planning involved in decorating these candy bars so you know it is easy! I just knew I was going to use the Cute Halloween DSP. If you need a last-minute Halloween treat, try decorating some candy bars with whatever you have for Halloween!