Category Archives: Christmas

Frosty Happy Holidays Card

Frosty Happy Holidays Card

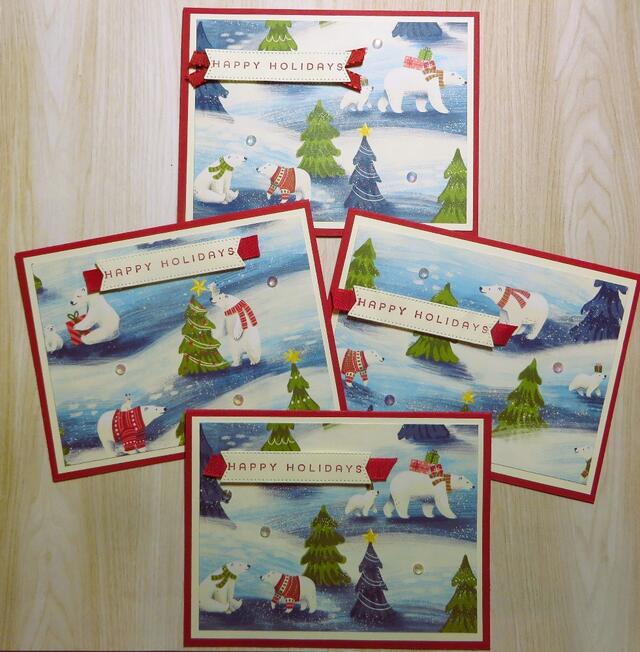
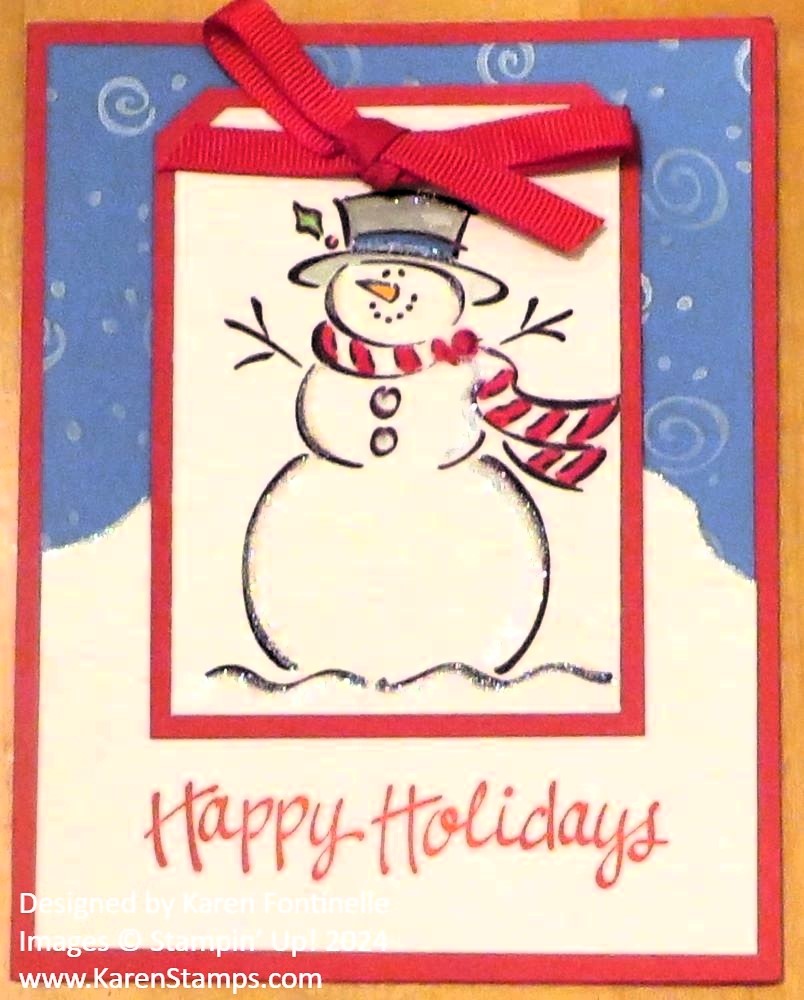
Who remembers this vintage stamp set from Stampin’ Up!?!! It was a favorite back then and for many years! It’s the Frosty Stamp Set! In reading some old blog posts, I see I wrote it was one of the first stamp sets I bought after becoming a Demonstrator in 2002 so I could use it at my first workshop! It’s one of those stamp sets that we couldn’t believe Stampin’ Up! would retire, but they did in 2007! It came out in 2001 so it had a six-year run, which is pretty long nowadays!

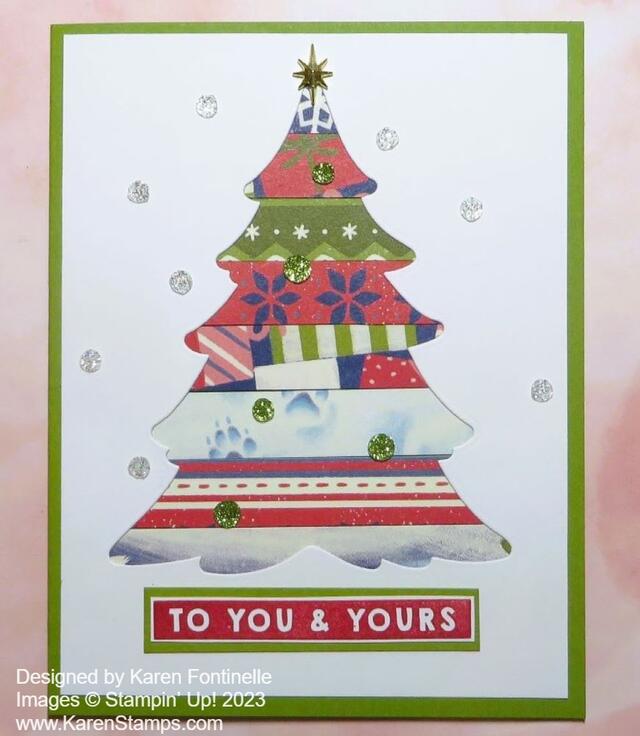
This card has been sitting in a container with some other Christmas cards that I think I made last year or the year before and were extras I didn’t get mailed. I don’t know if I made multiples of this card or just this one. Either way, I think I couldn’t let go of this Frosty card! I had to keep it for the memories!

The reason I am posting it today, besides for a trip down Memory Lane for those of us who have been around Stampin’ Up! for quite a while, is to commemorate all the winter weather all over our country, even all the way down here in Texas! Last winter we didn’t even have a hard freeze here in Houston, they say, but now we are getting real winter weather and extended freezing, maybe even freezing precipitation. I know that is bad if you have to go out and drive, so be careful, but when you can stay inside and off the roads, it’s kind of fun! I’d love to see some snowflakes but it sounds more like icy roads in places later today. I’d say it’s a good day to bake cookies but they have asked us to conserve energy in the morning hours so I’ll wait.

My husband worked hard covering the outside faucets and covering a few plants in the yard, including wheeling the gardening box into the garage as we have lettuce, radishes, and carrots already popping up out of the soil that he planted from seed not long ago. We can get an early start on these things as long as we protect them from a hard freeze. Some neighbors have blankets, tarps and all kinds of covers thrown all over their bushes and every plant in their yard, including some trees! I just hope the freeze kills some bugs that are so prolific here!

Here and here are a couple of very old blog posts of mine about using the Frosty Stamp Set!

I wish I was going to be able to build a snowman like Frosty, but I doubt we are having that kind of weather today and tomorrow! But a girl can hope! Stay warm and safe, Everyone!

Last Day For the Holiday Mini Catalog!

Amazingly, it is time for the September-December 2023 Mini Catalog (otherwise known as the Holiday Mini) to come to an end! Many products are retiring, some are discounted, and many are sold out, but today is the time to take the last stock of this catalog and see what you can’t live without!

Here are some of my favorite cards I made with products from the Holiday Mini! The products may or may not still be available. Click on the card to go to the blog post!

A Walk in the Forest Christmas Card

Beary Christmas Spirit of the Season Card

Layering Leaves October Fall Card

Joy of Christmas Noel Christmas Card

Christmas Ornaments Holiday Card

Merry and Bright Light Bulb Christmas Card

Scrappy Merriest Christmas Tree Card

There are lots more good things in that Holiday Mini so check it out one more time!

SHOP STAMPIN’ UP! ONLINE HERE!

Last-Minute Christmas Ideas

Wrapped_Christmas_Candy_Bars

Here are some Christmas ideas from years past in case you need some! Use whatever paper and materials you have!

Wrapped Christmas Candy Bars

Just wrap up some regular-size chocolate bars with cardstock or designer paper and decorate a little! Keep it simple!

Christmas Votive Home Decor

Christmas Votive Home Decor

You most likely have a plain glass votive holder somewhere in your house. Take it out and decorate it for a Christmas home decor item or give it as a gift.

Santa Suit Christmas Gift Bag

Santa Suite Christmas Gift Bag

Need a fun gift bag? Cover a plain gift bag with red cardstock and turn it into a Santa Suit!

Reindeer Candy Cane Treat

Reindeer Candy Cane Treat

You can use the retired Tag Topper Punch if you have it to make the reindeer face, but if you don’t have it, just cut a little chin for the reindeer and it will be fine.

Santa Treats

Santa Treats

Just follow the directions in my blog post to make one of these! They are made much like a 2-4-6-8 box. Then just wrap a belt and buckle around! Fill with candy or a small gift!

Snowman Gift Bag

Snowman Gift Bag

This is such an easy gift bag to make and so much fun! Use what you have to make any kind of snowman you like!

Gingerbread Gift Bag

Gingerbread Gift Bag

I’ve been seeing gingerbread designs all over the internet in various forms and I don’t mean cookies! Finally, it dawned on me that I could get a pen and play, too, so here is one of my Gingerbread Gift Bags! It is not stamping but it is papercrafting and something quick and easy you might like to do!

Crafty people have been buying any little 3D house or building they could find anywhere, especially the dollar stores, spray painting them a gingerbread brown color, and then using some white paint pen to add the “gingerbread” design! Maybe Pottery Barn started it with expensive decorations and people came up with their cheap knockoffs as we all like to do!

But then I started seeing this technique used on paper and cards or building their own houses out of cardboard! And when I found a stash of plain kraft gift bags in the closet, the lightbulb went off for what I could make! I ordered a set of 8 paint pens on Amazon! I wasn’t sure exactly what people online were using (and I always want to know ‘exactly’), but I found this package of 8 white acrylic paint pens (White Paint Pen for Art – 8Pack Acrylic White Paint Marker) for a good price, even though I only needed one. And I could get them the next day which was fantastic! You could also use a chalk pen or even real chalk or a white gel pen. I loved watching short videos on Instagram of people drawing designs like this on cards or paper decorations, etc. It was mesmerizing! One person said not to be too exact, she liked the wonky look better!

With that, I got out a kraft bag, primed my paint pen (shake it and press the tip down on a piece of scrap paper to get the ink flowing), and started drawing on the bag! The first one I made I completely copied from someone and it only took a few minutes! Then I got out another two bags for gifts and drew on those! The photo above is one of them. My table was so heaped with craft stuff and wrapping paper that there was no decent place in my dark house to take a good photo….so I just placed it on the carpet which didn’t produce a good background! But you get the idea!

This is like drawing when you were a kid and drawing houses all the time! Remember? You didn’t worry if it was perfect or even or crooked, you just drew the house, the windows, the door, and then maybe spiffed it up a bit with curtains or bricks or shingles or plants. That’s all you have to do here, just add the gingerbread features.

I can’t wait to make more real Christmas gift bags. You could draw a small version on a card or a tag if you need some last-minute things! Have fun making a gingerbread gift bag!

Candy Bar Homemade Christmas Fudge

Candy Bar Homemade Christmas Fudge

I’m bringing back an oldie but goodie! This Candy Bar Homemade Christmas Fudge poem and idea has been around probably as long as I have been a Demonstrator, which is a long time! But no matter how old it is, it will look updated with current designer paper and is always a funny gift to give!

You can modify this idea to whatever size candy bar you have, but my chocolate candy bar is 4.4 ounces and says “XL” on the label. You might even find a gigantic candy bar you could use!

I wrapped a piece of Real Red cardstock around the candy bar, and cut the correct length to cover the candy bar, without scoring. Since the candy bar has some thickness it probably works better to wrap, unless you want to figure out the score lines. The measurements all depend on the size of your candy bar. I think I used a piece about 7″ x 7 1/4″. Then I measured just the top of the bar and cut a piece of designer series paper almost like a card, leaving a slight red margin around the edges. I used the Merry Bold & Bright Designer Series Paper with the cute little light bulbs.

After typing and printing out the poem (you can do it on computer paper or Basic White cardstock if that works in your printer) I cut it down to a narrow size and layered it on a slightly larger piece of Real Red cardstock so it would stand out from the designer paper. I even stamped a few little ornaments in Real Red ink from the Merriest Trees Stamp Set. For the finishing touch, I added a Real Red & Gold Dotted Ribbon bow to the top of the poem.

You will find a few different versions of this poem online, but they are basically the same. Feel free to change it up for your personalization if you are good at poetry!

If I knew how to share a link to the poem I would, but you can type it up and make it whatever size and font you like.

Have fun with this project! I hope you find some giant chocolate bars!

Two Easy Christmas Gift Card Holders

Joy of Christmas Gift Card Holder

We’re getting down to the wire down for Christmas! If some of your gift-giving involves gift cards or even cash, here are Two Easy Christmas Gift Card Holders for you to make.

This first one is decorated with the Joy of Christmas Designer Series Paper. You don’t need very much so it’s a good way to use up scraps! Basically the bottom folds up to make the pocket for the gift card and the top folds down over the pocket. You can vary the measurements.

The Real Red cardstock is cut at 6 1/2″ long and 4 1/4″ wide. Score at 2 1/8″ and 5 1/8″. Fold the bottom portion up and adhere with Tear & Tape on each side to form the pocket. You could add a narrow strip of designer paper on the pocket if you wanted to. I left it plain.

For the cover, I cut a piece of Joy of Christmas Designer Series Paper in the red plaid paper at 2 1/8″ x 4 1/8″. For the inside top flap, I cut the same size piece out of Basic White to write “To: From” or write a personal message and stamped a few little ornaments.

To hold it closed, just wrap around a piece of cardstock or designer paper about 1″ x 6 3/4″ to make a bellyband. Don’t score first, just wrap it around, not too tight. then I stamped a greeting in the Brightest Glow Stamp Set in Real Red ink on Basic White and cut out with one of the small Deckled Circles Dies with a Shaded Spruce layer. Glue this over the seam of the belly band and nothing will show!

Joy of Christmas Gift Card Holder Inside

This second Merry Bold & Bright Christmas Gift Card Holder is also a very easy design. You can make it for any occasion and just decorate how you like.

Merry Bold & Bright Christmas Gift Card Holder

For this gift card holder, start with a 4 1/4″ x 12″ piece of cardstock. You could also use designer paper if you don’t have 12″ x 12″ cardstock.. Score this strip of paper at 4″ and 8″, basically in thirds since the paper is 12″ long. Then on the end section, cut from the score line down to the corner on a diagonal. This can be on either end of the card.

Put a strip of Tear & Tape Adhesive on the bottom of that section with the diagonal cut. Then fold that diagonal piece over to the inside panel next to it.

Merry Bold & Bright Christmas Gift Card Holder Inside

The gift card base is Granny Apple Green. For my sample I decorated the front with a piece of the little trees paper in the Merry Bold & Bright Designer Series Paper. Then I cut out my own little triangle tree out of Shaded Spruce and adhered a greeting across the front of the tree in the Merry & Bright Stamp Set.

For the inside, you can cut another square to layer on that corner but cut it down like a layer, then cut diagonally. That forms the little pocket where you can put a gift card or money.

These gift card holders are easy to make if you’d like to make some personalized ones!

Shining Christmas Merriest Trees Christmas Card

I considered naming this Shining Christmas Merriest Trees Christmas Card a DELUXE card, not because it is too hard to make but because there were a lot of steps. It just came together step by step. Just follow along, you can make this card too!

The card base is Real Red even though Cherry Cobbler is the official coordinating color, but I prefer Real Red! I adhered a layer of the Shining Christmas Designer Paper, an Online Exclusive, but I think it is no longer available. If you don’t already own it, just choose your own holiday designer paper for the background.

My main idea was to make a Christmas tree using the Merriest Trees Dies with all the different sizes that you can either have for separate trees or layer them all together and make it a little like a 3D tree, especially if you kind of curl the bottom edges of the layers. To help it stand out from the background paper of small candy canes on a dark Mossy Meadow green background, I used the Scalloped Contours Dies to make this Real Red background scalloped rectangle behind the tree.

The tree is made from Garden Green cardstock, diecut with the Merriest Trees Dies and sponged on the edges that would show with a little Garden Green ink. It’s barely noticeable but it’s there and I think it adds a little bit of dimension. After I had all the tree sections stacked properly and glued together, I adhered the whole tree to the Real Red rectangle. For some bling, I die cut the little garlands in the Merriest Trees Dies out of the More Dazzle 6″ x 6″ Designer Series Paper (or any gold paper you have or another color) and glued them on with the tiniest drops of glue. If you don’t have a way to add tiny drops of glue try making a little puddle of glue on a scrap and pick it up with a toothpick perhaps and use that. Or think ahead and use the Adhesive Sheets, but these garlands are so tiny and delicate it might be better to just use glue.

I also had the idea to use a white gel pen (but there are other things you could use) along the bottom edges of the tree layers to make it look like snow. The greeting is stamped in Real Red ink on Basic White from the Brightest Glow Stamp Set. Of course, I hated to cover up any part of my beautiful tree, but I think it looks okay. I cut the strip as narrow as I could and then flagged the ends like a banner. At the top of the tree I added a Star Trinket, which are no longer available.

On the inside, I added a layer of Basic White but added a 3/4″ x 4″ strip of the same designer paper at the bottom to decorate the inside. As I added the glue to the backside of the designer paper, I thought THAT side would have looks good inside the card! So before you apply the glue make sure you check both sides of the paper!

SHOP STAMPIN’ UP! ONLINE HERE!

Beary Christmas Scenes Christmas Cards

Beary Christmas cropped paper

Back in September and November, I made Christmas cards with this Beary Christmas Designer Series Paper. I’ve made other cards with this paper, too, but for the ones I am referring to I used a “scene” from the paper to be the card front. The other day when I was using this paper for more cards, I decided it was time to cut out more scenes to use. It is a little tricky because you have to figure out what area you can cut out without getting something you don’t want in the scene. But it can be done, and making the area smaller, like with a layer underneath rather than directly on the card base might make it easier. It is handy to have a ruler that you can measure with to get an idea of what scene will work.

In the top photo, you can see the large-enough “scenes’ I could cut out of the paper. This paper is just so cute with bears and other forest animals on other sheets. I didn’t use all of the scenes yet, but here are some cards I made with the scenes that I cut out. I was sort of copying the two previous cards I had made, but you usually can’t get the exact same scenes. Maybe this will give you some ideas!

Beary Christmas Tis the Season Card

On these cards, I was able to cut out the exact same scene as on the top card from the second sheet of designer paper. But the card on the left has a different scene. I wasn’t in the mood to do embossing, so I just stamped a new greeting in the Brightest Glow Stamp Set and die cut with a banner die in the Stylish Shapes Dies. I put the greeting up against the edge of the paper so I cut off the banner end to just have a straight edge on the right. I tucked under a little piece of Silver Trim on the banner end.

Beary Christmas Happy Holidays Christmas Card

The top card is the original one I made. The bottom card matches the top card, but then the two middle cards have different scenes. You may even have to move your greeting around to different spots depending on the scene on the card.

I also added some Iridescent Rhinestone Jewels to some of the cards and some Iridescent Adhesive-Backed Discs on other cards.

I didn’t do anything yet with the bears floating on the ice or the snowflake paper, which is the opposite side of the bear on the ice. But I went ahead and cut out the paper so it is ready to go.

This Beary Christmas DSP is still available in the Online Store but will be retiring in January. So if you like it and don’t have it yet, get it while you can!

Don’t forget to shop the Clearance Rack in the Online Store as well!

Merry and Bright Light Bulb Christmas Card

Merry and Bright Light Bulb Christmas Card

One of my favorite things about Christmas is Christmas lights on decorated houses. These large bulbs made a comeback several years ago but they always remind me of my childhood when Christmas trees had these large bulbs on them. It was fun to make this Merry and Bright Light Bulb Christmas Card using the Merry & Bright Stamp Set and the Merry Bold & Bright Designer Series Paper (no longer available)!

The card base is Lemon Lime Twist with a layer of Melon Mambo. Who can pass up using Melon Mambo when you have the chance to use it?! And this designer series paper has so many fun colors to use with it. I used a piece of the Christmas light bulb paper for the background. I hated to cover up very much of it.

On Basic White, I stamped several Christmas bulbs in different colors. It worked best to stamp them slightly off the edges of the paper (or they wouldn’t all fit!). I stamped the bulbs in Real Red, Melon Mambo, Crushed Curry, Pool Party, and Lemon Lime Twist. The bulb socket is Basic Gray. I also stamped the little image of “brightness” in Daffodil Delight ink. Then I used Wink of Stella to put a little sparkle on the bulbs and the “brightness” lines.

The greeting is stamped from the Merry & Bright Stamp Set in Melon Mambo on a scrap of Basic White. Those words in the color blocks are easy to trim down with just a tiny border of white around them. Then I glued them down. Those center pieces are 2 1/2″ x 3 1/4″ layered on Melon Mambo cut at 2 3/4″ x 3 1/2″ and finally Lemon Lime Twist cut at 3″ x 3 3/4″. I think you can still see a lot of the background bulbs. I really like the way this card turned out! Another good idea would be to clear emboss the bulbs to make them shiny.

Remember, Stampin’ Up! just refreshed the Clearance Rack yesterday so be sure to check it out. I haven’t kept track of what was on there and what sold out early. I wish they would leave the product up and just mark it “Sold Out” so we could see what we missed! Everything on there is “while supplies last”.

Watch for my 12 Week of Christmas newsletter for Week 10 coming this afternoon at 1:00 PM if you are one of my Mailing List subscribers!

Holly Jolly Christmas Tag Card

Holly Jolly Christmas Tag Card

How about a bright Christmas card like this Holly Jolly Christmas Tag Card using Lemon Lime Twist?! Doesn’t Lemon Lime Twist sound like the perfect color for a Christmas card? I think it works fine on this card and many others, too! I love the classic Christmas card look, but I also love the fun and bright designs!

You’d be amazed if you knew how many times my mind changes ideas as I start planning a card (if I even have a plan before I start pulling out paper!) and making the card. This started by copying a Christmas tag I’d already made. After I made the tag, I thought, why not put it on a card? And that’s how this card came about.

The card base is Shaded Spruce cardstock with a layer of Lemon Lime Twist paper in the Brights 6″ x 6″ Designer Series Paper. I chose a pattern in there that I hoped wouldn’t be too busy behind the tag.

The tag is diecut with the tag die in the Merriest Trees Dies and so is the little tree designer paper in the Merry Bold & Bright Designer Series Paper (retired). To make the designer paper layer on the cardstock tag, I just trimmed the designer paper just inside the “stitching” on the diecut paper. That gives it just enough of a border to fit on the tag.

For the little tree on the tag, I used another piece of the Brights 6″ x 6″ DSP and cut it out with the smallest tree die in the Merriest Trees Dies. For a little greeting on the tag, I stamped the words in the Merry & Bright Stamp Set in Shaded Spruce ink on Basic white. To make the words fit on my little tree, I trimmed around them with Paper snips following the curve of the cursive writing.

To embellish the tag after adhering the stamped words, I used a Star Trinket (retired) on top of the tree and just three little Lemon Lime Twist gems in the Tinsel Gems Four-Pack. The ribbon at the top is the Silver & White 1/2″ Sheer Ribbon.

Try making some gift tags and then either use them as tags for presents or stick them on the front of a card and make the tag the focal point! Either way, you win!

SHOP STAMPIN’ UP! ONLINE HERE!

Easy Joy of Christmas Card

Easy Joy of Christmas Card

I love this patterned paper with poinsettias, evergreen foliage, pinecones, and berries so I thought I would just make an easy card. This Easy Joy of Christmas Card is made with the Joy of Christmas Designer Series Paper (retired). It didn’t photograph very well in trying to get the embossed greeting to show up, too, but it’s a classic Christmas paper to use.

The card base is Old Olive and I added a layer of Real Red because I love Real Red and it looks good with the red on the paper. Before adhering the designer paper to the card, I added a strip of the Real Red & Gold 3/8″ Dotted Ribbon down the side of the card and tied on a knot.

For the greeting, I stamped one from the Brightest Glow Stamp Set in Versamark, then embossed it in Gold with a Heat Tool on Real Red cardstock.

Just some designer paper on a card with some ribbon and a greeting is all you need!

Scrappy Merriest Christmas Tree Card

Scrappy Merriest Christmas Tree Card

People who have been making a lot of Christmas cards and projects by now probably have a lot of scraps of paper (depending on how many scraps you hoard!). This Scrappy Merriest Christmas Tree Card is a great way to use those scraps!

The card base is Old Olive but you could choose almost any color, possibly depending on the colors in your scraps. Even something neutral like Crumb Cake would probably work. I diecut a piece of Basic White cardstock with the largest tree in the Merriest Trees Dies in the Holiday Mini. Instead of using the diecut tree, I used the negative. You could also do this in green.

For scraps, at first, I pulled out all my Christmas papers, but as it turned out, I only used scraps from the Beary Christmas Designer Series Paper because I’d worked with it earlier in the day. you don’t even need too many but you do need a strip that will go across the width of the bottom of the tree. I cut mine at 1/2″ wide. You could also use scraps of ribbon and I may try that another day! I know we all have SO much excess ribbon!!

On the back of the negative piece, I applied Stampin’ Seal Adhesive all around the border of the cutout tree. I didn’t even trim down the scraps lengthwise. You can just place them and trim off the excess afterward. Even though I was putting them close together, from the front there seemed to be slight gaps but I knew those wouldn’t show with the green Old Olive background. You probably want to keep the strips straight or else put them on a diagonal.

Scrappy Merriest Christmas Tree Prep

After trimming off the lengths of the scraps, I applied Stampin’ Seal Adhesive (you could use the Multipurpose Glue) on the back of the card, across all the strips, and then adhered it to the card base.

Scrappy Merriest Christmas Tree Back

To finish the card, I stamped a greeting from the Merry & Bright Stamp Set in Real Red on a scrap strip of Basic White and trimmed it down to fit on a layer of Old Olive, then adhered to the card below the tree.

Of course, I had to do some embellishing! I put a Star Trinket (no longer available) at the top, which didn’t photograph very well, but looks really nice. Then I started playing with the Adhesive-Backed Glitter Sequins and probably didn’t stop soon enough! I put white ones around the tree to maybe look like snow and I put green ones on the tree to give it some sparkle! These are retiring but are still in the Online Store as I write this so I would recommend putting a package or two on your next order because they will be good year round and being flat, are great for mailing!

Scrappy Merriest Christmas Tree Card

Check out your paper scraps (or ribbon scraps) and see what you come up with! Every card could be different!

Santa Gift Card Holder

Santa Gift Card Holder

Here is an idea I saw on Pinterest, a Santa Gift Card Holder, but I had to figure out how to make it myself. It’s fairly easy so I hope you will give it a try! The top half is held in place by Santa’s buckle and inside there is a pocket to hold a gift card or cash.

Cut a piece of Real Red cardstock 4 1/4″ x 11. Score at 5 1/2″. Fold and crease. Cut off the 2 3/4″ bottom portion of the front of the card. This is half of the card front which is 5 1/2″ long, so half is 2 3/4″. This piece that was cut off will become the pocket on the inside of the card to hold the gift card! Apply some strong adhesive to adhere to the bottom of the inside of the card. I used Tear & Tape to adhere the pocket. Put the tape along the bottom of the piece and on each side. However, leave a little space without tape up near the top on each side to leave space for the tucked in top fold. Adhere it at the very bottom of the inside of the card. That makes the pocket!

To decorate the front, you can use Basic White cardstock to make Santa’s fur trim. I used the scallop edge die in the Scalloped Contours Dies to cut out the fur. Just die cut two long strips and you can cut off the excess when you adhere it to the card. A little piece goes on the top portion. A longer piece goes along the bottom. If you use a die cut piece with the scallop on both sides, just lower it so it completely covers the red Santa suit and then trim off the excess bottom edge. Slip in the short little piece of fun going up to where the belt will be.

For the belt, cut a strip of Basic Black that is 1″ x 4 1/4″ Glue that along the top edge of the inside pocket. For the belt buckle, cut out a piece of Gold Glimmer Paper or Gold Foil or whatever you like. It should measure about 1 3/4″ x 1 3/4″. Cut out a piece of Basic Black at 1″ x 1″. Adhere this to the center to look like the belt going through the buckle. On this sample, the buckle is popped up with Stampin’ Dimensionals. Do not place Dimensionals above the belt line or you will close off the gift card pocket!

On the inside top of the card, add a white piece of cardstock with a stamped greeting such as this one in the Merry & Bright Stamp Set. Put the gift card or cash into the pocket. I suggest placing it vertically so it doesn’t disappear down in the pocket. When closing the top portion of Santa’s suite, tuck that top fold underneath the gold buckle to hold it closed!

That’s all there is to it! You could add a little tag to the top corner of the card or add some buttons on the fur. This time I just liked the fur plain. Check out the photos below!

Santa Gift Card Holder Open

Santa Gift Card Holder Inside