Category Archives: 3-D, Gifts & Things

Thanksgiving Candy Holder Favors

Thanksgiving Candy Holder Favors

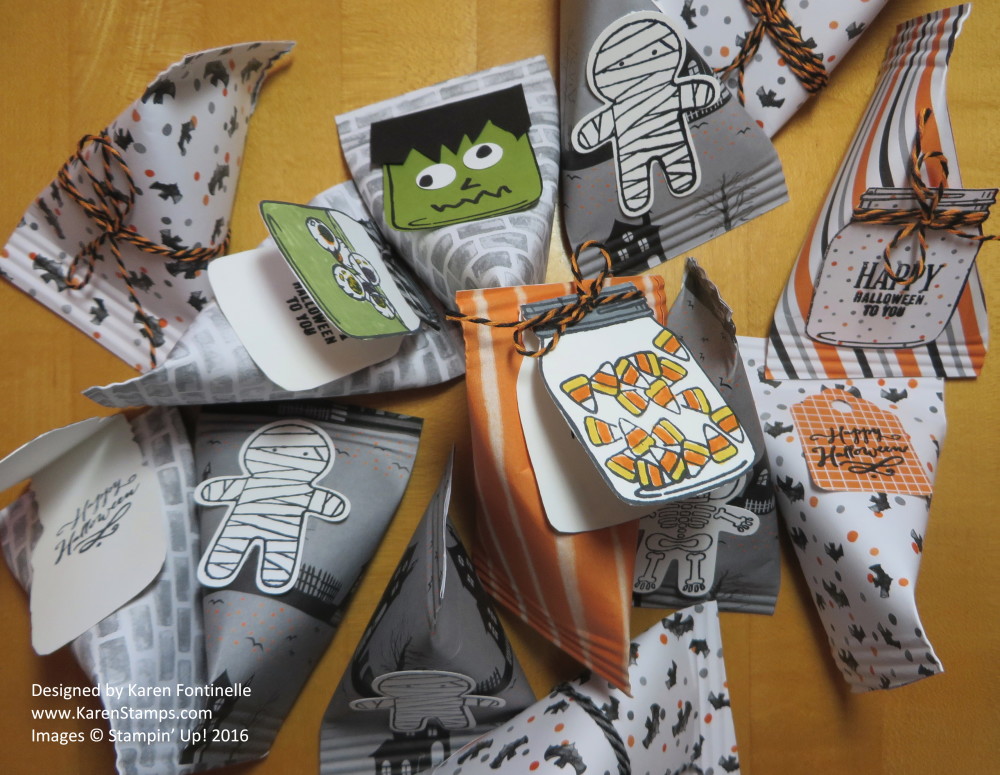
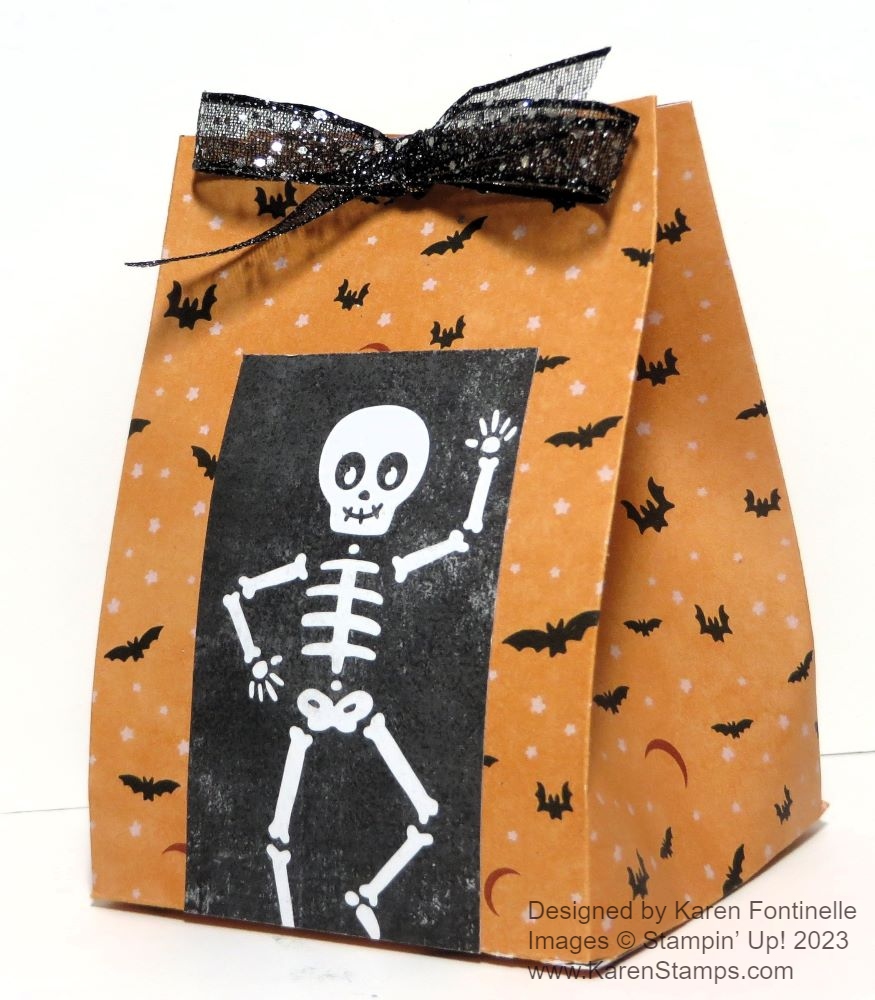
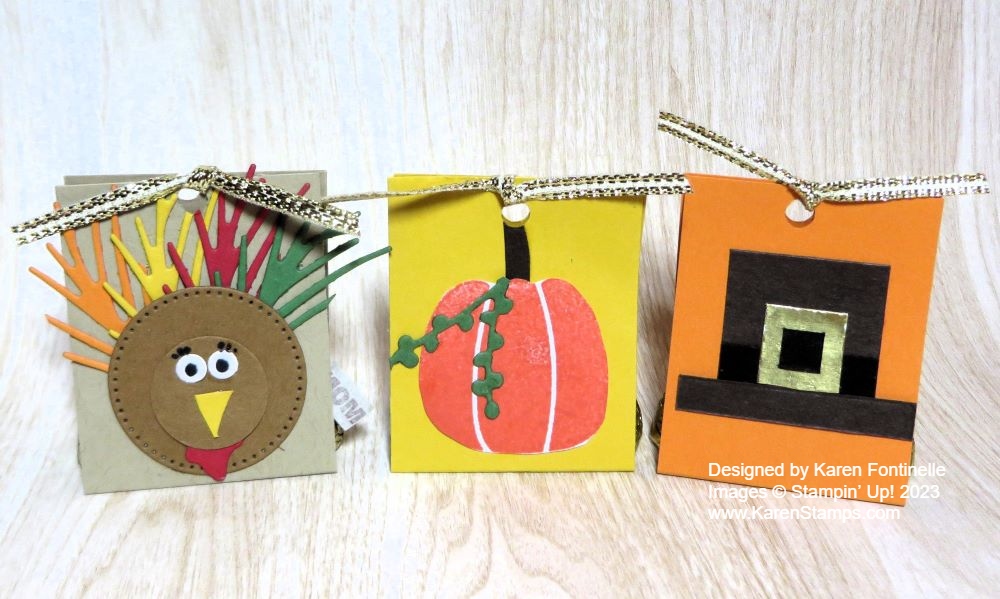
It’s down to the wire for Thanksgiving, as hard as that is to believe, but there’s still time if you want to make some little Thanksgiving Candy Holder Favors. These are really easy and will hold two chocolate kisses or a chocolate nugget. Think how cute these would be by everyone’s plate at Thanksgiving dinner for a little favor!

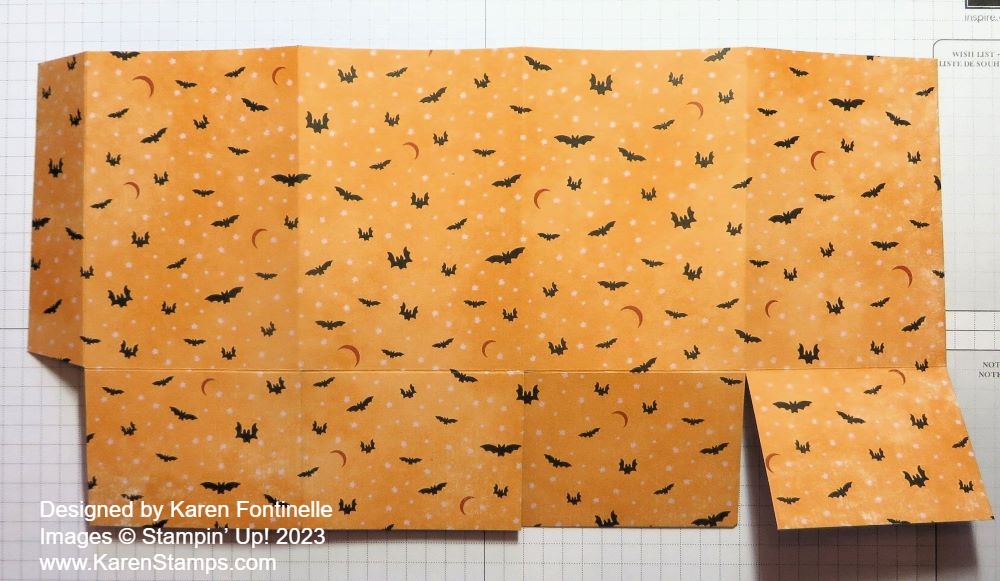
To make these little candy holders, cut a strip of cardstock approximately 5″ long by 1 3/4″ wide. You can change up the measurements depending on what kind of candy you want to put inside. Score these strips at 2″ and 3″. Crease and fold on the score lines. You can use different colors and images on the front or make them all match.

After you have your candy inside, you can punch a hole in the top and tie a ribbon through the hole or use a couple of Mini Glue Dots to hold them closed. If you have any kinds of clips you could use those to hold them closed. You can also attach a greeting or a guest’s name to use each favor as a place card. I used to love to make place cards when I was young for family dinners!

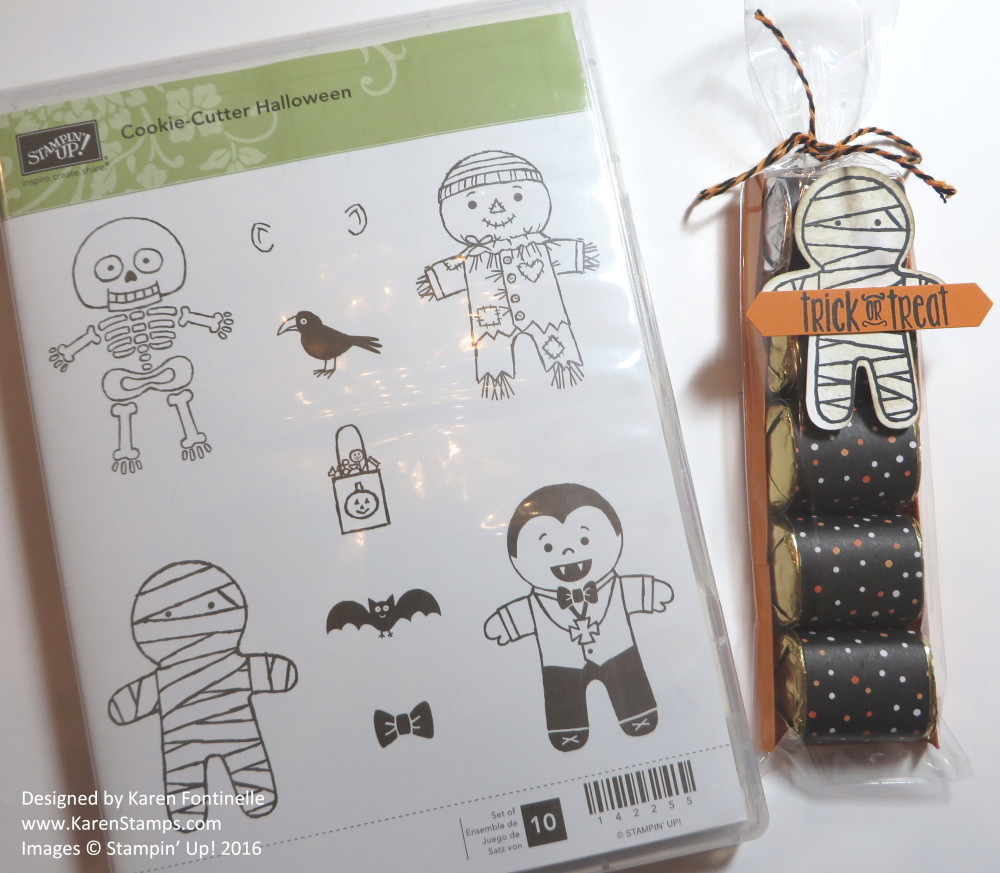
I started with the pumpkin and the Pilgrim hat but I got a little carried away with the turkey! The pumpkin is stamped from the Pick of the Patch Stamp set and just a little diecut greenery that was already in a pile of scraps on my table.

The Pilgrim hat is made with Early Espresso for the hat and the brim. The hat is a 1″ x 1″ square and the brim is 1/4″ x 1 1/2″. The Basic Black band on the hat is 1/4″ x 1″. The buckle is made with a 1/2″ x 1/2″ square of Gold Foil with a center of Basic Black 1/4″ x 1/4″ to look like the band going through the buckle.

The turkey is made with two circles of Pecan Pie cardstock. The feathers are die cut greenery in the Joy of Noel Dies! Just use whatever you have or come across! The red turkey waddle is a diecut holly leaf from that set! The eyes are punched with my old Crop-a-Dile and colored in with black.

These are just fun little candy favors, so unless you want to, you don’t need to go to a lot of trouble making these!

Happy Thanksgiving!

Get the November Paper Pumpkin Kit Today!

Paper Pumpkin November 2023 Sq Ad1

The November Paper Pumpkin Kit, the papercrafting kit that comes to you in the mail every month, is called “Warm Wishes” and is a kit to make holiday treat boxes! Always fun things for the holidays! The holiday Paper Pumpkin Kits are usually my favorites.

You only have today and tomorrow left to sign up for Paper Pumpkin to receive this month’s kit! Friday, November 10th is the last day, and soon after that Stampin’ Up! will begin sending out the kits that you will receive in your mailbox! What a treat!

I always say Paper Pumpkin is the gift you give yourself (and maybe someone else too!). It actually seems like a gift when you open it, especially the holiday kits with the specially decorated box. Inside you’ll see the little ink spot and the exclusive stamp set. Then wrapped in tissue paper, just like a gift, is a package with all the materials you need and the instructions!

“Light up the Christmas season with this month’s Paper Pumpkin kit! With traditional Christmas home designs and warm Christmas wishes, spread the light of Christmas with a gift box! Plus, you can get the Warm Wishes Cards & Envelopes Add-On to take your Christmas crafting even further (available while supplies last).” (You can only purchase these cards and envelopes if you are a Paper Pumpkin subscriber.

Kit Details:

This kit includes:

8 boxes; 4 each of 2 designs
1 Mossy Meadow Stampin’ Spot
Iridescent glitter accents on paper
Precut paper pieces
Linen thread
Treat bags
Warm Wishes photopolymer stamp set


Completed box size: 4-1/4″ x 4-1/2″ x 1-1/2″ and 4/1/4″ x 3-3/4″ x 1-1/2″


Coordinating Stampin’ Up! colors: Balmy Blue, Blueberry Bushel, Cherry Cobbler, Crushed Curry, Daffodil Delight, Lemon Lolly, Mossy Meadow, Night of Navy, Old Olive, Pecan Pie, Real Red

Sign up for a Paper Pumpkin subscription today!

No risk, no obligation. Cancel or Skip a month now and then if you need to.  Sign up by November 10th! 

As a bonus you can purchase when you are a subscriber:

Paper Pumpkin Add-On

ADD-ON DETAILS

Warm Wishes Cards & Envelopes (163985)
 

While supplies last.
$14.00 USD

This add-on includes:
• 20 Cards & Envelopes 
• Iridescent glitter accents on paper
• Folded card size: 5″ x 7″ 

These look like beautiful cards AND envelopes that will help you get your Christmas cards out to the mailbox quickly!  Just add a nice greeting to the card and stamp or write a personal message inside!

SUBSCRIBE to the November Paper Pumpkin by November 10th! Click HERE!

Get the 12 Weeks of Christmas Today!

Christmas Truck

Every year I send out the 12 Weeks of Christmas holiday emails only to my Mailing List subscribers as a thank you for following me on this stamping journey! They also get a newsletter every Tuesday with Stampin’ Up! news and offers plus at least one stamping project idea or tip. But when we start counting down to Christmas, I send out a special email on Wednesdays with an exclusive holiday project that I don’t post anywhere else!

We are already on Week 5 of the 12 Weeks of Christmas!! You missed the first four weeks, but you can still get the rest of the holiday emails if you sign up right now before 1:00 PM CT today!

Here’s how to get on my Mailing List! If you are on a computer, you probably will see a red box on the right side at the top. Just fill in your name and best email address.

If you are on your phone, you may have to scroll to the bottom of the screen.

Or just click here to go to my Mailing List Sign Up page!

Last Minute Past Halloween Ideas!

If you are still looking for last-minute Halloween ideas, here are a few from past years! You can update with our newer products or maybe you still have some of these older products from years past! Whatever you like! Click the title above the photo to go to that blog post for directions. Don’t miss the last idea at the bottom of the post – a new one I had to stick in because it’s so fun! I usually make one of these every year! Save that paper towel roll!

Make a Cute Halloween Votive Candle Holder

Make Easy Sour Cream Containers for Halloween Treats

Make Easy Sour Cream Containers for Halloween Treats

Halloween Chocolate Candy Treat Bag

Halloween Chocolate Candy Treat Bag

Triangle Treat Box For Halloween

Triangle Treat Box For Halloween

Halloween Night Candy Bars

Halloween Night Candy Bars

Witch’s Boots

Here’s an updated idea I made this year but I’ve made lots of these in the past!

I didn’t stuff any candy in there yet but I will! The Witch’s Boots are made with a paper towel roll cut in half. Wrap the roll in designer paper or cardstock. I used the Merry Bold & Bright Designer Paper, the pattern with the stripes that look like socks! Yes, you can use Christmas paper for a Halloween project!

Take a piece of Basic Black Cardstock however high you would like it to be to wrap around the bottom of the roll to start making the “boot”. Cut it so the ends meet in the center of the front of the boot and then you can fold back the top corners. Make it tall enough to add the buckle, especially if you want a big one.

Cut a piece of Basic Black in a long triangle to make the bottom of the boot. You want it to be as wide as the roll but you can trim around it to make it rounded in the back. You can cut it longer than you want and then curl up the toe with just a pencil or something however you like it.

You can make a cheater buckle by just adhering a square of black in the center of a square of Gold Foil. Then put some candy in a cello bag or add it to the “boot” as is. Just have fun with this idea

I hope these ideas are helpful and fun for you! Each one of these is my favorite thing that I love to make! (Maybe, especially, decorating these large candy bars??!!!)

Have fun and be safe on Halloween Night!

Them Bones Skeleton Triangle Treat Box For Halloween

Them Bones Skeleton Triangle Treat Box

One of my favorite types of treat boxes is this triangle treat box. You can make them for any occasion such as this Them Bones Skeleton Triangle Treat Box For Halloween. This kind of treat box is really so easy to make! You will be surprised if you haven’t made one yet!

You can vary the size of these triangle boxes. All you have to do is follow the basic pattern. You can use cardstock or designer paper. You can leave the cardstock plain, stamp on it, or add designer paper or embellishments. And these boxes aren’t just for candy or food. They can hold a small gift, or even money or a gift card.

Here is the basic pattern and the size I used for this Halloween Triangle Box. I used a piece of Them Bones Designer Series Paper to make this box. Obviously, cardstock would be a little bit sturdier if you needed that. My paper is cut at 4″ x 8″. If your paper has a pattern you need to pay attention to which way you cut the paper so the pattern won’t be sideways or something.

Triangle Box Drawing

After cutting the paper to the size you want, the rest is scoring. The blue lines on the diagram above are the score lines. Score the length of the paper in half, so if your paper is 4″ x 8″, score at 4″ in the middle. Measure the mid-point on the ends (2″) and lightly mark with a pencil.

The “tricky” part is scoring on the diagonal but it is easy. In that awkward position with your Paper Trimmer, score from that 2″ middle point at one end down to the middle score line which will be on a diagonal. Do that on both sides of one end, then turn the paper and score at the other end in the same way. When you do it, you’ll see how it goes. Here you can see the other side of the paper, which I could have used instead of the bones pattern. You can see what the score lines look like, really from midline to midline. Then you’ll punch holes in each corner, preferably holding the ends together when you do it so they match up.

Triangle Treat Box Scored

After you do the scoring, crease all the score lines and fold the box together to see how it goes. Then hold the ends together on each side and use a hole punch of whatever size you like to punch holes through the two papers on each side. After you decorate your box and put the treat inside, you can tie the box together with ribbon or twine.

This box is simply decorated by cutting out the skeletons from another sheet of paper in the Them Bones DSP and adhering them to the box. You could also add a greeting or some other embellishments. I tied my box closed with the Black & White 1/4″ Gingham Ribbon.

Here is what the box looks like from the side:

Them Bones Skeleton Triangle Treat Box Side

Here’s a triangle box I turned into a Witch’s Hat for Halloween….nine years ago! Wow!

Try one and you will see how easy it is to make a triangle treat box. And you just might need one or more for Halloween night maybe for family treats or for a few special trick-or-treaters!

Happy Halloween in a few days!

OnStageAtHome2023 Gift Box!

OnStageAtHome2023 Box

Stampin’ Up! is having a virtual event on the second Saturday in November called OnStageAtHome 2023 and I was one of the lucky “several thousand” people who registered early enough to get this free gift box! It just arrived late yesterday and was so much fun I had to show you all the things in it!

You still have time to sign up to be a Demonstrator with Stampin’ Up!, get the special deal offered until October 31, and get to “attend” this virtual mini-convention on your computer FREE of charge! You will automatically be registered, and even if you can’t attend, you can watch a recording later. (But you won’t get a gift box, sorry!) And get previews of the upcoming Spring Mini Catalog!

OnStageAtHome2023 Box Inside

Inside is a 500-piece jigsaw puzzle and all kinds of things!

OnStageAtHome2023 Box Contents

Even a pair of Stampin’ Up! socks!! There are pens, a pin, photo props, and a quality notebook with little stickers!

OnStageAtHome2023 Box Open
OnStageAtHome2023 Notebook

OnStageAtHome2023 Box Props

I knew it was coming, but it was such a nice surprise when it arrived on my porch! I just had to show you all the goodies! And now I have a new pair of socks to wear! And don’t all of us papercrafters just go crazy over notebooks and pens?!! I always have!

We are all still very much in holiday mode, but it won’t be long until we’ll be looking forward to a change of pace and be ready for new spring products! It will be fun at this virtual OnStage to see what some of the new products will be! One of the best perks of being a Demonstrator!

Them Bones Halloween Treat Bag

Them Bones Halloween Treat Bag

Here is a quick and easy candy or treat holder you can make! It’s the Them Bones Halloween Treat Bag and you can copy this exactly or make it and decorate it however you like! It only took a few minutes to make!

Start with a piece of cardstock or designer paper that is 12″ x 6″. Keep in mind that 2″ of that will be the bottom flaps, so if you want your treat bag taller, you need to add more height so maybe you would want to cut the paper 12″ x 8″. I used the batty pattern in the Them Bones Designer Series Paper in the Stampin’ Up! Holiday Catalog.

Using the Paper Trimmer or Scoring Tool you will score the paper so it can be folded into the bag shape. Pay attention if your paper has a pattern so you don’t end up with it upside down! Place the paper vertically so you can score the bottom flaps at 2″. Then turn the paper so the 12″ length goes across the top, horizontally. Score at 1″ 3 3/4″, 6 1/2″, and 9 1/4″.

Box Diagram

Crease and fold all the score lines and use a Bone Folder to get a sharp crease. Cut out the small section at the bottom as you see in the diagram above (the light blue area). Cut up on all the bottom score lines for the flaps just up to the 2″ score line.

Them Bones Treat Bag Scored

You can pretty well see from my paper above how it is scored, creased, and the bottom flaps cut apart. If you flipped the designer paper over, you would put adhesive on that narrow strip on one side and it adheres to the straight side on the other end of the paper.

Fold everything to form into the treat bag. Make sure you see how it all goes together before you start glueing! Add some strong Seal+ or Tear n Tape on that narrow section above the cut off piece. Then just fold the other end over flat on the table so it all lines up. This is easier than trying to hold it in your hands! Next, glue the bottom flaps together. Push your Bone Folder or something down inside the bag so you can push those bottom flaps together after they have been adhered to get a strong bond.

Before you decorate the bag, look and see where the paper is adhered together to form the bag shape so that you can put that in the back so it’s not so visible. Then decorate the front of the bag however you like. I cut out a rectangle with a skeleton on it that fit perfectly on the front of the bag. You could add a greeting or some jewels. I decided I liked it as is.

With this pattern, you can leave the top of the bag open if you like. Before adhering anything, you could even fold the top edge of the bag down if you wanted to show the inside design of the paper. I didn’t want my bag to be much shorter than it is so I didn’t do that. But if you want to put your treat inside and then close it up, you can add some kind of clip or punch two holes in the top with a punch and put a ribbon through. I used this Black Glittered Organdy Ribbon (retired) but the gingham ribbons we sell now would be cute also. To close the top of this bag, just push in the sides and work with it until you get the top edges even and the sides and bottom how you want them.

As I said before, you could use any paper and decorations to make these little bags for any occasions to hold treats or a small gift! Once you get the hang of making these little bags and boxes with your stamping supplies, you will open up another way to be creative!

SHOP STAMPIN’ UP! ONLINE HERE!

New November Paper Pumpkin Kit!

Paper Pumpkin November 2023 Flyer

Just as soon as the current month’s Paper Pumpkin goes out in the mail, the next day we find out what the next Paper Pumpkin Kit will be! The November Paper Pumpkin Kit, the papercrafting kit that comes to you in the mail every month, is called “Warm Wishes” and is a kit to make holiday treat boxes! Always fun things for the holidays! The holiday Paper Pumpkin Kits are usually my favorites.

“Light up the Christmas season with this month’s Paper Pumpkin kit! With traditional Christmas home designs and warm Christmas wishes, spread the light of Christmas with a gift box! Plus, you can get the Warm Wishes Cards & Envelopes Add-On to take your Christmas crafting even further (available while supplies last).” (You can only purchase these cards and envelopes if you are a Paper Pumpkin subscriber.

Kit Details::

This kit includes:

8 boxes; 4 each of 2 designs
1 Mossy Meadow Stampin’ Spot
Iridescent glitter accents on paper
Precut paper pieces
Linen thread
Treat bags
Warm Wishes photopolymer stamp set


Completed box size: 4-1/4″ x 4-1/2″ x 1-1/2″ and 4/1/4″ x 3-3/4″ x 1-1/2″


Coordinating Stampin’ Up! colors: Balmy Blue, Blueberry Bushel, Cherry Cobbler, Crushed Curry, Daffodil Delight, Lemon Lolly, Mossy Meadow, Night of Navy, Old Olive, Pecan Pie, Real Red

Sign up for a Paper Pumpkin subscription today!

New Rustic Christmas Countdown Kit!

Rustic Christmas Countdown Kit

There’s a new holiday kit in the Stampin’ Up! Kits Collection! Bring the spirit of Christmas into your home with the Rustic Christmas Countdown Kit.

This kit has everything you need to create 25 individual envelopes that you can fill with small treats, kind messages, and more. With seasonal greenery, fun accent pieces, and gold detailing, you’ll be able to make and display your own unique hanging advent calendar anywhere you’d like. What a simple and easy way to count down the days ’til Christmas!

This kit includes:

-Enough supplies to create 25 individual envelopes
-Printed die cuts, printed labels, adhesive, embellishments, clothespins, and twine
-Folded envelope size: 4″ x 3″ (10.2 x 7.6 cm)
-Coordinating colors: Cherry Cobbler, Crumb Cake, Mossy Meadow, Old Olive

You can use this kit for an Advent Calendar or maybe you will think of an alternate way to use this kit for your family. Maybe you will want to make it and give it as a gift to another family. Lots of possibilities! It looks like a beautiful kit and something different! Check it out!

Watch Sara Douglass show you how the Rustic Christmas Countdown Kit goes together!

SHOP THE KITS COLLECTION HERE!

Join Our Stamping With Karen Mailing List!

Mailing List Mailbox

Have you signed up for my Stamping With Karen Mailing List yet? If you like visiting my blog or if this is your first time here, please join us by signing up in the Mailing List Sign Up Box! You will receive an email newsletter on the first Tuesday of each month with the latest Stampin’ Up! news and any special offers, plus at least one tutorial for a card or another project or tip.  Each following Tuesday I send an email, again with some kind of stamping idea or a review of some projects I have recently had on my blog, plus any news or reminders. Stampin’ Up! generally updates us on Tuesday mornings so that is why Tuesday is a good time to get in touch with you!

If you like getting new ideas for stamping, then this is for you! These projects are exclusive to my newsletter. As a special gift for signing up, you will receive a PDF called “A  Dozen Creative Gift Wrap Ideas”.

And one of the best parts of being on my mailing list is something that will be coming up VERY soon! We know the holiday season will sneak up on us quickly!  Something very popular with my subscribers is my “12 Weeks of Christmas” newsletter. Each week leading up to Christmas, I send out a special email with an exclusive project in it.  We start with cards, move on to gift ideas, and end up with tags and bags! Only my subscribers receive these newsletters each week leading up to the holidays so make sure YOU are signed up! And tell your friends!

No obligation, of course!  As with any email, just unsubscribe it if it is not for you.

You can also follow me on my Stamping With Karen Facebook page HERE and follow me on Instagram @stampingwithkaren.

Keep on top of all things Stampin’ Up! and learn ways to use those great products in your papercrafting!  Sign up in the Mailing List sign-up box in the upper right corner of my blog or in the pop-up box! If you are on your phone, the red signup box may be at the bottom of this post.

Here is a link to sign up also. See you on Tuesday! And for the 12 Weeks of Christmas!

Penguin Punch Christmas Gift Tags

Penguin Punch Christmas Gift Tags

If you don’t already own the Penguin Builder Punch, run and get it on the Stampin’ Up! Clearance Rack so you can make these Penguin Punch Christmas Gift Tags! I can’t believe it is still available but it is marked down to $4.50 instead of $19.00! You may as well buy one for that price! Or you may already have one from a previous catalog so dig it out and make something fun for Christmas!

I thought it would be fun to make a couple of gift tags using the Penguin Punch and some new designer series paper. You can use a tag die that you have or cut your own rectangle and then cut the top corners at an angle. I intended to use the tag die in the new Merriest Trees Dies (coming soon!) but then I came across the Tailor Made Tags Dies. If you have those, just use either of the die shapes.

I cut out a piece of designer series paper and cardstock for each of the tags. That makes them both the same size so you can’t layer them, but I just trimmed off inside the stitched marks on the designer paper, which made it fit just inside the stitched lines of the cardstock tag.

The Penguin tag on the left is made with Poppy Parade Cardstock and the Fa La La La La pattern in the Merry Bold & Bright Designer Series Paper (161945). This paper is so bright and happy, you will love it! I adhered the designer paper onto the cardstock tag and popped the penguin up with Stampin’ Dimensionals. For a finishing touch, I got the idea to just cut out a short strand of the Christmas lights on another of the papers and put it on the tag up at the top. If you want, you can put a piece of Basic White on the back of the tag if you think you need something to write your “To & From” on or a personal message.

The penguin tag on the right is made with Misty Moonlight cardstock and the snowflake paper in the Beary Christmas Designer Series Paper (162015). Before I adhered the penguin with Stampin’ Dimensionals, I got the idea to cut out some trees from the A Walk in the Forest Designer Series Paper (162377). It’s the paper at the top of page 5 in the Holiday Mini so don’t miss it. Maybe some dies would have cut out some of these little trees but I didn’t look! (Actually, some dies will cut out the fuller trees, not the skinny straight ones.) For a greeting, I used one in the Brightest Glow Stamp Set but cut the words apart and cut them smaller so they would fit on the tag.

The penguins are super easy to make with the punch. Just cut the two pieces out of black and white and the little feet out of Pumpkin Pie cardstock or something similar. I do not have the coordinating stamp set so I just drew in the little black eyes with a marker and the little beak with a Pumpkin Pie Stampin’ Write Marker. If you want, you could add a scarf around his neck or make a little hat.

The die punches out the hole in the tag so you don’t have to do that. Just pick a ribbon you like to tie through the hole so your tag is ready to go when you start wrapping gifts!

Remember to check out the Clearance Rack and see what other bargains you need plus the Penguin Punch!

SHOP STAMPIN’ UP! HERE!

Kits Collection Festive Tags Kit

Kits Collection Festive Tags Kit Contents

A great kit to purchase on the Stampin’ Up! Kits Collection Sale during August is this Festive Tags Kit! It is an easy kit to make, no stamping, only takes about an hour total, and you will be using the tags for sure for holiday gifts! It’s a win win!

Inside the box, you get all the supplies you need to make the project, all wrapped up with the easy directions.

Kits Collection Festive Tags Kit Contents2

It’s so fun to open up the package of supplies and see what goodies you got in there! Besides the basic pieces to make the tags, you get some goldish jewels and a roll of twine, plus Dimensionals, which are the only adhesive you need.

Kits Collection Festive Tags Kit Pieces

Here’s a tip that usually works! As you punch out the pieces of any kit, if you keep the stack of the same pieces lined up and together, you can usually punch out all three pieces in the stack at the same time. You don’t necessarily have to do each one on each sheet. Just stack them up perfectly and punch them out! Once you have all the pieces and embellishments laid out on the table, you are in good shape to start assembling the project!

Kits Collection Festive Tags Kit Tags

This Festive Tags Kit makes 15 tags for your holiday gifts! Three each of five designs! That really gives you a good variety! And just stick on the greeting (in another language, if you choose!) instead of stamping! Tied the decorated tag onto a backing tag and you have a cute tag with space to write on the back who the gift is to and from. Once you add those gold-colored self-adhesive jewels, it really makes those cute tags pop!

Watch Sara’s video below and see how she puts the tags together!

You’ll save a little bit of money if you purchase this kit before August 31 while this Kits Collection Sale is on! I would recommend buying more than one kit, maybe even two extra kits! You will enjoy putting the tags together and knowing that you have plenty when you go to gift wrap your packages. Or add the tag you made to the front of a card, perhaps with an extra layer or something to make up the card, and you’ll have an easy card ready to go!

Check out the other holiday tag kits from past years as well!

Shop the Kits Collection Sale HERE!

Here’s the September Paper Pumpkin!

Paper Pumpkin Sept 2023 Love and Gratitude Sq2

It’s always exciting to see what the next Paper Pumpkin Kit will be after the current one goes out in the mail to subscribers! In this case, when I saw the September Paper Pumpkin Kit, With Love & Gratitude, I was very impressed! Just look at the gorgeous box the kit is coming in and the beautiful pumpkin designs and colors!

And the reason it is so pretty is because it was inspired by Shelli Gardner, Founder of Stampin’ Up! If you are new you may not be familiar with Shelli because now her daughter, Sara Douglass is CEO of the company, but Shelli is still active in the company. Those of us who have been with Stampin’ Up! for a long time and feel like we “know” Shelli can attest to the fact that when she has a hand in a project, it will be one we all like!

Express your love and gratitude in elegant style with the September Paper Pumpkin Kit inspired by Shelli! This kit includes eight treat packages (you can also use them for small gifts) and eight miniature note cards with matching envelopes and specialty gold foil embellishments. Whether you’re needing a hostess gift, a sweet surprise for dinner guests, or have another reason to give love and thanks, this kit has you covered.

Plus, don’t miss the Thoughts of Thanks Journal! It matches both the design and intent of the kit, giving you an even more personal way to document and express your gratitude. It’s available as an add-on, but only while supplies last! You can purchase it right now in the Online Store IF you are a Paper Pumpkin subscriber!

Paper Pumpkin Sept 2023 Love and Gratitude Sq3

ABOUT THE KIT
Kit Name: With Love & Gratitude

This kit includes:

8 treat packages
8 note cards
8 coordinating envelopes
1 photopolymer stamp set
1 Lost Lagoon Ink Spot
Specialty gold foil, precut embellishments
Adhesives
Finished treat packaging: 3-1/2″ x 5″ x 2″
Final card size: 3-1/2″ x 3-1/2″
Coordinating Stampin’ Up! colors: Copper Clay, Crumb Cake, gold foil, Lost Lagoon, Mossy Meadow, Pebbled Path

ADD-ON DETAILS
Thoughts of Thanks Journal (163270)
Available starting: August 11, while supplies last

Price: $15.00 USD

This add-on includes:

8″ x 10″ journal
2 specialty gold foil sticker sheets
Gold-clip page marker
Coordinating Stampin’ Up! colors: Copper Clay, Crumb Cake, gold foil, Lost Lagoon, Mossy Meadow, Pebbled Path

SIGN UP RIGHT AWAY SO YOU WON’T MISS OUT!

JOIN PAPER PUMPKIN HERE!

Altered Gift Bag with Masterfully Made DSP

Altered Gift Bag with Masterfully Made DSP

It just so happened that I needed a larger gift bag and couldn’t find one in my stash of bags in the closet. They are mostly Christmas bags. Luckily, I found this gift bag from a fabulous bakery, but of course, it has the bakery’s name on the front of the bag and the back. I decided to use the bag but decorate over the bakery name and this Altered Gift Bag with Masterfully Made DSP is what came of that project!

The colors on the bag were already interesting. When I started comparing our Stampin’ Up! cardstock, the colors on the bag came very close to Berry Burst and even pretty close to Coastal Cabana. And this bag is at least several years old so they were ahead of the Stampin’ Up! trend!

I played around with some different ideas and originally thought about using the Cheerful Daisies one way or another, but I ended up using the Masterfully Made Designer Series Paper which is extremely colorful but seemed to go along with this bag. I cut a wide enough strip of this roses pattern to cover the bakery name and take up some space on the front. The paper is still 12″ wide so you can get an idea of how much wider the shopping bag is. Then I added narrow strips of the green torn paper pattern in the Masterfully Made DSP to the top and bottom of the strip. I had a few scraps of the rose paper so I cut out the roses as best I could out of the scraps using my Paper Snips and decided to place them on the bag as if they are cascading down.

This isn’t my favorite bag I have ever decorated, but I think it turned out okay and I decided to not get too perfectionistic about it because who knows what will happen to a gift bag after the gift is opened. I really love to decorate and personalize shopping bags I get at certain stores, usually requiring the business name to be covered up, which is pretty simple. This bag being larger and having these two colors on it made it a little more challenging. You can even purchase place kraft or white shopping bags at craft stores or online to have some handy for when you want to make your own creation to go with the gift and occasion.

The back side of the bag also had the bakery name so I just chose a piece of the Bright & Beautiful 6″ x 6″ Designer Series Paper to cover the name. It also has the Berry Burst color in it. Here is a photo of the back of the bag.

Altered Gift Bag back

At least I have a large enough gift bag to use and decorated with some interesting designer paper! I usually save those handled bags when I get them because I know I can turn them into a gift bag and not have to run to the store at the last minute. Here is one example from a few years ago of a bag I turned into a Christmas gift bag.

Look through your bags and see if you have something you can alter and make into a nice gift bag! It’s really a fun project and oh so handy! You will be glad you did!

It’s the Last Day For the Stampin’ Up! Designer Series Paper Sale!

TODAY, June 30th is the last day to get these select designer series papers discounted at 15%! Every little bit helps! Check your inventory and either replace what you have used up so far or get what other papers you want just because!

SHOP THE STAMPIN’ UP! DESIGNER SERIES PAPER SALE!

DSP Sale Items1
DSP Sale Items 2
DSP Sale Items4

Those are your choices! Pretty ones! Have fun shopping!

SHOP STAMPIN’ UP! ONLINE HERE!