Monthly Archives: April 2015

Starburst Sayings Happy Day Card

Starburst Sayings Happy Day Card

Starburst Sayings is one of the stamp sets on the Stampin’ Up! Retired List that I was so surprised to see on there! It’s a fun stamp set to use and can cover many occasions from congratulations, birthdays, anniversaries, new baby, encouragement, and even weddings. All it takes is using the appropriate colors, papers and embellishments.  Dress it up or dress it down, as they say! You can use circle punches with several of the stamps if you don’t mind punching inside the starburst edges.  Use the matching Starburst Framelits Dies to use with these stamps or just paper.

The Starburst Sayings Stamp Set is discounted on the Retired List right now or you can purchase the Bundle with the stamp set and the framelits and save a little money.

Starburst Saying Stamp Set Images

Here’s another card I made awhile back with one of the other sayings:

Starburst Sayings and Retro Fresh

This card is from last year and has retired paper and trim on it, but you can easily change it with something current.  You can read that blog post HERE.

To shop for any of the Stampin’ Up! Retired products, just go to my Stampin’ Up! Online Store HERE.  You can choose Stamps or Accessories. Click the View ALL dropdown box so that you can just scroll through all the products rather than having to go to the next page and the next.

Label Love Happy Birthday Card

Label Love Happy Birthday Card

Is it really going?  Label Love Stamp Set? It’s on the Stampin’ Up! Retired List so I guess it is true. This was a set that even if I wasn’t planning to use it, the greetings were so “usable” that if I couldn’t find quite the right thing, this set would usually fill the bill.

Label Love Stamp Set

As you can see, the sentiments cover just about everything! And even better, this stamp set coordinates with the Artisan Label Punch. This punch is also retiring and is discounted. Of course it is only available while supplies last as are all the accessories. On this card, I actually cut out the stamped label and then punched out a piece of Coastal Cabana card stock for the layer behind it. You could also color the edge of the stamped image and punch out and it would look like a layer. To make the label stand out a little bit, I punched a piece of Tangerine Tango with the 1 3/4″ Circle Punch.

The card base is So Saffron with a Whisper White layer on which I have adhered Retro Fresh This and That Washi Tape for a little background.  I wound up some Coastal Cabana Thick Baker’s Twine to put behind the label, which is kind of “in style” now. For the little bow, I took some White Baker’s Twine and used my Coastal Cabana Stampin’ Write Marker to just put some stripes on the baker’s twine to make it match my project. For a little pizzazz for this birthday card, I punched some stars with the star punch in the Itty Bitty Accents Punch Pack out of the Champagne Glimmer Paper.

I think almost everything I used on this card is retiring so be sure to check the list and availability. Don’t wait too long because you never know what or when something will sell out. Stamps, however, will be available throughout most of May.

Here are the lists again. If Stampin’ Up! has updated the availability, you will see an X in the last column meaning it is no longer available.

Stampin’ Up! Retired List PDF

Stampin’ Up! Retired Sortable Excel List

Don’t forget about My Digital Studio!!  You don’t pay shipping on these digital products and you access them right away.  But you do put them on a regular order with any other products you want.  They do not have to go on a separate order just for MDS.

Retired List My Digital Studio PDF

Retired List My Digital Studio Excel

Visit my Stampin’ Up! Online Store today and choose the Retiring Products you can’t live without!


Don’t Miss Out on My Newsletters!

For the Birds Mailbox

Are you on my Mailing List? If not, you missed out on getting all the news that we know so far about the Stampin’ Up! Retiring List, links to click to get your own list to print, info about My Digital Studio and why you might want it, the new Stampin’ Up! Weekly Deals, and more!

My monthly newsletter has all the latest Stampin’ Up! news and any deals, plus several projects with complete instructions and maybe some stamping or papercrafting tips and techniques. You won’t see these projects on my blog or Facebook page, they are just for my subscribers.

Occasionally I send out an extra newsletter, such as this last one about the Retirement List, but usually I only send one at the beginning of the month and one mid-month. I know people get lots of emails. But sometimes I want to be sure my subscribers have the latest important Stampin’ Up! information!

When you subscribe to my newsletter by filling in the red Sign Up box, you will also receive my free gift, “A Dozen Creative Gift Wrap Ideas”. You can use these ideas with whatever card stock, paper, ink and accessories are current and put your own twist on them if you like!

After you subscribe, you will receive an email asking you to CONFIRM your subscription.  You MUST open this email and click the link inside to officially be on my list. This is just “safe” email practice you’ve probably seen with other companies to guard against spam and other nasty stuff. So be SURE you watch for that confirmation email (usually within a few minutes) and after you click on that you will receive your FREE GIFT. Let me know if you don’t receive this confirmation email or have any trouble with the process.  It’s surprising how many people sign up but don’t complete the process and I can’t contact them and remind them to do so!

Don’t just be a lurker!  Join us by signing up for my Mailing List today!

For The Birds Little Red Wagon Card

For The Birds Little Red Wagon Card

One of the stamp sets on the Retirement List is For The Birds, which is kind of a shame because it’s one of those nice stamp sets, pleasing images, all-occasion greetings and easy to color in.  You can also stamp the image in just one color and leave it plain without coloring it in and make a monochromatic card.

In this card, I used a Mossy Meadow card base and a piece of designer paper from the All Abloom Designer Series Paper Stack for the layer. The image is stamped with Jet Black Stazon Ink on Whisper White.  The wagon, flowers, and bird are colored in with Stampin’ Write Markers and Blender Pens. Isn’t it fun to feel like a little kid again while you sit and color?! For a  little sky color I just sponged on a little blue with a Sponge Dauber in the background.

When I found a little scrap of Real Red that was already embossed with the Perfect Polka Dots Embossing Folder, I tried it as a layer under my stamped image and thought it worked. This Polka Dot Folder is retiring also!  I use this one a lot so will be sorry to see it go! It’s a good all-purpose/want-a-little-something embossing folder!

For a finishing touch I added a small bow made with the Lost Lagoon 3/8″ Satin Stitched Ribbon.  I thought it finished off the card nicely. When the card was finished, I felt very satisfied with the colors and look of this card! It’s nice when that happens!

To shop for all the Stampin’ Up! Retiring Products, check out this section of my Stampin’ Up! Online Store.

Stampin’ Up! Retiring List PDF

Stampin’ Up! Excel List (by page number)

And don’t forget to check the Stampin’ Up! Weekly Deals!

Easy Way to View the Stampin’ Up! Retiring Products

How to View All the Products on the Page

I just remembered a tip for viewing items in my Stampin’ Up! Online Store.

For example, if you clicked on the page for Retiring Accessories HERE, the page would probably display 12 pictures of products and then at the bottom you would have to click on the next page and the next page to view all the pages and products.  And it only displays about 5 pages at a time, so you might think you were at the end.  You would then have to click on the three dots to continue on.  A little confusing!

To make viewing easier, if you look at the photo at the top of this post, over on the right side and underneath the “Retiring Accessories” banner, you see the drop down menu for Show: and Sort By:  If you click the drop down arrow for “Show:” and change it to “ALL”, then that page will display ALL the retiring accessories on that one page and you only have to scroll down to see them all, not change to the next page and the next.

Try it and you won’t miss out on seeing ALL of the retiring items!

Shop Stampin’ Up! Online HERE

The Stampin’ Up! Retired List Is Here!

Last Chance for Retiring Products

Stampin' Up! Retirement List Banner 2015

Click Here!

Here are the lists! Click on each link.  You may need to “zoom” in to read the small print! CTRL + will do it, or go to the Zoom function in your settings.

  • Lots of discounts so don’t wait too long to put in your order for things you REALLY want!

Retiring List PDF

My Digital Studio PDF

*Note: Due to high demand for retiring stamps, we’ll keep producing retiring stamps until May 26 (not accessories-accessories are only while supplies last).

Enjoy this Stamin’ Up! video of their favorite retiring products!

The Stampin’ Up! website is going to be very BUSY today so please be patient (as patient as we CAN be anyway!!). It’s running a little slow this morning! So much excitement!

Shop Online at my Stampin’ Up! Online Store HERE!

Email me at Karen@KarenStamps.com  if you have any questions or need assistance with your order!

Diagonal Paper Strips Thank You Card

Diagonal Paper Strips Thank You Card

One of everyone’s favorite things about being a Stampin’ Up! Demonstrator is receiving the Stampin’ Success Magazine. Inside we will find the latest Stampin’ Up! news and products, stamping tips and ideas, business tips and more.  The part I love, of course, are the pictures of samples of cards and other projects! This thank you card is based on a card I saw in my new magazine, although I changed it up a little. I made a regular size card and used the Painted Blooms Designer Series Paper cut in 3/4″ strips and adhered on a diagonal on Whisper White card stock.  The card base is Daffodil Delight.

To make the card, I just laid out the strips of paper so that they covered the Whisper White down to the bottom.  If you miss a little bit, like I did, just trim it off later. I stamped the greeting from the Fabulous Four Stamp Setpart on the Whisper White and part on the designer paper strip.  I got lucky just eyeballing it, but you could be more precise with the Stamp-a-Ma-Jig. I only put a little bit of adhesive on the back of that first strip until after I did the stamping, so in case I messed up, I wouldn’t be ruining the whole card! But as I said, I got lucky!  The ink is Blackberry Bliss, one of the coordinating colors of the designer paper.

For a little embellishment, I added a bit of Gold Baker’s Twine. You could also use the Painted Blooms Cotton Twine, as I did in another card I made while I had the supplies out.

Here’s how I laid out my strips on the Whisper White layer.  Then I just trimmed off the excess strips. This is easier than trying to measure exactly!

Making Diagonal Paper Strips

For any stamping supplies in the regular Annual Stampin’ Up! Catalog or the Occasions Catalog, please visit my Stampin’ Up! Online Store!

Thinlits Multicolor Butterfly Card

Thinlits Multicolor Butterfly Card

Yes, Stampin’ Up! has the long-delayed Butterflies Thinlits Dies in stock now and ready to order! And to make up for the long delay, Stampin’ Up! has this special offer, available only until April 30:

  1. Get the Butterflies Thinlits at a 15 percent discount–just $21.20!
  2. Buy any of the Butterflies Thinlits Bundles at a 15 percent discount and choose one of three FREE Sale-A-Bration items (only available while supplies last)!
  • Best Year Ever Designer Series Paper (item 138633)
  • Best Year Ever Accessory Pack (item 138634)
  • Irresistibly Yours Specialty Designer Series Paper (item 138635)

The background layer on this card is actually made from the Irresistibly Yours Specialty Designer Series Paper, which you can choose FREE with the purchase of a Butterflies Bundle. The paper is embossed with white patterns so that when you apply some ink over the paper, the embossed pattern will pop out! Then just wipe with a tissue to clean it off and get off any excess ink.

The multicolored butterfly is made by sponging on several colors of ink on Whisper White card stock and THEN die-cutting with the butterfly thinlit. It will be a surprise what your butterfly will look like! Really fun to do!  Then I placed it over a Tea Lace Paper Doily adhered to the card.  The butterfly has three Candy Dots on its body.

If you want the Butterflies Thinlits, don’t hesitate!  Go get them at my Stampin’ Up! Online Store while you can get a discount!  Be sure to check the Weekly Deals for this week, ending Monday night.Stampin' Up! Weekly Deals April 14, 2015

Calling All Heroes Stormy Night in Houston

Calling All Heroes Stormy Night in Houston

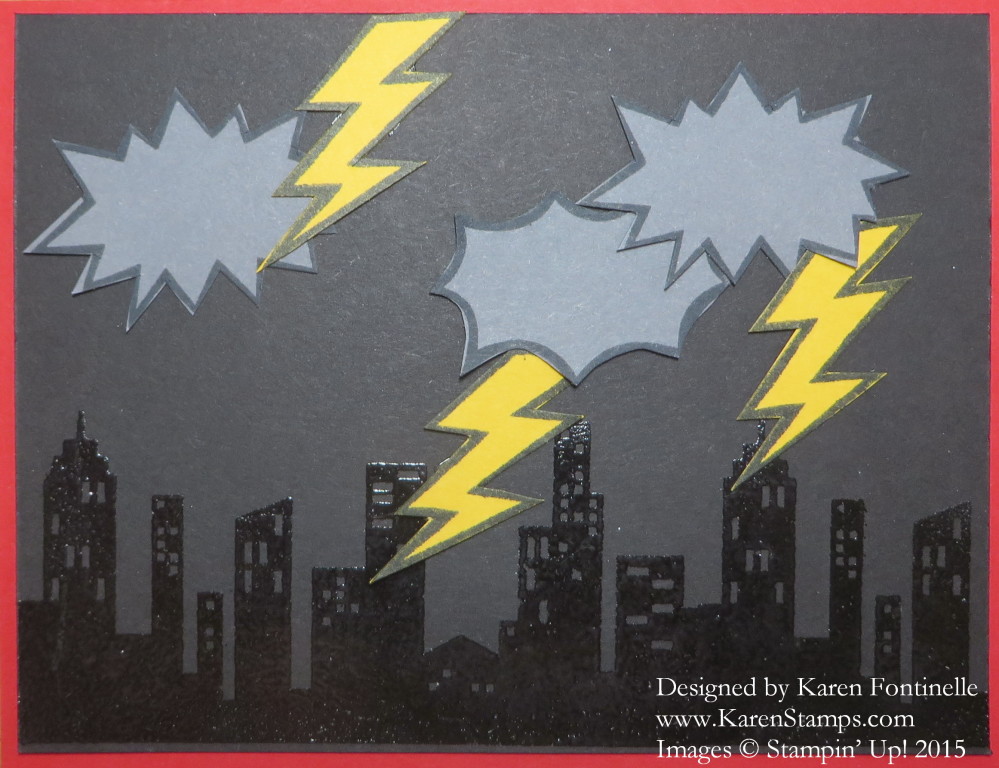
We were having such a stormy night in Houston, Texas last night that I got the idea to make a stormy card with the Calling All Heroes Stamp Set right in the midst of the lightning, thunder and buckets of rain. Those lightning bolts in the stamp set popped into my head, plus the tall buildings for a skyline, as well as the word bubbles that could serve as angry clouds.

In spite of looking dark gray in my photo, the card layer is actually Basic Black. At first I stamped the buildings in one of the gray inks, but they barely showed up. Then I thought of stamping with Versamark Ink and embossing with Clear Emboss Powder using the Stampin’ Up! Heat Tool. It made the buildings show up subtlely in the dark and stormy night, and they certainly were soaked in rain!

I stamped the “word bubble” stamps in Memento Ink on Basic Gray cardstock and cut out with my Paper Snips. I stamped the lightning bolts also in Memento Ink on Crushed Curry card stock and cut out.

I was stamping this card in the midst of this storm with all kinds of thunderstorm warnings and flood warnings beeping loudly on the TV plus on my cellphone, the lightning was flashing like crazy, and it was raining harder than I’ve heard it in a long time. So I had plenty of inspiration going on around me!!

Just as I finished photographing the card, the power went off!  All these years we have been on the lucky side of the street with the power, for the most part, even after hurricanes, but lately something has been wrong and the power has been off several times as they made repairs. Last night I didn’t hold out much hope that it was going to get fixed any time soon and it didn’t.  It came back on about 7 am today, which was great.  Thank goodness for a charged laptop and a small battery TV so we could keep up with the weather and watch some of the late shows before bed. Not to mention doing some reading with a flashlight.

The good thing is, stamping does not require electricity (except for heat embossing) so any time your electricity is off, you can still stamp by a window or with a flashlight!

The other good news is the Calling All Heroes Stamp Set, which I surprisingly love, is good for stormy nights and not just super heroes!

And maybe the best news of the weekend, if you saw my late post yesterday, is that the Butterflies Thinlits Dies are available again! Due to the west coast port situation, plus the delay of unloading the ships and finding a truck to transport them, Stampin’ Up! has been out of them for ages.  But the Butterflies arrived yesterday in Riverton, UT and are available now! To make up for the delay, Stampin’ Up! is offering them at a discount OR if you want the already-discounted Bundle with the coordinating Butterfly Basics Stamp Set, you can choose a free Sale-A-Bration item (while supplies last!)

SHOP HERE FOR ALL THINGS STAMPIN’ UP!

Butterflies Thinlits Dies Are Here!!

Butterflies Thinlits

After a (very) long migration, the Butterflies Thinlits Dies have landed in our warehouse and are now available for purchase!

You can take advantage of two special offers through April 30:

  1. Get the Butterflies Thinlits at a 15 percent discount–just $21.20!
  2. Buy any of the Butterflies Thinlits Bundles at a 15 percent discount and choose one of three FREE Sale-A-Bration items (only available while supplies last)!

Of course you can purchase the Butterflies and more at my Stampin’ Up! Online Store or I can always put the order in for you!  Let me know if you have any questions!

Work of Art Butterfly Thinlits Card

For more information on this card, read my blog post HERE.

Hooray It’s Your Day Card Kit Video

I love watching Stampin’ Up! videos, especially ones done by Bonnie from the Stampin’ Up! Home Office! Watch how she tells about this Hooray It’s Your Day Card Kit and shows some samples of cards you can make!

Then go to my Stampin’ Up! Online Store and order your kit!

I’ll keep you posted on the Butterflies Thinlits and Bundles and the Stampin’ Up! special offer and let you know when you can order these long-awaited products!

An Easy Sheltering Tree Card

Sheltering Tree Card

Want to make an easy and fun card with the Sheltering Tree Stamp Set? Make a lovely pastoral scene with the Sheltering Tree. This stamp set, which is photopolymer, has a lot of little pieces that make it fun to play with!  Since it is photopolymer you can see through the stamp and know that you are placing your stamp where you want it. But you don’t need to use all the pieces if you want to make a simpler card.

The card base is Baked Brown Sugar, layered with Pistachio Pudding and then Whisper White for the stamped layer. I stamped the tree trunk in Early Espresso and the leaves with Pistachio Pudding ink plus other greens markered on with the Stampin’ Write Markers. That didn’t show up that well so probably not worth the trouble, but you could try doing it with a little more contrast. Next I stamped the swaths of grass in Pistachio Pudding and Old Olive for some contrast, you could do just one color easily. Several good greetings come in the stamp set so you can choose the one you like. I stamped mine in Early Espresso.  The rake is also stamped in Early Espresso.  I put the rake in the scene because I raked up some leaves and broken twigs this morning on our sidewalk.  Not one of my usual activities! But I was in the mood!

The little blades of grass are also a stamp in the set.  Kinda fun to stamp those around.  And for a final touch, I sponged some Soft Sky ink around the background for some sky and additional color.

Lots you can do with this set, including making some framed pictures for home decor!

Here are the Stampin’ Up! Weekly Deals if you missed them on Tuesday.  These are good until Monday, April 20.

Stampin' Up! Weekly Deals April 14, 2015

 Shop Stampin’ Up! Online anytime, day or night!

Butterflies Thinlits Just Because Card

Butterflies Thinlits Just Because Card

Stampin’ Up! was hoping these Butterflies Thinlits Dies would be available today, but not quite! Here is the update from Stampin’ Up! hot off the press:

We have received notice from our supplier that the container with the Butterflies Thinlits Dies was finally unloaded from the ship; however, there is a shortage of trucks, which has delayed the container being picked up. We have secured a truck to pick up the container, and, as of now, it is scheduled to be delivered to Stampin’ Up! on Friday. We will post an update as soon as they are available.

Thank you for your patience and flexibility as we continue to await their arrival!

So hang in there! Stampin’ Up! is trying as hard as they can!  I will continue to keep you updated.

In the meantime, I made this card the other day, playing with the butterfly thinlits and the Sale-A-Bration designer series paper, Best Year Ever.  Such an easy way to make multicolored pretty butterflies!  And once these butterfly thinlits become available, Stampin’ Up! will have a special offer for you:

  1. Get the Butterflies Thinlits at a 15 percent discount–just $21.20!
  2. Buy any of the Butterflies Thinlits Bundles at the already-discounted price and choose one of three FREE Sale-A-Bration items (only available while supplies last)
  • Best Year Ever Designer Series Paper (item 138633)
  • Best Year Ever Accessory Pack (item 138634)
  • Irresistibly Yours Specialty Designer Series Paper (item 138635)

My card is an odd size. The card base is 6 1/2″ x 5 1/2″, folded in half, so the card is 5 1/2″ x 3 1/4″. I don’t even know why I made this size, but there it is! I stamped a couple of swooshes on the background with Work Of Art before I adhere the die-cut butterflies. The greeting is stamped from the  And Many More Stamp Set, chock full of greetings just like my favorite greeting stamp set Teeny Tiny Wishes!  And I added some bling with both Rhinestones and Pearls!  Why not?!

Stay tuned for more updates about the Butterflies Thinlits Dies so you can purchase them or the Bundles as soon as they are available!

Shop at my Stampin’ Up! Online Store 24/7!

New Stampin’ Up! Weekly Deals April 14, 2015

Stampin' Up! Weekly Deals April 14, 2015

Here are the new Stampin’ Up! Weekly Deals good today through Monday April 20, 2015. Click the link or the photo above to view in my store!

With Mother’s Day coming up in May, you might want to pick up the Mother’s Love Photopolymer Stamp Set on the Deals this week! Of course it is not just for Mother’s Day, it can be for any time! And I have to mention the Handheld Stapler – yes, you probably have a stapler, but I just LIKE this cute stapler! (You do need to buy the staples in addition!) Of course all the other framelits and the Pansy Punch are worth owning as well.  If you are in to washi tape, you might want to try the Birthday Bash Designer Washi SHEETS.  You can cut larger pieces, or use framelits, or use them in many creative ways!

Keep in mind, the Retired List is due to come out next week. If you want any of the outgoing In Colors, especially the ink refills if you already have the ink pads, everyone suggests you beat the rush and order them ahead of the Retired List coming out. Those are items that usually sell out fast.

Haven’t heard any more, but Stampin’ Up! was hoping to have the Butterflies Thinlits back in stock tomorrow, April 15 with a special offer, if you missed those during Sale-A-Bration. Stay tuned!

Go check out the new Weekly Deals in my Stampin’ Up! Online Store!

For The Birds Thinking of You Card

For The Birds Mailbox Thinking of You Card

When I was ready to stamp, I just decided to pull out the For The Birds Stamp Set and ended up with this thinking of you card.  Sometimes there is no rhyme or reason for what I stamp. I might go to the shelf for a certain stamp set and something else will catch my eye. That’s one of the things I love about stamping –  there are so many options and choices and usually you can make any of them work.

These For The Birds stamps all have a saying underneath the image.  Some I like and some I don’t care for that much, but you can avoid using the saying if you don’t want it. Either cover it up with a post-it before you ink up and then remove it, or wipe the ink off, or cut the greeting off after you stamp. On this tag, I just cut off the words underneath the mailbox and made my own greeting with a stamp from Teeny Tiny Wishes. I cut out the greeting with the Bitty Banners Big Shot Die Framelits.

The tag is stamped with Stazon Black Ink and colored in with Stampin’ Write Markers – sort of! With the Blendabiities gone, I ordered some new Blender Pens on my last order. I still have my original set and one other but they are all a little ragged and dry. It was a joy to color with these new pointy Blender Pens!! There are so many options for coloring, but what I did today on this tag was to scribble some marker ink on the stamp case cover, then picked up that ink with a Blender Pen.  You can use the same one over and over and just scribble it on your Grid Paper (backordered right now!) or scrap paper until it is clear again. You can add more ink if you want your coloring darker, although you can’t “work” the coloring too much on just Whisper White paper.  Better to use Watercolor Paper. But I was using Whisper White and I did get it messed up a little bit – but let’s just say it’s an old mail box!! In some places where I wanted it darker, I used the marker directly. Depending on the colors, using markers straight on your image is too dark and heavy often times. That’s why Blender Pens or the Aqua Painter are so useful to have available.

Since the tag was too plain, I added some sponging with the Sponge Daubersjust a little Wild Wasabi and Soft Sky. And a little shadow with the Smokey Slate Marker.  I used the Tag Topper Scalloped Punch and adhered a bow with the Lost Lagoon 3/8″ Silky Taffeta Ribbon (which is on the Clearance Rack as I write this!).

The card base is a 4 1/4″ Whisper White square with a layer of Island Indigo card stock and a pattern from the All Abloom Designer Series Paper Stack.

Go look on your shelf of stamp sets and see which one jumps out at you and create something with it!

Reminder:  Last day for this week’s Weekly Deals!

Stampin' Up! Weekly Deals April 7 2015