Monthly Archives: February 2015

The Bokeh Technique in Card-Making

Bokeh Technique Happy Card

Bokeh is a photography term meaning the way the camera lens renders out of focus points of light, but we can produce a similar look of bokeh on the background of a card using our Stampin’ Up! inks and accessories. You might think about bokeh if you see a Christmas photo with a clear close-up of one ornament on the tree and the tree and lights in the background have a blur to them.

Here is an example of bokeh in photography:

Bokeh Background

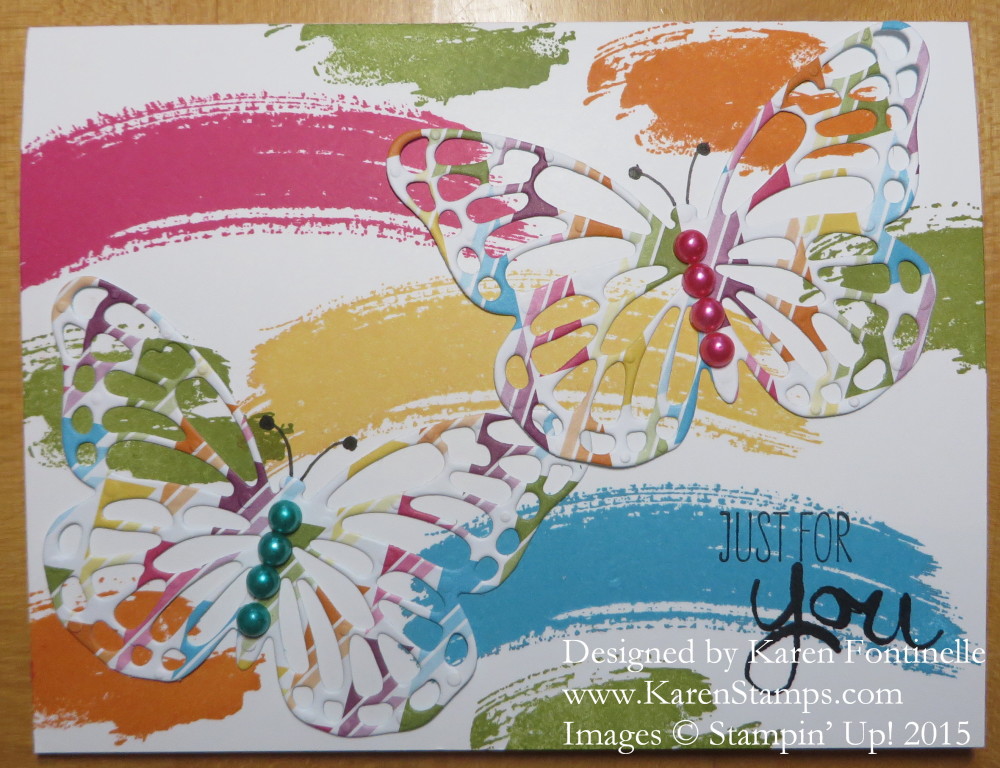
The bokeh technique is really popular right now in cardmaking!  And so fun to do! There’s almost no right or wrong (as in most stamping techniques) and there are several ways to do it. You can use watercolor paper and the Aqua Painter to spread around drops of ink. Or you can sponge ink in various colors on Whisper White card stock. Then you take circle stencils and sponge White Craft Ink inside the circles, overlapping, wherever you would like them.  That softens the colors in the background and gives you the spots of light look.  You can make it as soft or as bold as you like.

To see my little Flipogram video of the Bokeh technique, go to my Facebook Business Page right HERE and watch!  It was fun to make! There’s even music! You may have to scroll down depending on when you are reading this!

Or Follow me on Instagram:  @Stampingwithkaren

 Important Stampin’ Up! Update:

We are experiencing a quality issue with our Blendabilities product line. Except for the Tuxedo Black Memento Ink Pad (item #132708) and the Tuxedo Black Memento Ink Pad Refill (item #133456), all item numbers have been turned off; this includes Blendabilities Sale-A-Bration item numbers.

At this time, backorders for Blendabilities will not be fulfilled.

We thank you for your patience and will update you as soon as we have more information.

*****************************

I love my Blendabilities and use them quite often, although I had to call the other day about a dry one in one set. Maybe I won’t get a replacement now.  I do know Stampin’ Up! has excellent customer service so I feel sure they are working on this problem and will update us further as soon as they know something else to tell us. In the meantime, please look at the other fun items you can choose for your free Sale-A-Bration item with a $50 order!

And speaking of Sale-A-Bration, remember tomorrow, March 1st, there will be four new free items to earn with a $50 purchase. Click the photo below for a close-up!

New Sale-A-Bration Products March 2015

Click to view flyer!

Remember, March will be the last month for Sale-A-Bration, the biggest promotion from Stampin’ Up! Choose from the FREE products you can earn in this Sale-A-Bration Brochure. Look for the products marked “FREE” as there are other products available for purchase to coordinate with the free products.

Shop here at my Stampin’ Up! Online Store!

And go visit my Stamping With Karen Facebook Page!  Click the LIKE button while you are there!


A Foxy Birthday Card

A Foxy Birthday Card

There’s a lot behind this foxy birthday card using the stamp set Life in the Forest. I got the idea from a couple of samples I found online and I was pleased when it all came together. I made it for my sister-in-law who had a little problem with several sightings of a fox on the playground last summer at the preschool where she works. She set a trap for it but never caught anything, and the fox must have wandered off into the woods from whence he came and was never seen again, at least not at preschool! So of course we’ve had to tease her a little bit about the fox!

I stamped the fox with Memento Black Ink and colored with Blendabilities Markers and cut out with my Paper Snips. The “grass” is made from torn Old Olive card stock with some grass cut with the Fringe Scissors. I stamped the trees on designer paper and cut them out so I could adhere them around on the card. Some cutting but no coloring involved! The quote from the fox is from the stamp set Just Sayin’The saying at the top of the card I wrote on the computer and printed out. Too bad there wasn’t a stamp! The background of the card layer is Soft Sky with some clouds sponged in with White Craft Ink. Just punch out a scallop circle and use that to sponge the edges to get the puffy cloud look. And the fox has a little Rhinestone Jewel for his nose.

Here is the inside of the card:

Fox Birthday Card inside

Since the Blendabilities Markers would bleed through the Whisper White card stock I made a layer for inside the card and stamped and colored on that.  And sponged a little Soft Sky ink in the background for a sky.

It was a fun card to make! I love how we can make almost anything one way or another with Stampin’ Up! products!

To shop during Sale-A-Bration and earn a free product with EVERY $50 purchase, please visit my Stampin’ Up! Online Store.

Blended Bloom Hello Card

Blended Bloom Hello Card

Sometimes you get an idea for a card in a second from something you saw online and you have to jump right up and make that card! That’s how this Blended Bloom Hello card came to be! It’s actually very simple. I used the “Hello” stamp from the set Hi There and just stamped the word diagonally across the front of the Whisper White card. I could have used the Stamp-a-Ma-Jig to position it perfectly, but I got lucky and did pretty well just eye-balling it!  You probably want to place the stamp so the words aren’t in the exact same line, one right underneath each other.

After I stamped the word Hello on the front of the card, I wanted to add some flowers or something to the front.  I stamped and punched out some other flowers but they didn’t seem to work.  Then I stamped the Blended Bloom stamp with Memento Ink and colored in with Melon Mambo Blendabilities and Daffodil Delight Blendabilities (on backorder right now) for the flower center. I cut out the flower with my Paper Snips (excellent to have for a cutting job like this!) and adhered it to the card with Stampin’ Dimensionals.

This was a fun card to make and I kind of like the look of the words filling up the front.Try it yourself with this stamp set or another one. You could make a smaller card with smaller word stamps if that is what you have.

This is why I love stamping!  You can make art without being an artist!

To choose your “art” supplies from Stampin’ Up!, just go to my Online Store! It’s open 24/7!

Stampin’ Up! Weekly Deals Feb 24 2015

Stampin' Up! Weekly Deals Feb 24 2015

Here are the new Stampin’ Up! Weekly Deals for today February 24 – March 2. Sequins are trendy right now so pick up these In Color Sequins and add some sparkle to your cards and projects! Choose some ribbons and trims to embellish your projects – two kinds of twine in three colors, seam binding ribbon and beautiful white satin! The Simply Created Banner is just the canvas pennants and jute twine to hang them (not the original kit) but they are fun to decorate for sure! Use them for any occasion or holiday and decorate to your heart’s content!

The Celebrate Easter is a download for My Digital Studio, but did you know you can use it even if you do not own MDS?  Just print out the greeting or paper design or template with your computer and home printer. Or for only $19.95 you can own the My Digital Software and have access to ALL the content that comes with the software which is A LOT! I recommend the digital download so you get it immediately and you don’t have to worry about losing or damaging the disc. But the choice is yours. You CAN get the hang of digital designing, and it’s not just for scrapbooking.

Add any of these discounted Stampin’ Up! products to your order and they do count toward your Sale-A-Bration total – once you get to $50 in merchandise you can choose one of the Sale-A-Bration free products! And if you order March 1st or after, you will have the four extra new free products to choose from that were announced in yesterday’s post HERE.

If you want to order online, just go to my Stampin’ Up! Store HERE or contact me to place your order if you prefer.

New Sale-A-Bration Free Products Coming!

New Sale-A-Bration Products March 2015

New Sale-A-Bration Products March 2015

Stampin’ Up! is spicing things up with some new FREE products you can earn during Sale-A-Bration beginning in March! Starting March 1st you will also have these products to choose as your free item with every $50 purchase!  You can choose from two stamp sets, printed vellum paper, and a combination of beautiful colorful twine and buttons!! You’re going to want to have some Blendabilities for the coloring opportunities with these new products! Click each photo below for an up-close look at the products and samples.  Then go make your Stampin’ Up! list to be ready to order March 1st! Remember, this is one month only, the final month of Sale-A-Bration!

Reminder:  Today is the last day for these Stampin’ Up! Weekly Deals!

Weekly Deal Feb 17 2015

 Shop any time at my Stampin’ Up! Online Store!

Stampin’ Up! Berry Basket Cuteness!

Berry Basket Card HolderI recently ordered the Stampin’ Up! Berry Basket Bigz L Dieand I think it holds lots of potential for cuteness in our papercrafting! Maybe even true usefulness as it can be used to hold some of our stamping supplies! Think about cute little Easter baskets or spring baskets coming up (if it ever stops snowing in some parts of the country!). Just add a handle and some “grass” and you’ve got it. You can even use up your paper scraps along with your Fringe Scissors or Paper Trimmer to cut narrow strips of paper than can be wadded up and crinkled to look like that grass or paper shred you can buy in the store.

Use the Berry Basket Die to cut two sheets of card stock and fold on the score lines. The basket itself goes together easily, and then you can choose the straight edge trim or the scalloped edge trim. Stamp or embellish as you like! So many possibilities! The top of the basket is wider than the inside so as you can see from my top photo, the 3″ x 3″ cards fit perfectly inside, larger cards fit turned on a slight diagonal. But there are lots of possibilities for what will fit inside!

Berry Basket Card Holder 3x3

To keep this first Berry Basket simple, I just made the basket with Crumb Cake card stock and embellished it with the Bermuda Bay Sequin Trim and the Venetian Crochet TrimEveryone seems to like using the Stampin’ Up! Handheld Stapler on the basket to attach the trim edge. It just goes well with baskets!

I know I’m going to have fun trying out various kinds of baskets!  To get your Berry Basket Die, just place your online order on my Stampin’ Up! site!  Or you can always contact me to put the order in for you! Remember, with a $50 purchase you will also earn a FREE Sale-A-Bration product!


Better Than E-Mail Stamps

Better Than Email Stamps

This is the new stamp set from Stampin’ Up! called Better Than E-Mail Photopolymer Stamp Set. It is designed to help all of us comply with the Stampin’ Up! Angel Policy. Since Stampin’ Up! images are copyrighted, you must stamp anything created for sale using their images with one of the Stampin’ Up! copyright stamps, which have always been available in the catalog.  This is a new set that serves the purpose and I think has the most versatile and fun images.  You can read about the Stampin’ Up! Angel Policy HERE.

I think even if you are not selling your cards, it is fun to put a stamp of one kind or another on the back of the card.  Don’t we all automatically turn any card over and see who made it, even one of the big card companies?! If you made the card, why not have a way for you to take credit and apply your personalization to the back of the card?!  Stamp one of these stamps on the back of your handmade cards and people will see you used Stampin’ Up! stamps and materials, plus you can express your own personal message with the little saying.  Often I add my name or initials and maybe the year in my own handwriting somewhere around the angel stamp on the back of the card.

Give your cards that professional finished look by adding an angel stamp to the back from the set Better Than E-Mail and consider personalizing it further by signing your name and putting the date by the stamp.

Order your stamp set today at my Stampin’ Up! Online Store HERE.

Better Than Email Stamp Set


Colorful Butterflies Thinlits Dies

Work of Art Butterfly Thinlits CardYou never know what you will come out with when you start making a card, or any creative project! I decided to combine some “swaths” of color from the Work of Art Stamp Set with the Butterflies Thinlits DieI tried using some Sweet Taffy Designer Series Paper, the ombre turquoise pattern, and both sides of the butterfly I thought turned out beautiful! It was too hard to fit on three butterflies, so I ended up with just two and used the same pattern of the designer paper on both butterflies since I already had a colorful background. I thought the butterflies needed something to stand out a bit, so I drew in the antennae with a retired (I think) journaling pen and colored some Basic Pearls with my Blendabilities Markers and stuck those on along the body. Do you love it because it is so colorful and the butterflies so pretty or do you hate it because it is too busy??

The butterflies, made with the Butterflies Thinlits Dies are incredible embellishments to put on a project or card! Of course you need the Big Shot for the die-cutting.  I use mine almost every day for something. If you would like a Big Shot, think about purchasing it during Sale-A-Bration. Get the Big Shot, some accessories (dies, framelits, thinlits or embossing folders), maybe some card stock and if you reach $150 you will get all that plus 3 free Sale-A-Bration items, plus $25 in free Hostess dollars to spend! Best way to get more bang for your buck!

Visit my Stampin’ Up! Online Store now and choose your $50 bundles to earn a free Sale-A-Bration product!

Best Day Ever Happy Card

Best Day Ever Happy Card

Use the Best Day Ever Stamp Set, available as a free product you can earn during Sale-A-Bration, and the Hello You Thinlits Dies in the Occasions Catalog, you can make a simple card in bright, happy colors to cheer someone for whatever reason.

To make this card I just grabbed the stamp set and the little flower-looking stamp, and stamped it in Melon Mambo to match the card base, Daffodil Delight, and Tangerine Tango randomly on the Whisper White card front. Then I die cut the “Happy” from Gold Foil. To make it show up better, I decided to adhere it to Whisper White layered on Melon Mambo. That layer is popped up on Stampin’ Dimensionals. And I stamped a few hearts from the Best Day Ever Stamp Set. The Daffodil Delight Seam Binding Ribbon adds a nice, bright embellishment to the card.

Stampin’ Up! Sale-A-Bration is at the halfway mark, ending March 31. To see all the items available with every $50 purchase, browse through the Sale-A-Bration brochure at this link! Look for the items marked “FREE”!

Flower Pot Designer Series Paper On Trend!

Flower Pot Orange and Blue Pansy Punch Flower Card

The other day I was actually reading one of my new magazines (as opposed to catching up on Christmas issues in June!) and saw a lot of orange and blue used together in home decorating. I decided to make a card using dark blue and orange and was reminded that our Flower Pot Designer Series Paper already had those colors in it!

Flower Pot Designer Series Paper

I know we have been making Christmas cards, holiday cards, and Valentine cards for months now, so it’s time to remind ourselves of some other papers and supplies we have as we page through the Stampin’ Up! Annual Catalog again. As cold as it is in many parts of the country right now (even in Houston!), spring will arrive eventually. Maybe just working with bright colors and flowered paper will get your mind out of the winter funk! We always say stamping is therapeutic!

This is a very simple card, but that doesn’t mean it was simple for me to make! For some reason I couldn’t get my original idea to come together, as simple as it was! All it took was turning the Flower Pot DSP over and using the other side, the orange print, which was less busy that the other flowered side. I cut it down to fit just on the bottom portion of the card. Now maybe today I could make something with the dark blue side easily, but the other day it wasn’t working. That’s how creativity is!

The flower is made with the Pansy Punch (discounted this week on the Weekly Deals!!) and sponged with a little bit of Tangelo Twist ink. Since I originally planned to use the Flower Patch Photopolymer Stamp Set I stamped the flower center with one of the stamps and punched out with the 7/8″ Circle Scallop Punch. The little Hello Honey circle underneath is the 1″ Circle Punch. The ribbon is the beautiful Tangelo Twist 3/8″ Satin Stitched Ribbon. The greeting is from the Fabulous Four Stamp Set.

With all the excitement around the Occasions Catalog, don’t forget to check out the wonderful products in the Stampin’ Up! Annual Catalog. Click this link now or grab your own catalog and take a few minutes to page through it. For Sale-A-Bration, you can add any current Stampin’ Up! products to your order to earn a free product with every $50 purchase. Don’t miss it!


New Stampin’ Up! Weekly Deals

Weekly Deal Feb 17 2015

Click to Shop

Here are the new Stampin’ Up! Weekly Deals for Tuesday February 17 through Monday February 23. Be sure to check them out when you place an order. With every $50 purchase from now through March 31 you can earn a FREE product from the Sale-A-Bration Brochure! No limit! And I’d sure like to see you get free Stampin’ Up! products!!

Speaking of Sale-A-Bration, here is one of the stamp sets you can earn with a $50 purchase.

You Brighten My Day Stamp Set

The You Brighten My Day Stamp Set (Item 139103 [w]) is very versatile. Think about how many days you can brighten with the You Brighten My Day Stamp Set! No need to spend precious time cutting out all the adorable images; this set coordinates with three different punches: the Banner and What’s Up Punches, and the Itty Bitty Accents Punch Pack. Plus, the triple star and triple heart images fit right on the little house, making it ever so easy to customize your creation. And with four different sentiments, this stamp set works for just about any occasion.

You Brighten My Day SAB


Please check out all the great Stampin’ Up! products available to you to make your stamping and crafting projects look beautiful and professional!

Visit my Stampin’ Up! Online Store HERE today!

Be sure to check your merchandise total to make sure you reach $50 – or $100 – or $150 – and so on to earn your free Sale-A-Bration products!


How to Store Your Paper Stack

Paper Stack Storage in Case

Now that Valentine’s Day is over, you may have used a lot of papers in your Stacked with Love Designer Paper Stack and have a lot of partial scraps or torn out patterns. Even though you try to keep them inside the pad, they probably tend to fall out. You could put them in a plastic bag, but, I don’t know, that doesn’t fit well into your perfect organizational scheme, does it?! So here is an idea I saw recently and I thought it was a great storage idea for the paper stacks!

The whole paper stack fits nicely into a Stampin’ Up! Clear-Mount Stamp Case. Did you know you could purchase extra empty stamp cases and use them for projects or storage? The Clear-Mount Stamp Cases (119105) are available for purchase!  You get 4 cases for only $5.95. They are so useful for storing extra stamps (like from Paper Pumpkin kits) or paper scraps or decorating to hold a notebook and pen – whatever you can imagine! Since you can see through the cover of the stamp case, you can read the name of the Paper Stack through the cover or you can label it as yo like.

Next time you place an order, think about including a set of Clear-Mount Stamp Cases.  You can also purchase the larger Wood-Mount Stamp Cases (full-size) and the Wood-Mount Half Cases. All these empty stamp cases are good to use for storage. And I know we stampers are always looking for new storage ideas!

Don’t forget to check the Stampin’ Up! Weekly Deals as well. Monday nights are the last time to purchase the current Weekly Deals and then on Tuesday there will be new ones.

Stampin' Up! Weekly Deal Feb 10 2015
We’re moving along through Sale-A-Bration, the Stampin’ Up! promotion where you earn a free product with a $50 purchase, so don’t delay!  Get your goodies so you don’t forget!

Try the Stampin’ Up! Clear-Mount Stamp Cases to store your paper stack and not have scraps and pages falling out all over the place. Use the extra ones for other storage or stamping projects!  They are great!

Shop 24/7 at my Stampin’ Up! Online Store or contact me if you have any questions!

Last Minute Valentine’s Day Projects

Last Minute Valentine's Day Project Ideas

Looking for last minute Valentine project ideas?  Here are two Valentine cards and one Tiny Treat gift box decorated for Valentine’s Day.

If you have a small gift you are giving your Valentine, just use one of Stampin’ Up!’s many gift boxes, such as this Tiny Treat Box. Or use any box you have and get some inspiration for decorating from this box. Do a little stamping, embellish a little and tie on a pretty ribbon! I always keep some Stampin’ Up! packaging products on hand because you never know when you might need one, and once you have the box, it is easy to decorate! I used the You Plus Me Stamp Set and some coordinating Stacked with Love Designer Washi Tape.

The Wood You Be Mine Photopolymer Stamp Set is great for masculine cards with loving greetings that aren’t “too mushy”! I even WON this stamp set as a Prize Patrol from Stampin’ Up! during the Occasions Catalog Reveal that was livestreamed! Who would think you could win a prize sitting at your computer?! While I wasn’t crazy about this stamp set at first, you can’t but fall in love with this woodsman and his cute flannel shirt that you can stamp or color any way you want! Lots of possibilities with this stamp set, and of course it won’t just be for Valentine’s Day with different greetings. I cut out the woodsman with my Paper Snips so I could place everything on the card the way I wanted (copying a sample in the Occasions Catalog!). He was surprisingly easy to cut out so don’t be afraid! Of course using Paper Snips Scissors makes cutting easy! They REALLY make a difference! Every stamper should have a pair.

And for a fun Valentine, how about the Cheerful Critters Photopolymer Stamp Set?! These “critters” just make you happy no matter what project you are making!  And with their signs and arms up you can add any greeting you like. After coloring the bunny critter with the Blendabilities Markers, I cut out with Paper Snips and cut out her arms without the sign so she could hold up the heart, die cut with the Hearts Collection Framelits Die. The background is stamped with the little grouping of tiny hearts from the You Plus Me stamp set.  Just think of how often you can use those cute little hearts because hearts and stars are for any occasion!  Good to have on hand!

If you are making valentines at the last minute today, I hope these ideas inspire some creative ideas for you whether or not you have these exact stamp sets or materials.

Of course you can order any stamping supplies you need at your convenience online at my Stampin’ Up! Online Store by clicking this link! Remember, with a $50 purchase during Sale-A-Bration you get to choose a free Sale-A-Bration product! You will see the details at my Online Store.

Have a Happy Valentine’s Day!!!

Masculine Valentine Card for Your Husband

Masculine Valentine Card for Your HusbandNow that the valentines you made have been mailed and the valentines for your kids’ classes have been made and will be passed out this afternoon at the school parties, it’s probably time to think about a masculine Valentine card for your husband (or boyfriend)! Chances are, the men aren’t going to ooh and aah over our beautiful cards we make like our friends might, so you may as well keep it simple. My husband has been known to open his card, read it, put it down, and not say a word. But that’s him and I do know he has at least COME to appreciate my handmade cards. We do place some importance on the cards we give each other and what they say and how they look.

Most “masculine” cards have darker colors, simpler design, less embellishment and maybe more texture. Somehow we often feel at a loss when we go to make a card for a man, but it’s really not that hard. You just usually have to think in terms of the things I just mentioned.

Since I just received the Adventure Bound Designer Series Paper Stack in my most recent order, I was flipping through it and spied this woodgrain paper. As it happens, we need to do some replacement of part of our wood fence and gate, so you could say the paper kind of goes along with that! Not that it matters so much, I might have picked the woodgrain paper regardless!

I was thinking about a heart, or a heart cutout or something, when I thought of this round image in the You Plus Me Stamp Set. I thought maybe it looked a little like the knots in the wood or something somebody might carve into wood. I stamped it in Early Espresso Ink to match the paper and punched out with the 1 3/4″ Circle Punch. I also punched out the little heart in the Itty Bitty Accents Punch Pack to cover the little white heart that is part of the stamp. Then since I had just received the Confetti Hearts Border Punch, I had to play with that, and punched all the tiny hearts and glued a stream of them to the card.

It’s a very simple card to make if you still need a valentine for your husband!  If you don’t own the Adventure Bound Paper Stack, use the Hardwood Stamp instead. And if you don’t own the Adventure Bound Paper Stack, put it on your next order if you ever need to make masculine cards because it will be great.  There is a coordinating stamp set as well, Adventure Awaits, that you might like. And if you want to save money, but them together in a Bundle to save 15%.

Tomorrow is Valentine’s Day! Do you have a valentine card made for your husband?

Adventure Bound Paper Stack

Click to Shop!


Valentine Card with Hearts

Valentine Card with HeartsTime to make a valentine card with hearts! This one has die cut hearts and punched out hearts!  The card base is Real Red with a Whisper White card stock layer. I used the Hearts Border Punch to punch the row of hearts along the edge. The red card stock underneath shows through to look like a row of red hearts!  The two hearts in the  center of the card are die cut with the Hearts Collection Framelits Dies from a sheet in the the Stacked with Love Designer Series Paper Stack and the Gold Foil Sheets.  The greeting is stamped from You Plus Me. And for a finishing touch I tied on some Gold Baker’s Twine. Pretty easy valentine to make if you are looking for last minute ideas!

Remember to shop at Stampin’ Up! Online here at your convenience!

If you don’t have a Stampin’ Up! Demonstrator and would like to have a catalog, please email me at Karen@KarenStamps.com.

Have fun making some valentines!