Monthly Archives: June 2013

Last Day To “Grab Your Greetings”!

Grab Your Greetings Offer on Stampin' Up! Greetings Stamp Sets

Click on image to enlarge

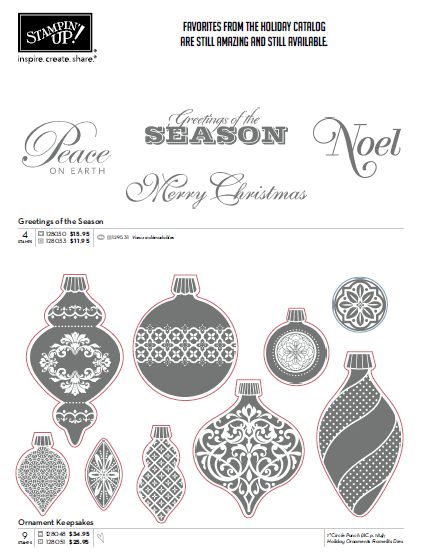
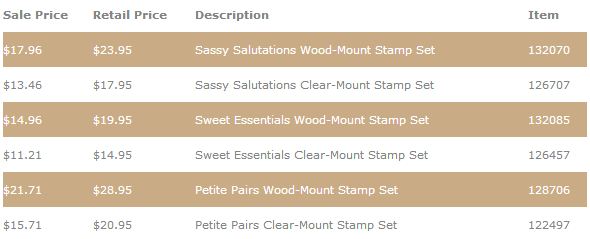
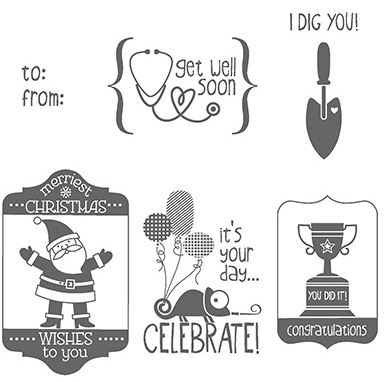
Today, June 30, 2013 is the last day to “Grab Your Greetings“, a special offer on greeting sets from Stampin’ Up! I know you’ll find lots of uses for these stamp sets and getting them for 25% off is a bargain!

I heard a news anchor on TV say that she couldn’t believe it was the END of June!  Well, I’m right there with her.  What happened to June??!

AND Stampin’ Up! just announced that Clearance items can be added to any kind of order, even if is not online. So if I put in an order for you, we can try to order the Clearance items.  But if it turns out that some item is sold out at that time, then you would have to change your order.  When you put it in online yourself, then you know immediately if something is available or not. But at least it is another possibility for ordering!

Go to my Stampin’ Up! Online Store TODAY and Grab those greeting stamp sets that you like in this special offer, maybe even all of them, and check out the Clearance Rack while you are there!

Happy Last Day of June!!

Join Me! Sign Up For My Stamping With Karen Mailing List!

Sign Up for My Stamping With Karen Mailing List

If you have found my blog and like the projects I post almost everyday, please consider signing up for my Stamping With Karen mailing list! I send out an email newsletter that I write myself around the beginning of the month and another short one around the middle of the month. The monthly newsletter contains all the most recent Stampin’ Up! news and offers and stamping projects exclusive to my newsletter. You won’t find them on my blog, only in my newsletter. The mid-month newsletter is usually a reminder about an offer or something new from Stampin’ Up! If anything else turns out to be exciting or urgent, I will send an extra newsletter just to make sure everyone has the information.

After you sign up AND confirm your email (you MUST confirm for the mailing service to be given permission), you will receive your FREE GIFT for signing up!

You’ll see the sign-up box at the top right of my blog. Please take a moment to enter your information and in just a few minutes check your email for the confirmation message.  Just click on the link in the email or you will not be signed up. Then look forward to the next email I send out! Actually, if you sign up just after I have sent out a newsletter to my subscribers, I will go ahead and send that one to you and then you’ll be ready to receive the next upcoming issue. This is my way to personally communicate with you and have fun with stamping!

Let me know if you have any questions!

Make a Card with Flower Shop

Flower Shop Flowers

This is how I started making an unknown card, just stamping some flowers from the new stamp set Flower Shop, and with a die cut tag using the Chalk Talk Framelits Dies from Basic Black card stock.

I wanted that “chalk” look on this card so I stamped a greeting from the stamp set  Chalk Talk on the black tag using Versamark Ink and then embossing with White Stampin’ Emboss Powder and the Heat Tool.

I LOVE the new Pansy Punch that fits the Flower Shop flowers! You can purchase the stamp set and punch in a Flower Shop Clear Bundle (or wood-mount).

After punching out some flowers, stamping the background of the card with Versamark flowers and adding a Paper Doily, this was my final creatiion. If you just PLAY with your stamps, ink and paper a design and creation will come to you!

Flower Shop Chalk Talk Tag Card

Today get out some stamps, ink and paper that you haven’t used yet and see what you can create on your own! Send me a photo!

If you need any Stampin’ Up! stamps, ink and paper, you are welcome to visit my Stampin’ Up! Online Store  any time or contact me if you have any questions!

Single New Color Stampin’ Write Markers

Stampin’ Up! has just announced that for a limited time, we will be able to buy the new colors in Stampin’ Write markers individually OR in the New Color Kit. Some of us already own most of the colors in the kit, so this will enable us to buy just the markers we need rather than have duplicates.  Check your Stampin’ Write Marker collection and see what your needs are. Please note that the New Color Kit does include a new insert for the Many Marvelous Marker case, if you happen to own that.  However, once Stampin’ Up! fixes a glitch, you will be able to print that insert with the new color families yourself if you would like.

“In the 2013-2014 annual catalog, we offer the Stampin’ Write Marker New Color Kit (item 130034, page 163) to help you update your Many Marvelous Marker pack. Now, we’ve sweetened the deal. For a limited time, from June 26 until October 31, you can buy any of the new colors in the pack or on their own! Go ahead, fill in the missing pieces in your collection or buy the whole lot.”

Stampin' Write Markers

Remember, Smoky Slate is the one totally brand new color that no one owns for sure!  Also, the New Color Kit does not include the new In Colors.

Add your markers on to your regular Stampin’ Up! order!  You can order online at the Stampin’ Up! Online Store HERE if you like or contact me if you would like me to put it in for you. Keep in mind Clearance Rack items can only be ordered on an Online Order since availability can change at any moment.

Less Than 6 Months Until Christmas!!

If you have looked at the new Stampin’ Up! Catalog, you probably wondered what happened to all the holiday stamp sets that were usually in the front of the catalog.  Stampin’ Up! is making the annual catalog more of a core catalog and then the extra “mini” catalogs (which aren’t so mini anymore!) will have the newest seasonal and on trend stamp sets and products. And if the new Stampin’ Up! Catalog isn’t enough excitement, the new Holiday Catalog will be out August 1st!!

Having said all that, there are some past holiday sets, framelits, and punches that are being carried over and are still available! Certainly some of these are favorite sets!

Stampin' Up! Holiday Carryover

Click Image to View All Sets

Click the image above to view the WHOLE document (there are three pages!) or click this link here to view the entire list in the document.

You can also go to my Stampin’ Up! Online Store here to view “Online Stamps”……however, that won’t bring up the punch pack or the framelits.

Here’s the list with links! (I’m putting in the clear-mount stamps but you can also choose wood-mount)

Greetings of the Season Stamp Set  #128033

Ornament Keepsakes Stamp Set  #128051

 Holiday Ornaments Framelits Dies  #127816 (these are what we all used to make that beautiful ornament on the front of the Holiday Catalog last year)

Snowflake Soiree Stamp Set  #127925  (gorgeous stamp set!)

Evergreen Stamp Set  #127973 

More Merry Messages #126402

Jewish Celebrations  #128045

Merry Minis Punch Pack  #126882 (star, ornament, tree punches)


New Stampin’ Up! Products on the Clearance Rack

Shop the Stampin' Up! Clearance Rack

Stampin’ Up! announced they put some new items on the Clearance Rack today!  Go check them out at my Stampin’ Up! Online Store here.  You can add them to your regular order, too.  These are available online only and while supplies last (that’s why it has to be online!).  Look down the left sidebar at the store to check out ALL the categories of products!

Shop Stampin’ Up! Online Today!  Check out the Clearance Rack, too!

Last Days for Grab Your Greetings Special Offer

Grab Your Greetings Sale

We always need more greeting stamp sets for our cards and papercrafting projects so why not pick some up from Stampin’ Up! at a discount? Here are three great greeting stamp sets on sale for 25% off, but time is running out.  This offer ends Sunday, June 30th, so don’t delay! Just go to my Stampin’ Up! Online Store HERE to decide on which sets you want…or all of them!

Grab Your Greetings Stamp Sets

A Five-Way Flower Notecard from Scraps

Five-Way Flower 3x3 Notecard

Sometimes you don’t have to look far for creative inspiration! Sometimes it is as close as the scraps on your table!

I had stamped the Five-Way Flower several times with my new stamp set and also had some Real Red card stock scraps laying out. The card stock scrap looked pretty close to a 3″ x 6″ strip to trim, fold, and make into a notecard, and the Real Red stamped flower looked good on it since the Very Vanilla edges provided a contrast. Voila!  A little notecard just that easy!

The Five-Way Flower is a single stamp in the new catalog. When you look at it closely, you realize it is made for several scallop circle punches, probably already in your collection! Stamp the flower several times and then punch different size scallops to layer to build up the flower.  Separate the layers with a Stampin’ Dimensional. Or just stamp the flower and leave it as is!  I added a Rhinestone Basic Jewel to the center. You could also punch a different colored center or use a pearl or whatever you like.

I only had room for a small greeting (you wouldn’t have to have one) so I chose one from Itty Bitty Banners and just cut it out by hand (although there are matching framelits you can use!) (and the new Magnetic Platform would be super-duper for these!)

Such a simple little thing to make and yet it was so easy and most importantly, made me happy to make it!

Please visit my Stampin’ Up! Online Store to purchase any stamping, scrapbooking, and papercrafting supplies you may need!

Summertime Sunburst Card

Gingham Garden Summer Sunburst Card

On the one hand, I can’t believe it is officially summer already; on the other hand, here in Houston it has been summer for weeks! Heat and humidity, the standard summer weather forecast:  95 for a high, 75 for a low and 10% chance of rain!  So in honor of summer, I decided to try my hand at what I guess most people would call a “sunburst” card.  It’s a great way to use scraps of paper, and I’ve seen so many variations of this idea that you can do almost anything with it.  There is no right and wrong.

Since it is officially summer, I wanted my sunburst to be mostly yellow. I used the Gingham Garden Designer Series Paper to cut angled strips.  You can do this lots of different ways I’m sure and make lots of different sizes.  It probably doesn’t matter at all what you do,  I started with strips of the Gingham Garden paper about 4 1/2″ x 1 1/2″ and used my Stampin’ Trimmer to cut from one corner to the other diagonal corner.  Basically you want one straight edge and one angled side. Then just lay them out in the design you want, with the excess hanging off the card layer.  Be sure not to put adhesive ALL over the back of the strip because part will be trimmed off the card later. You can just lay out the strips in one area of the card or all over the top half as I did or over the whole card, whatever you like. Trim off the excess paper hanging off the edge of the card with your Paper Snips and you can also trim the place where all the points meet if you need to.  I placed a strip of designer paper across the middle of the card to cover that area but just the punched flower would have done so as well.  The flower is punched with the Blossom Punch – one piece of Delightful Daffodil card stock and two pieces of Gingham Garden paper. The center is a piece of Pear Pizzazz that was in my scraps already embossed! I just punched it out with the 7/8″ Scallop Circle Punch.

This was a fun and easy card to make and I’m anxious to try some other versions! Dig out some of your scrap paper and try it!

Visit my Stampin’ Up! Online Store here 24/7!

You’re Amazing Birthday Card

You're Amazing Birthday Card

Do you ever wonder where people get these creative ideas for making cards or any papercrafting projects?  There are lots of places, but perhaps the best one is right at your fingertips…..the new Stampin’ Up! Annual Catalog! I just barely started paging through the catalog when I saw both a tag and a birthday card at the top of page 15. The birthday card was simple enough although it had some sewing on it……but the tag was also cute.

I made the tag using the stamp set You’re Amazing and embossed with Pool Party Stampin’ Emboss Powder and Versamark Ink. I added two of the new Candy Dots on there (probably my main reason for making the whole card!). One of my favorite framelits dies is the one I used from the Apothecary Accents Framelits collection. I even punched a little hole in each side of the Happy Birthday piece and tied on some Pool Party Baker’s Twine (that color retired).

The card base is Crumb Cake, a great neutral to start with! For this card, I did cut it smaller than usual, 4 1/4″ x 8 1/2″ so when it is folded I have a 4 1/4″ square card. I meant to round the bottom corners of the card but I guess I forgot! After putting a little border on the bottom of the greeting using the  Dotted Scallop Ribbon Border Punch  I used strips of the This And That Epic Designer Series Paper for the layers underneath.  Very simple, good use of scraps, and makes a fun card I think!

In the photo below I think you can see the Pool Party embossing a little better!

You're Amazing Birthday Card with Embossing


If you want to purchase any Stampin’ Up! supplies, please visit my Stampin’ Up! Online Store now! Check the categories in the left sidebar when you get there and make sure you see ALL that is available!

Stampin’ Up! My Digital Studio New Downloads!

Stampin' Up! My Digital Studio

Hey! Here’s a great idea for your summer!  Buy the My Digital Studio software for only $19.95 and start creating your summer scrapbooks, summer party favors, invitations, fun things for the kids to make, whatever you want! It won’t take you long at all to “get the hang of it” with MDS. And if you have the kids home for the summer, you KNOW they will be able to help you with anything digital! Let them create some things as well, then print them out at home or at the office supply store or send off to Stampin’ Up! for printing if it is a special keepsake. Let them help you digitally scrap any photos from the past school year! Or make an album together to get ready for the upcoming school year and have it ready to drop the photos into during the school year! There’s so much potential for you and the kids to work on during the summer and have fun together…..indoors and in the air-conditioning I might add!

One of the best parts is that every Tuesday Stampin’ Up! releases new downloads you can purchase (and on occasion some free ones!). Here are the newest downloads released this week:

My Digital Studio Newest Downloads for June 18th!

View the PDF with all the details!

I suggest purchasing the software because the price has dropped from originally being $79.95 to only $19.95 and you will not believe all the content you get with that full version software!! And when you are ready, you can purchase extra downloads that come out every Tuesday from Stampin’ Up! to suit your projects. But you won’t “need” anything for a long time with all the artwork you receive in the software.

If you really do not want to spend the money without trying, you’re in luck because you can take the MDS 30-Day Free Trial! Get a trial version…..the full software with some artwork to use……and work with it for 30 days. If you want to purchase the full version, do it just before your 30 days ends to make installation a little easier.  If you aren’t interested, the program will end after 30 days.  No obligation.

My Digital Studio is certainly not just about scrapbooking!  So if you are not into scrapbooking, don’t think this program is of no use or joy to you! Experience it!  Take the Free 30-Day Trial!

 My Digital Studio Software or Free 30-Day Trial!  You Choose!

Tag a Box Kraft Gift Box with Acetate Sleeve

Tag a Box Gift Wrap

This is a fun new product in the new Stampin’ Up! Annual Catalog!  You can buy just the box, the Tag a Box, which is a sturdy kraft box with an acetate sleeve. Before I opened the package, I thought the acetate was going to be a lid that I would have to assemble.  But it is a sleeve that just needs to be made 3D from being folded and then slid right over the box.  Love it! The box comes flat and then you easily assemble. Then the fun begins, filling it with whatever treat or gift you want to put in there! Since I was giving this to a stamper, I added three small cello bags of new and old ribbon, buttons and other embellishments….plus a few chocolates! I tied the Summer Starfruit ribbon around and added a tag. You can buy JUST the Tag a Box Gift Boxes, but I recommend purchasing the Tag a Box Bundle, which comes with the boxes and the Tag a Bag Accessory Kit.

Tag a Box Bundle

 * 10 large base tags
* 10 medium builder tags
* Baker’s Twine, 20′ each of 3 colors: Crushed Curry, Tangerine Tango, Bermuda Bay
* 10 mini clothespins
* 5 Smoky Slate self-adhesive
strips, each 12″
* 40 Stampin’ Dimensionals

Here’s a close-up of the tag. As you can see, I used a base tag and builder tag plus punched or cut out two images from stamps to put on the tag.  The “K is for Kindness” is from A Round Array, punched out with the new 7/8″ Scallop Circle Punch (I cut out the center by hand).  The “Thank You” is stamped with Itty Bitty Banners and just cut out by hand with my Paper Snips, although there are Itty Bitty Framelits you could use.

Tag a Box Bundle Gift TagTo purchase these or any other Stampin’ Up! products, please order online at my Stampin’ Up! Online Store or contact me at Karen@KarenStamps.com and I’ll be happy to put your order in for you. These gift boxes would be great to have on hand for those unexpected occasions when you need a cute little gift for someone!

Help a Charity with the Stampin’ Up! Stamp Set “Tag It”

Tag It Stamp Set

There’s one stamp set in the new Stampin’ Up! Annual Catalog that you can feel GOOD about purchasing! Doesn’t matter how many stamp sets you already have or how full your craft room is or how much paper you are hoarding!  The purchase of the “Tag It” stamp set from Stampin’ Up! will help the Ronald McDonald House Charities program because for the sale of every Tag It stamp set, Stampin’ Up! will donate $3 to the charity!

Tag It is a great stamp set, one of those versatile ones that you can use for lots of occasions AND the new Chalk Talk Framelits will also work with it. You won’t have to cut out the tags by hand!

For the first time, the Ronald McDonald House set is available in four different languages: English, Spanish, French, and German. If another language appeals to you, now you have a choice!

To purchase this Tag It stamp set and have Stampin’ Up! donate $3 for each one sold, just go to my Stampin’ Up! Online Store here and place it on your next order!


A Father’s Day Paper Napkin Necktie

Paper Napkin Necktie

I received an email from Chinet, a company who makes paper table goods, that had a cute idea for folding one of their square paper napkins into a necktie shape for Father’s Day. To finish theirs off, they wrote on a paper tag the menu for Father’s Day. I thought it was a cute idea but used some Stampin’ Up! stamps, ink and paper to make a cute tag and attached it with a paper clip (like a tie clip!) The paper napkin necktie is pretty easy to make (only took me three tries!). You might call it simple origami! It would make a cute table decoration for Father’s Day. You can watch the video below.

For my tag, I stamped the images in Early Espresso, one on Crumb Cake and one on Whisper White with the Chalk Talk stamp set.  There are matching Chalk Talk framelits, but I don’t have them yet, so I just cut them out by hand. (There’s also a Chalk Talk Bundle to save you 15%!)  I also used the Curly Label Punch to add that extra colorful layer. I used the new In Color, Coastal Cabana.

Chalk Talk Tag on Paper Napkin Necktie

Shop the Stampin’ Up! Online Store Here!