Monthly Archives: October 2011

An Alternate Way to Trick or Treat This Halloween

Happy Halloween Door

Looking for a different, safer way to have your children trick or treat this Halloween with the neighbors and their friends? Here is an older post I did in 2009 explaining something we did for a few years with our kids. It takes a little bit of planning so you need to get started….really just contacting your friends and/or neighbors and planning the route you will take! Parents and children all go together so it is fun for the whole family….and a chance to visit with your neighbors!

Here is the link to my previous post: https://www.karenstamps.com/2009/10/a-different-way-to-trickortreat.html

It sounds crazy and confusing, but it really works….and most of all, it is FUN!!  Let me know if you try it!

Spooky Halloween Tree Card

Spooky Halloween Tree Card

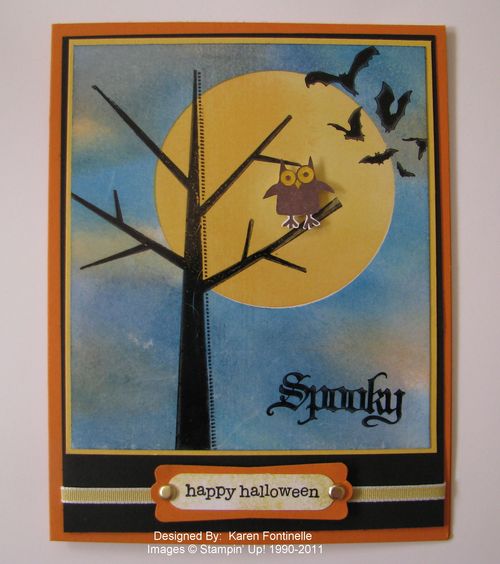
This Spooky Halloween Tree card was so much fun to make!  I used Glossy White card stock #102599 so that I could do lots of sponging of color. I wanted a big moon in the sky so the silhouette of the tree would show.

The way you make the moon is with the 2 1/2" Circle Punch #120906 and post-it notes….or at least some sort of circle stencil. I punched a hole in a post-it note with some sticky on the back.  First I placed the punched-out piece down like a stencil to color in the moon.  I used a sponge and several colors of yellow classic ink with a touch of Pumpkin Pie.  Then I removed the stencil piece and stuck on the circle I had punched as a mask to cover the moon I had just sponged.  That way I could sponge the background sky without getting ink on the moon. I just used different blues…I think Pacific Point, Not Quite Navy and Night of Navy…with a little Pumpkin Pie thrown in and maybe some yellow.

Next I stamped the tree from Season of Friendship #111776, the bats and the word "spooky" from Wicked Cool #120600 (clear).  The owl I stamped in Chocolate Chip from Spooky Bingo Bits #123946 (clear) and cut him out with my Paper Snips. The Halloween greeting is from Teeny Tiny Wishes.

It was really fun to play with all those colors and doing the sponging.  So if you need some Halloween stamping supplies, be sure to go to my Online Store HERE and place your order!

***If you aren't already on my newsletter Mailing List, be sure to sign up in the box in the upper left!  On Wednesday you will start receiving my "12 Weeks of Christmas" weekly idea of a Christmas idea…a card, gift, or packaging ideas!  You won't want to miss it!!

Wednesday–Stampin’ Up! Hispanic Opportunity Call

Don't forget….if you are interested in being a Stampin' Up! demonstrator in the Hispanic market, Stampin' Up! holds special calls on any Wednesday to discuss Stampin' Up! and the business opportunity with an opportunity for questions at the end.

The calls are held every Wednesday in both English and Spanish:

  • 11:00 AM (MT) for English
  • 4:00 PM (MT) for Spanish

To participate, simply call 877-787-7226 (toll free) at the appropriate time.

Be sure to check out the Big Shot opportunity for new Stampin' Up! demonstrators during October!!

You can sign up to be a demonstrator when you are ready on my website HERE. Just click the "Join Now" button on the left side of that page!


Spooky Ghost Gift Bag For Halloween

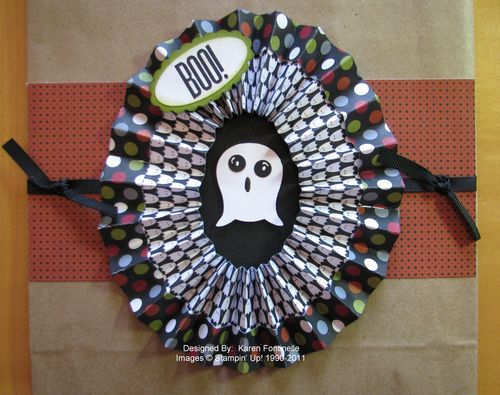
Grab one of those paper gift bags you have and let's make a spooky ghost gift bag for Halloween! You might want to take a hostess gift to a Halloween party or maybe someone has a Halloween birthday. There are so many fun Halloween ideas out there you should use them whenever you can!

Spooky Ghost Halloween Gift Bag

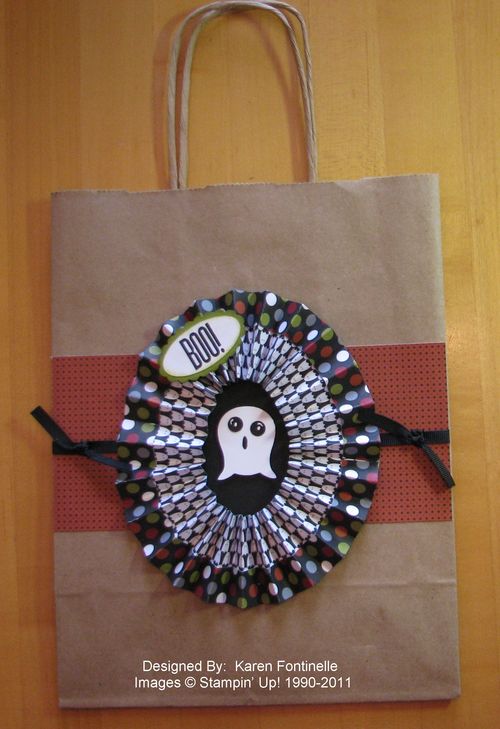
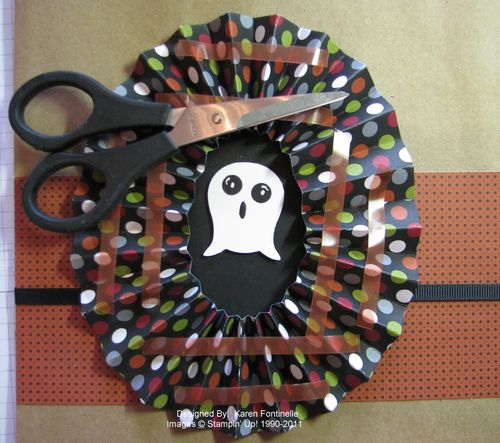
Here's how I made the Halloween gift bag.  It was a total accident!! My plan was to make one of those medallions or lollies out of Halloween paper, perhaps sticking it on a bag.  I wanted to try scoring the Halloween paper and folding up part of it to get a two-toned medallion. I was doing that and after glueing the two scored strips together and flattening it, trying to push it together in the center, I got this oval shape and thought why not do something with that?!

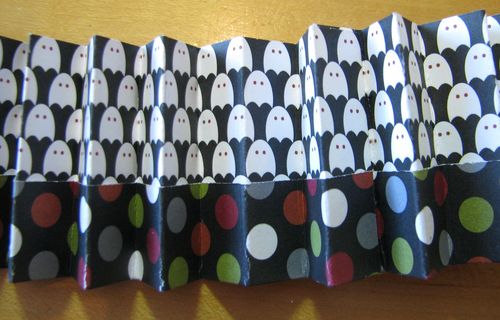
Here is the scored Frightful Sight Designer Series Paper #122351. I made two strips, each 12" x 2 1/2" and scored at every 1/2". ( I should have cut ONE strip 12" x 5" and cut in half later!) Then I turned the paper in my Simply Scored #122334 and scored at 3/4" to get the edge I would fold over. Love the Simply Scored!!!

Frightful Sight DSP Scored

Frightful Sight DSP close up

After I got the two strips glued together and played around with the shape I wanted, I turned it over and used Sticky Strip #104294 to hold it in shape on the back side.  The scissors is just holding it down in place. It is not glued to the bag yet, I'm just fitting it around the ghost to get the proper shape.  The ghost I made with the Owl Punch #118074….punch out the owl, cut off its feet and turn it upside down! Make his face with punched pieces or draw them in.

Sticky Strip on Medallion Back

Take off all the Sticky Strip red covering and stick to the bag centering the ghost, which is already glued down on a black piece of card stock.

Ghost Bag front

There's still plenty of time to order paper and stamping supplies for Halloween projects!  Just go to my website at www.karenfontinelle.stampinup.net and click the "Shop Now" button!


This Is How To Become a Stampin’ Up! Demonstrator!

Stampin' Up! Starter Kits

Images copyright Stampin' Up! 2011

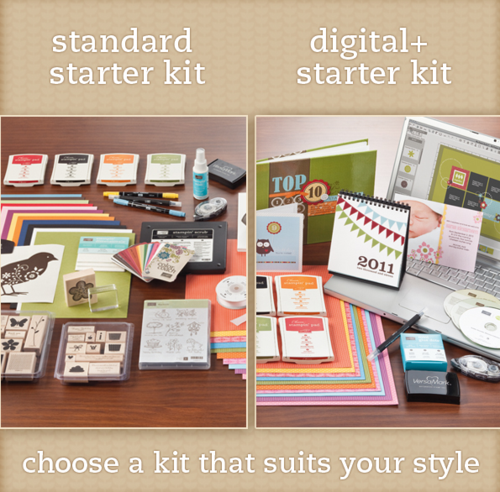
The standard Starter Kit includes

  • Four complete stamp sets (including a clear-mount set and clear-mount block)
  • A Stampin' Around wheel, handle, and ink cartridge  
  • Assortment of Designer Series Paper and card stock
  • White envelopes (40)
  • Four Classic Stampin' Pads
  • Two Stampin' Write markers
  • VersaMark Pad
  • Whisper White 5/8" satin ribbon
  • Always Bird Décor Elements and applicator
  • Adhesives
  • Blender pen
  • Color Coach
  • Cupcake Punch
  • Stamping sponge
  • Stampin' Scrub and Mist 
  • Box of Idea Book & Catalogs
  • Business forms and tools 

The Digital+ Starter Kit includes

  • My Digital Studio digital designing software
  • His & Hers Digital Content Collection DVD
  • One clear-mount stamp set (including a clear-mount block)
  • Assortment of card stock
  • Note cards and envelopes (20)
  • Four Classic Stampin' Pads  
  • Real Red 1/4" grosgrain ribbon
  • Brights Designer Buttons
  • Always Bird Décor Elements and applicator
  • Adhesives
  • Blender Pen
  • Stampin' Scrub and Mist 
  • Box of Idea Book & Catalogs
  • Business forms and tools 

Choose the Starter Kit that best matches your stamping and paper-crafting interests, and get over $340 of Stampin' Up!'s high-quality products for just $175.

**************

With all the talk about the fantastic offer of a free Big Shot when you sign up to be a Stampin' Up! demonstrator during this month of October, I thought you might like more detail on what that entails.

After gathering all the information you need to make your decision to join Stampin' Up! (you can start HERE and ask ME!), you will purchase the Starter Kit for $175.  The quickest and easiest way to do this is online at my website HERE.  Just click the "Join Now" button on the left. Stampin' Up! will email you your "demo number" and you are set to start your own stamping business!  You just have to wait for your kit to arrive shortly!

You choose between two kits….the Standard Starter Kit (with lots of traditional stamping supplies) or the Digital+ Starter Kit (which comes with My Digital Studio software and a few traditional stamping supplies). Each kit is customizable on almost all items so, for example, if you would rather have different colors of ink pads than the suggested ones, you can change that in your kit.

    Here is a link to the Standard Starter Kit form. Click HERE.

    Here is a link to the Digital+ Starter Kit form.  Click HERE.

Then if you like, you can order optional add-on kits for scrapbooking (Stampin' Memories) and for the Definitely Decorative Line.

You will also receive catalogs and business supplies in your kit.

So there you have it!!  It's so easy to join Stampin' Up! and what a great way to start your own business for extra cash, a new career, or just your own stamping pleasure!  Let me know what questions you have!


Be a Stampin’ Up! Demonstrator! You Know You Want To!

It will soon be nine years since I signed up to be a Stampin' Up! demonstrator and I've enjoyed every minute of it!  My friend had recently signed up when I had visited her one summer.  I had never heard of Stampin' Up! but when I saw the projects she had made at a stamp camp I was intrigued. There was more to rubber stamping that I had imagined!

I'd love to share this fun with you, and this month is the best time ever! Listen to Shelli Gardner, Cofounder and CEO of Stampin' Up!, tell you all about it!

Now if you would like to purchase a Big Shot and some accessories from me, I'd be happy to sell you one because you will LOVE using it on all your projects!  Just go to my store HERE.

But if you would like to have your own Stampin' Up! business and full Stampin' Up! experience and on top of that want to get a FREE Big Shot, well….just go to my website HERE and click on the JOIN NOW button in the left sidebar!

You probably have questions and I'd be happy to answer them.  Just email me at Karen@Karenstamps.com and we can get in touch.

The Big Shot offer is good until October 31.

Stampin’ Up! Heat Tool: A Handy Dandy Tool to Own!

Heat tool

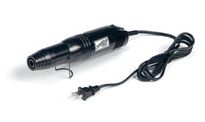
You probably are familiar with the Stampin' Up! Heat Tool #100005 for embossing or using Heat & Stick powder.  Sometimes it is used for quickly drying ink, particularly craft ink.  I've also told you how handy it is to unstick Sticky Strip on a project like in this old post HERE.  

Well, today I used my Heat Tool to unstick self-adhesive postage stamps! Over a year ago when I was putting postage on wedding invitations and putting on too much, I pulled off the extra stamps and tried to save them (at $.44 each!). I stuck them on to the sort of waxy envelope from the post office that the stamps came in, hoping they wouldn't stick for good on there.  I've pulled off as many of the stamps as I easily could the past year, but now I'm down to the ones that seemed really stuck on.  So today I turned on my Heat Tool and blasted a stamp…..it came off easily and I was able to reuse it on my current mail!  Just to be on the safe side, I used a drop of Multipurpose Liquid Glue to make sure the stamp didn't come off the envelope.

So Stampin' Up! supplies aren't just for stamping anymore!

Need a high quality Heat Tool?  Here's the Stampin' Up! one!  And you might want to pick up some of our great embossing powders, too HERE.

(Don't forget to check the bargains on the Clearance Rack as well!

Halloween Craft: Crazy Halloween Monster Face Card

Crazy Halloween Monster card

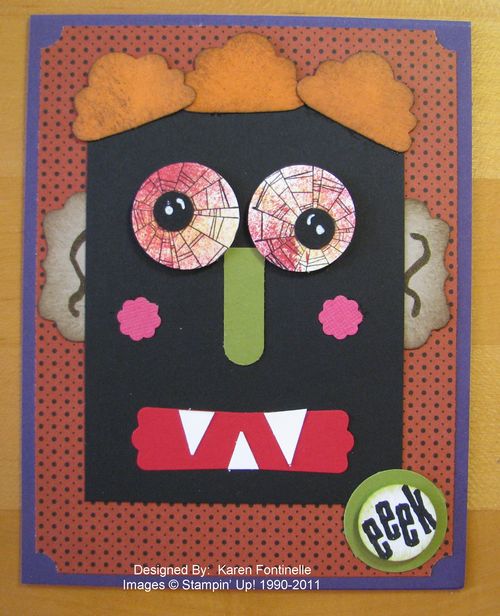
If you are looking for ideas for a Halloween craft or Halloween crafts for kids, I think something like this Halloween card would be fun! Basically just use some paper scraps and punches or scissors and make a monster face!

I was planning to make some simple Halloween card and opened a magazine to get some ideas.  The magazine had glass jars filled with candy and then some monster face features pasted on the glass jar.  I got the idea to make a card instead and came up with this!  I guess it is a form of "punch art" since I grabbed a variety of my Stampin' Up! punches and just had a creative moment!

See if you can figure out what punches I used!

If you need some Stampin' Up! punches to make your Halloween crafting fun, just go to my Online Store.  Don't forget to check the Clearance Rack for the latest and greatest deals!

Stampin’ Up! My Digital Studio Banners for My New 12 Weeks of Christmas

The new My Digital Studio downloads were so exciting yesterday that I decided to try creating my own banner for my 12 Weeks of Christmas emails that begin later today!  If you are on my newsletter mailing list, once a week you will receive a special email with a Christmas project for you to make or be inspired by.  I got to work in My Digital Studio, did some cropping in the photo program on my computer and voila….

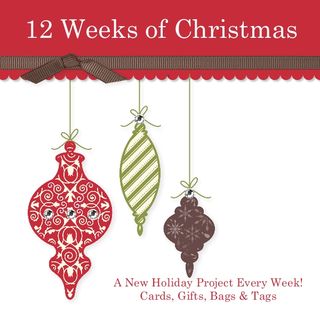
My Digital Studio12 Weeks Christmas Footer

This is the bottom footer of my newsletter.  For the banner, I began with a template that was in the program and then added to it.  To see it, you'll have to be on my mailing list…..so go sign up in the upper left corner here in my blog for my Monthly Email Newsletter that gives you stamping news and ideas and that will get you the "12 Weeks of Christmas".  Hope you enjoy!  Watch your inbox later today!


Stampin’ Up! My Digital Studio….You Gotta Have It!!

My Digital Studio is the Stampin' Up! software and downloads for digital papercrafting.  I guarantee you it is not just for digital scrapbooking…although it is great fun for that!  You can make so many projects with My Digital Studio, and I think we all just keep loving it more and more! Some day when you see smoke, it will be our computers overloaded with all the fantastic My Digital Studio downloads that they come out with weekly!!  

For plenty of samples, ideas, tutorials, videos, discussion about My Digital Studio join www.mydigitalstudio.net. It's free and for customers and demonstrators alike! You can also find out about My Digital Studio HERE on my website!

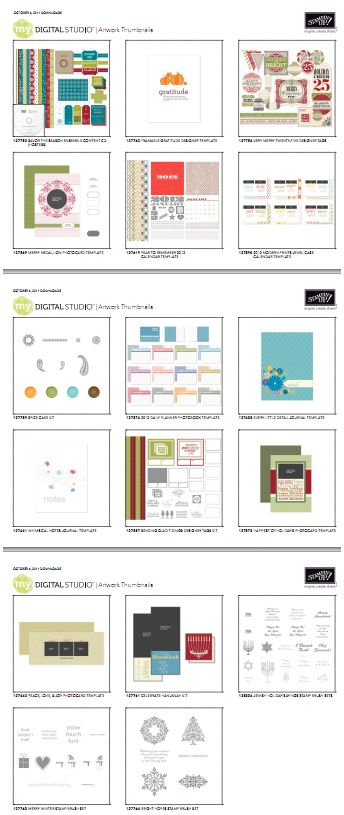
It's Tuesday, so click HERE to see the new downloads for this week!

MDS Dwnlds 10 04

Click on images above to see actual size.

AND

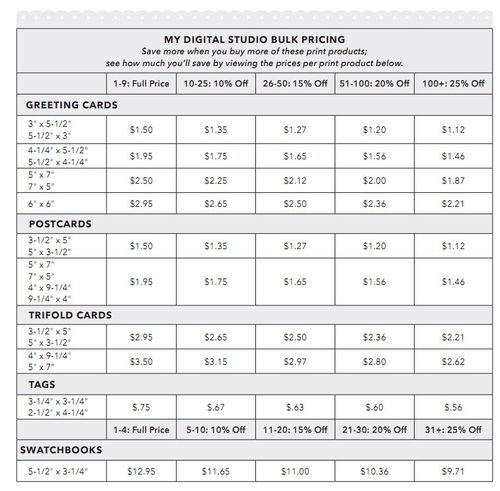
Bulk pricing is available for printing My Digital Studio projects! Just in time for the holidays!  Keep in mind that when you create a card in My Digital Studio, you can design the whole inside and even back of the card so it will be truly unique!

MDS Bulk Pricing 2011

Click Chart to Enlarge

To check out the purchasing option for My Digital Studio and downloads of your choice, please click HERE.

Contact me any time with your questions.


New My Digital Studio Hostess Package!

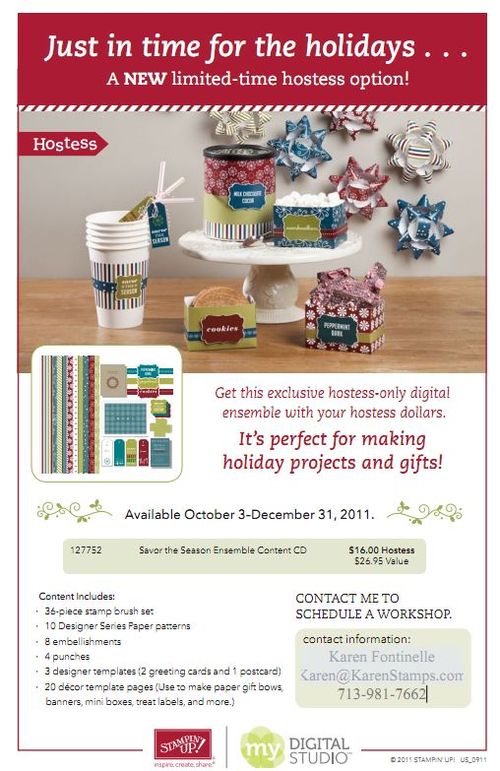
My Digital Studio Hostess Set 2011 Oct

Book a Stampin' Up! workshop with me and this will be one of your hostess-only choices for your hostess benefits!  On this My Digital Studio ensemble CD, you will receive:

  •  36-piece stamp brush set
  • 10 Designer Series Paper patterns 
  • 8 embellishments
  • 4 punches
  • 3 designer templates (2 greeting cards and 1 postcard) 
  • 20 décor template pages (Use to make paper gift bows, banners, mini boxes, treat labels, and more.)

If you want to learn about My Digital Studio and have a fun workshop with your friends, this is the perfect time!  As you can see, My Digital Studio is not only about scrapbooking. Let me show you the possibilities! Contact me today!

Be sure you are signed up for my newsletter mailing list in the upper left corner in order to receive not only my monthly email newsletter but my "12 Weeks of Christmas" special weekly newsletter which begins this Wednesday, October 5!

Xmas Banner Small-001

Stampin’ Up! Cookie Stamps!

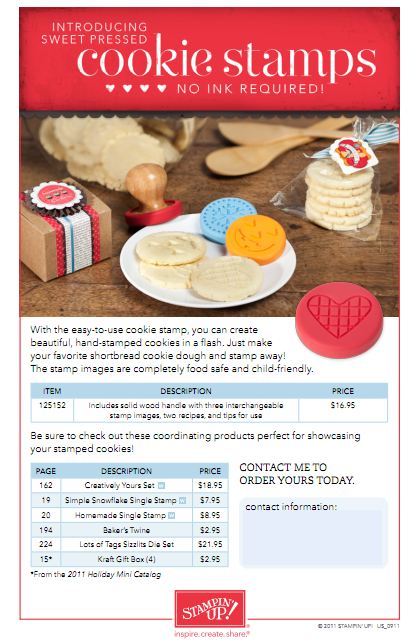
Stampin' Up! Cookie Stamps

Just in time for holiday baking, Stampin' Up! has introduced a new product called Cookie Stamps!  You get three cookie stamps with a wooden handle to decorate your cookies. This works best with a shortbread recipe so the stamped image will not become distorted while baking. Demonstrators were treated to these stamped cookies at our Stampin' Up! Convention this summer!

Check them out here or click on the image above.

And after you bake the cookies, use Stampin' Up! products for decorative packaging!  Make a cute tag with a pretty Stampin' Up! ribbon….or use our new Kraft Gift Boxes.  You can make great gifts any time of year!!

To order these brand new Cookie Stamps, just email me or go to my Online Store.  Be sure to check the Clearance Rack while you are there for some great bargains!


Be a Big Shot with Stampin’ Up!…and Get a Free Big Shot, Too!


BIG SHOT RECRUITING PROMOTION!!!

New demonstrators who join the Stampin' Up! family in October will get a FREE Big Shot (or up to $100 in free Stampin' Up! products)! Can you believe that??! What an opportunity to start your own business right before the holidays!  Join my team and take advantage of the great products in the Holiday Mini Catalog and the Stampin' Up! Idea Book & Catalog to start your stamping, scrapbooking and papercrafting business! And to have a FREE Big Shot to do it with is nothing short of spectacular!

  • Any new recruit who signs up during the promotion period will receive a Sizzix Big Shot Machine or $100 in Stampin' Up! products of your choice from any of our current catalogs.
  • New recruits who use the online IDA (Independent Demonstrator Agreement HERE) will be given access to the Promotional Product Bonus order type in OEX (the ordering page for demonstrators) approximately one hour after you complete your online IDA (you will be provided a link to OEX for this redemption via e-mail). In this order type, you will either enter the item number for the Big Shot (item 113439) or the item numbers for up to $100 in Stampin' Up! products. Products can be chosen from any current catalog and shipping is free!
  • New Recruits should ensure that your free total comes as close as possible to $100 without going over since the Promotional Product Bonus order type will not allow items beyond $100 to be added to the order.
  • Those who mail in their IDAs can simply list the items they want for free on their accompanying order form.
  • New recruits will have until November 30, 2011, to redeem their product bonus.

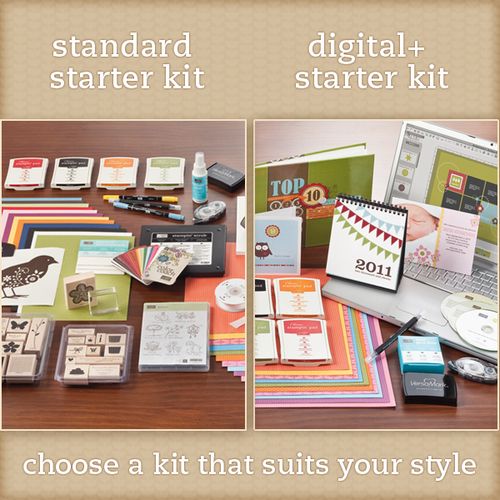
What this means is….you can sign up online to be a Stampin' Up! demonstrator HERE and become a demonstrator in minutes by purchasing either the Standard Starter Kit or the Digital+ Starter Kit.  Both kits are customizable. Then after approximately one hour you will be able to log in to the Demonstrator side of the Stampin' Up! website and find a special link with which to order your Big Shot or $100 in stamping products.  Shipping is FREE! (Or you can wait until November….but who could wait that long for FREE stuff!)

Starter Kits

The standard Starter Kit includes

  • Four complete stamp sets (including a clear-mount set and clear-mount block)
  • A Stampin' Around wheel, handle, and ink cartridge  
  • Assortment of Designer Series Paper and card stock
  • White envelopes (40)
  • Four Classic Stampin' Pads
  • Two Stampin' Write markers
  • VersaMark Pad
  • Whisper White 5/8" satin ribbon
  • Always Bird Décor Elements and applicator
  • Adhesives
  • Blender pen
  • Color Coach
  • Cupcake Punch
  • Stamping sponge
  • Stampin' Scrub and Mist 
  • Box of Idea Book & Catalogs
  • Business forms and tools 

The Digital+ Starter Kit includes

  • My Digital Studio digital designing software
  • His & Hers Digital Content Collection DVD
  • One clear-mount stamp set (including a clear-mount block)
  • Assortment of card stock
  • Note cards and envelopes (20)
  • Four Classic Stampin' Pads  
  • Real Red 1/4" grosgrain ribbon
  • Brights Designer Buttons
  • Always Bird Décor Elements and applicator
  • Adhesives
  • Blender Pen
  • Stampin' Scrub and Mist 
  • Box of Idea Book & Catalogs
  • Business forms and tools 

Choose the Starter Kit that best matches your stamping and paper-crafting interests, and get over $340 of Stampin' Up!'s high-quality products for just $175.

Read all about joining Stampin' Up! HERE.  Read about the Big Shot offer HERE.

Contact me with your questions at Karen@Karenstamps.com.

You'll be so glad you decided on Stampin' Up!


World Card Making Day…..Make a Card for Someone!

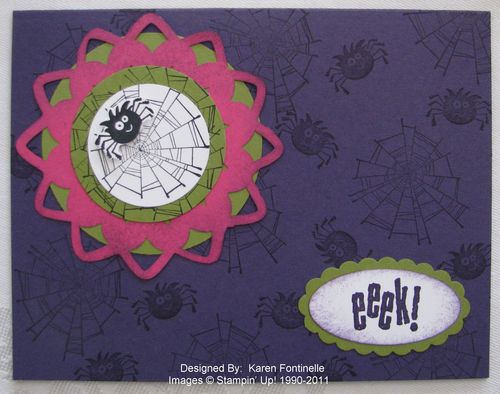
Halloween Doily Card

Today, October 1 is World Card Making Day!  This is the day to celebrate card makers from around the world as we begin the busy crafting season of fall and leading into the holidays.  Why not grab some of your stamping supplies and make a card for someone?  Now if you would hate to actually send a card you went to the trouble to make, maybe you should make two…..keep one, send one!  But as long as you have all your stuff out, why not make three cards, and then you'll have an extra…after you send one and keep one!  We can never have too many cards!

Here is a card I sort of challenged myself to make.  I sat looking at the doilies poking out of the Flirtacious Specialty Paper #122360….yes, you get a whole page of doilies….you can cut them apart or use them how you want. I wondered if I could make a Halloween card with a Melon Mambo doily!  Well, yes, I could!  I got out my Color Coach to see what colors would coordinate with Melon Mambo and there they were….Elegant Eggplant and Old Olive!

If you don't feel you have any creative ideas, just find a picture in a magazine or a design on your clothes or in the store and use those colors or shape to make your card.  It really works!

Happy Card Making Day!  

Need supplies? Just order online HERE!