Monthly Archives: August 2008

Bella Rose Baby Name Frame

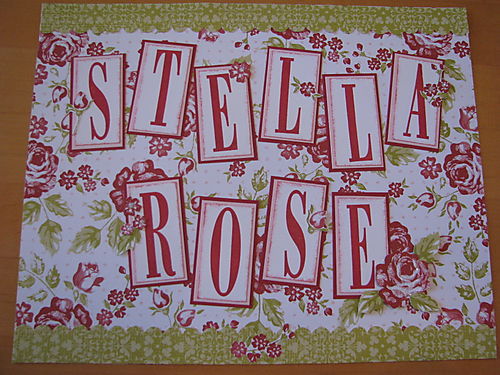
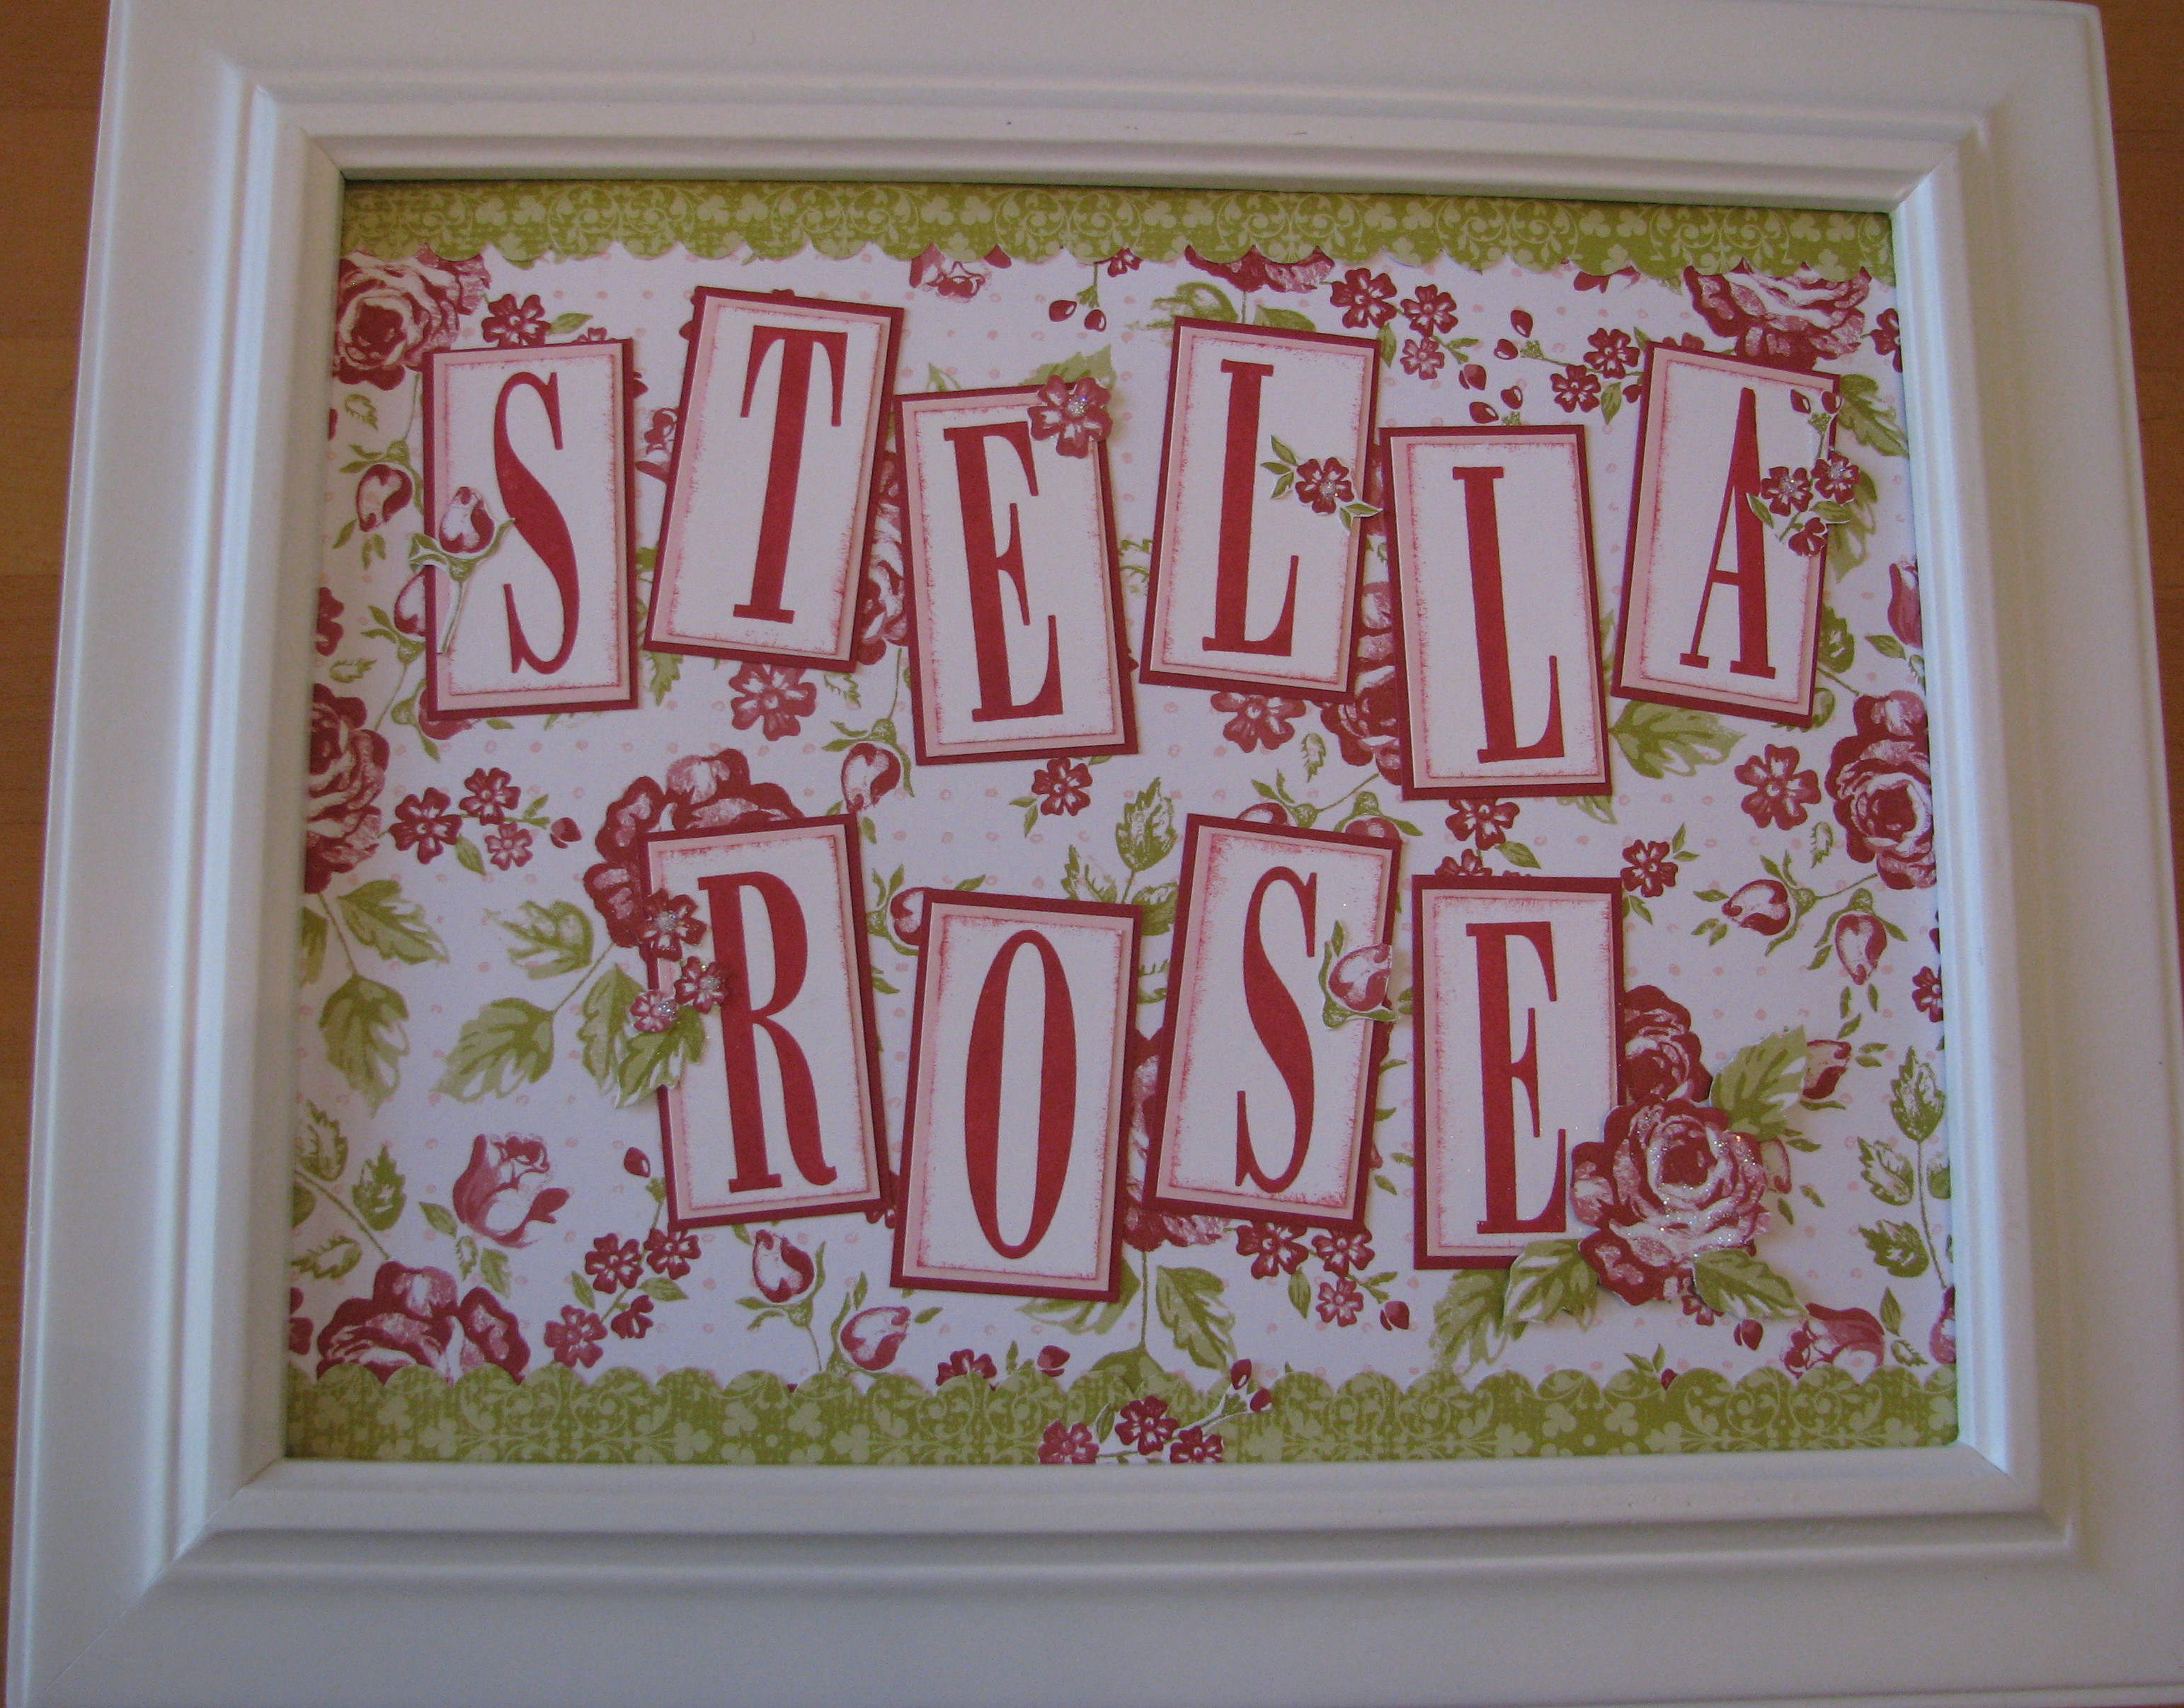
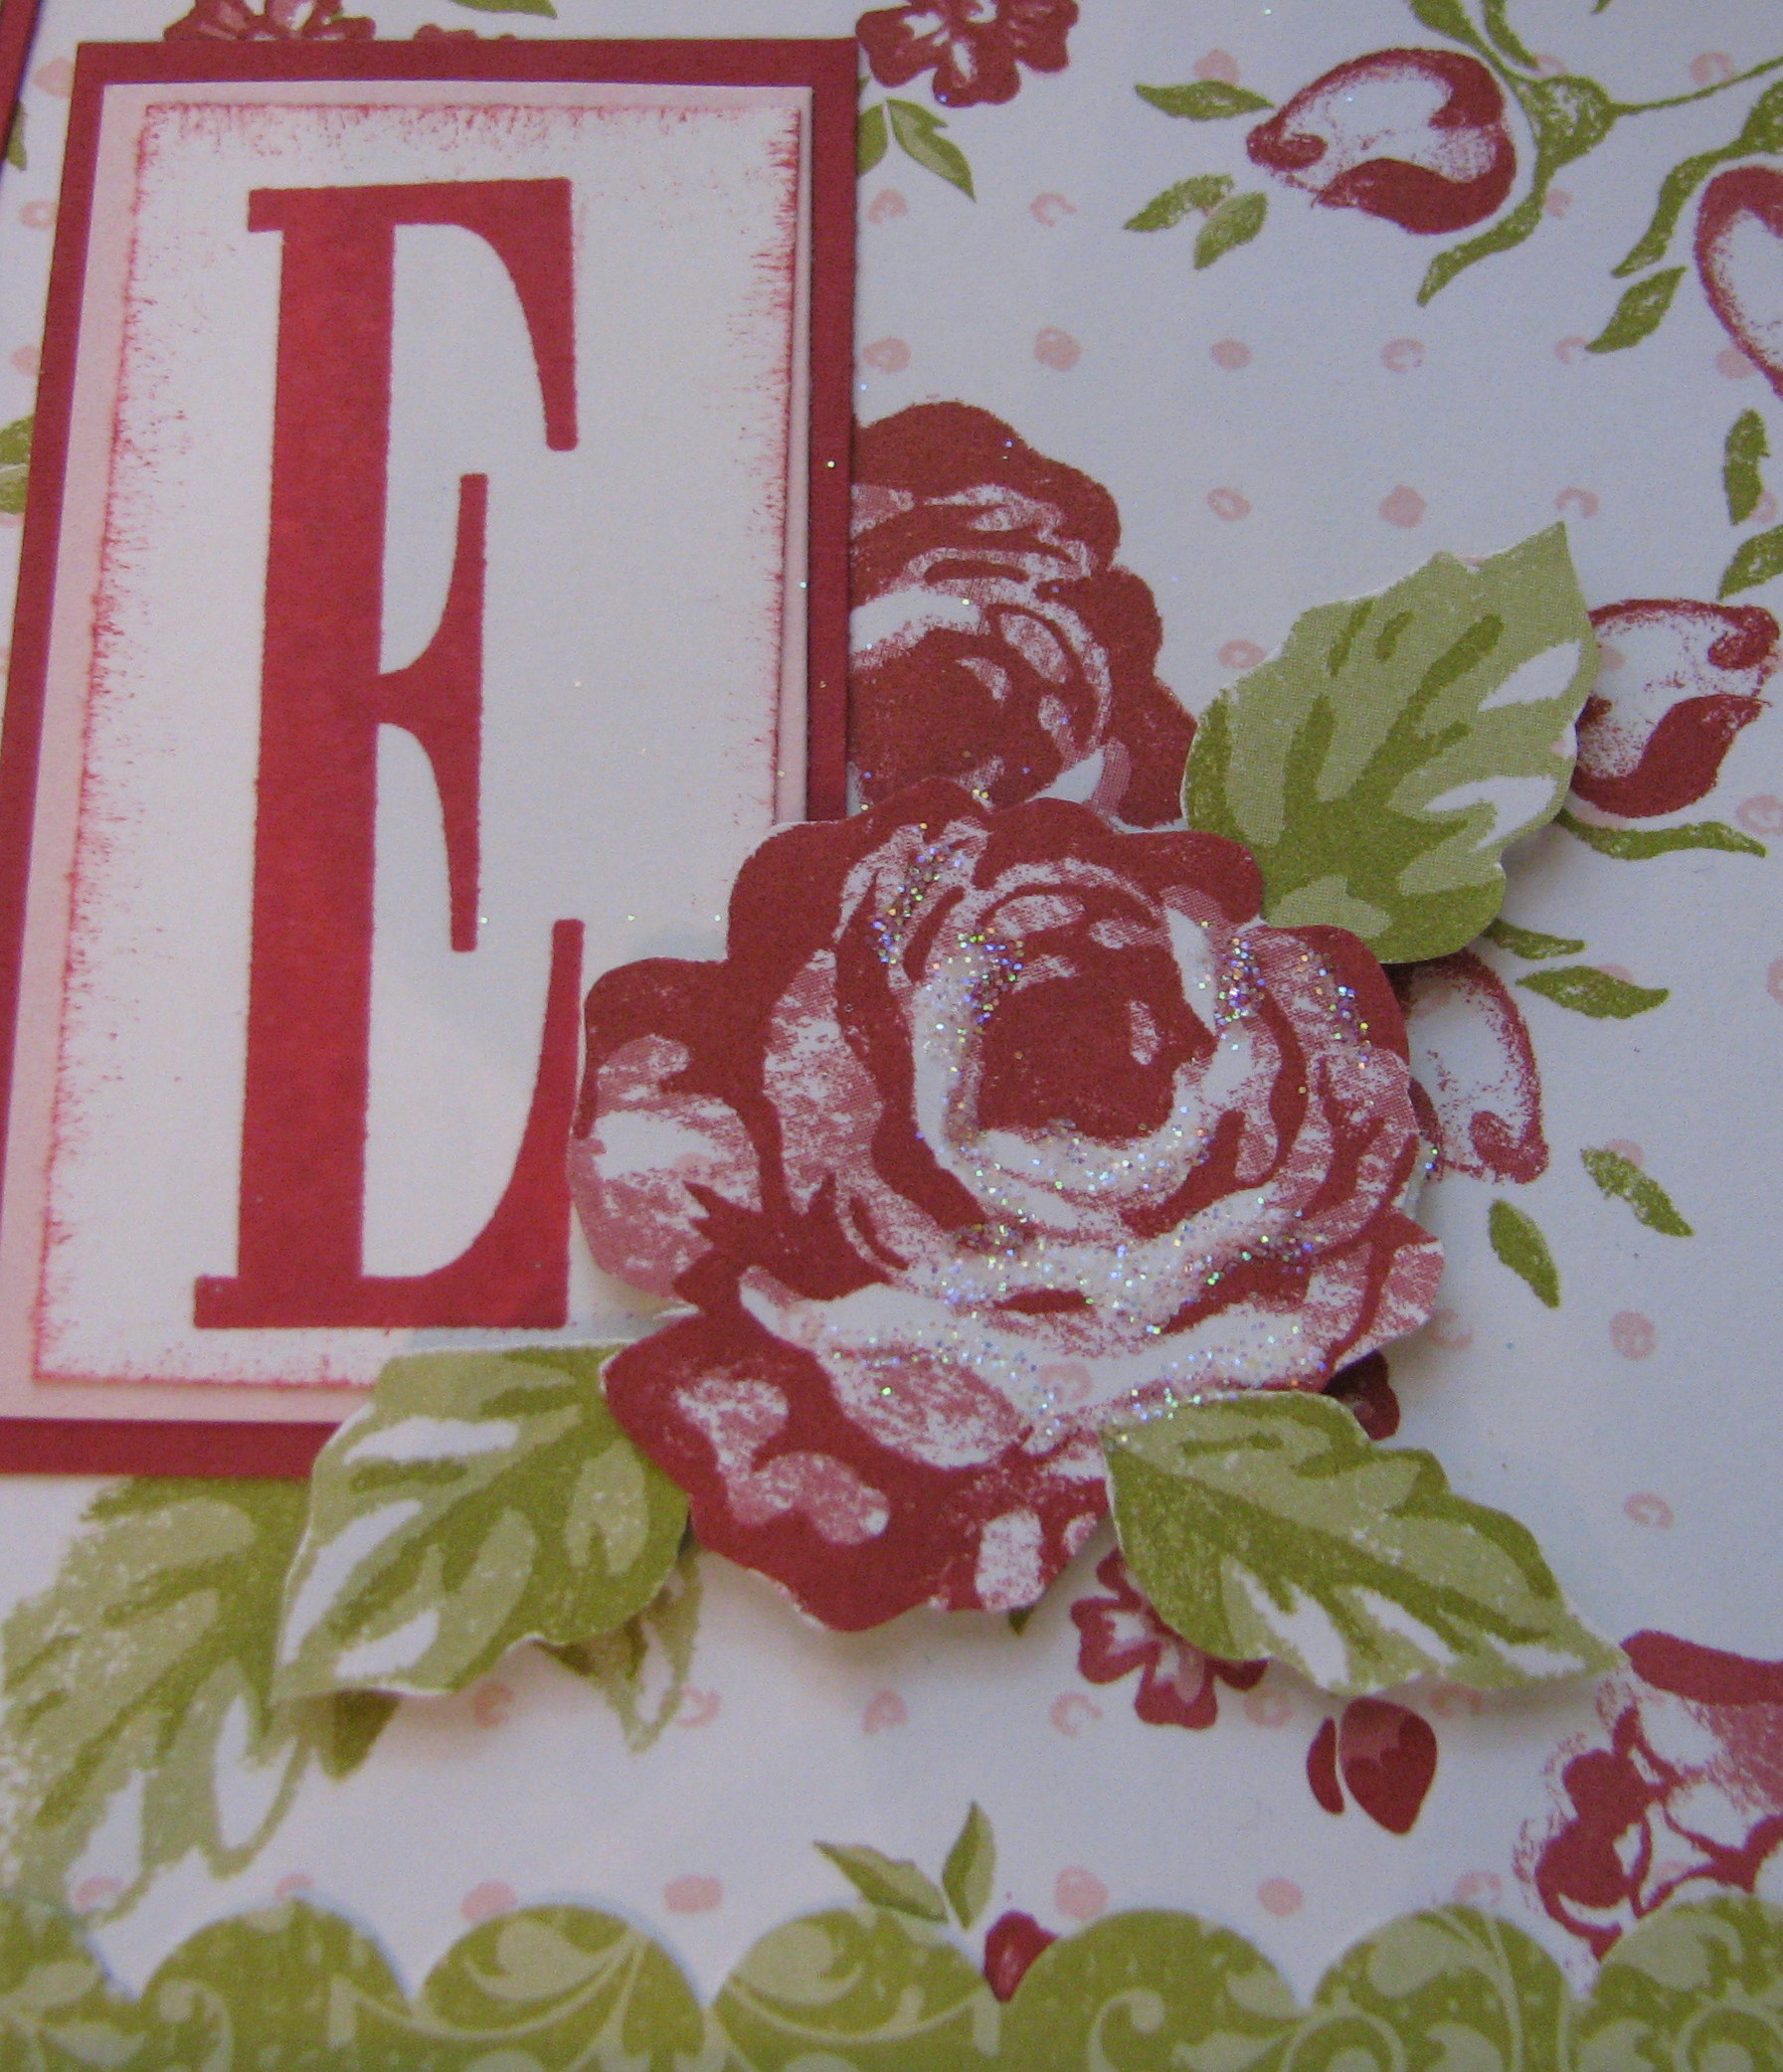
These name frames have been quite popular ever since Stampin' Up! came out with these large alphabet sets.  They make wonderful gifts, are easy to design, and you can be as creative as you want!  Even though the Letterpress Alphabet is now retired I used it on this project.  You could easily substitute another alphabet stamp set of your choosing or even chipboard alphabet letters to spell out a name.  When the new Bella Rose Designer Series Paper came out, I knew it was perfect to use.  After purchasing a frame, I just cut the designer paper to size and added strips of another pattern of paper to the top and bottom just to add some other color.  The letters were all stamped and layered with cardstock, with a little sponging on the edges.  I also cut out a few flowers from other sheets of the Bella Rose paper to add additional embellishments on the letters.  In the end, I HAD to add a little Dazzling Diamonds glitter on a few of the flowers!  Click on the photos to make them larger if you want.

StellaRosename

             Images © Stampin’ Up! 1990-2008

StellaRosenameframe

                Images © Stampin’ Up! 1990-2008

StellaRosecloseup

Easy Baby Gift Bag

At the Stampin' Up! Convention Linda Hanson made one of these cute gift bags so when I needed a gift bag I wanted to try to make it.  It actually reminded me of making something similar with just a plain lunch sack a long time ago.  I had only seen photos from Convention of the bag so I had no directions, but somehow it came back to me and I was able to figure it out!

BabyBoyGiftBag 


Pull out the side portions of the gift bag and just cut in a few inches down or however large you want your sleeve.  Just cut up to the line that makes the sack.

BBoygiftbagcut.jpg 

When you push the sides of the bag back in like they should be, but pull out the sleeve portion you just cut, it will look like the picture below.Babygiftbagoutside

To make the neckline, just freehand the shape or trace around a glass or something if you want a pattern.  Adhere portions of designer paper (yes, this one is retired!) on to the sleeves, both front and back.  You can probably see my measurements scribbled on my SU Grid paper but it will really depend on what size your bag and cuts are.

Babygiftbagsleeve 

Adhere more paper for the shirt top, front and back.

Babygiftbagshirt 

Adhere cardstock for the "suit" down to the bottom of the bag, front and back.

Babygiftbagbottom 

Add some straps, however long you want them.  Now you may notice the score line across the top of the suit.  That actually came from a mistake as my paper was longer than I planned (I think each side of the bag is a different size so check your measurements as you work).  You can see the suit comes up a little bit up into the sleeves so I thought I'd try fixing that, like folding down or cutting off the excess.  But then I decided it was going to be fine the way it was and it could actually look like that was how it was supposed to be!

Babygiftbagfront 

I added some SU Soft Subtles buttons with glue dots and added some faux stitching with my SU white gel pen.  The stamped image on the front, to look like a pocket or decoration, is from the stamp set "Nursery Necessities", now in the new catalog.

Babygiftbagfront2 

And the back looks like this:

BabyBoyGiftBagback 

And there you have an easy gift bag!

IMG_1390


Zoofari Waterfall Card

Have you ever made a Waterfall card?  While they look very complicated, they are not that hard to make.  That's what I love about stamping….nothing is too hard even for a beginner!  It is nothing more than a folded strip and your three panels adhered to the strip.  All the reader has to do is pull the tab, and you look like an advanced papercrafter for creating such a design.  Here is my latest waterfall card using the stamp set "Zoofari".

The images are stamped with Stazon ink and then watercolored, some grass and sky added.  The designer paper is retired but any pattern can be substituted.

Zoofari Waterfall card 

Zoofari Waterfall Card2 

Zoofari Waterfall Card3  

Contact me today if you'd like to learn how to make a waterfall card.


I Won a Prize!!!!

Splitcoaststampers had a "non-raffle" for those donating money to the American Red Cross for the Midwest Flood Relief a couple weeks ago, and guess what?!  I won a prize!  My prize was two boxes of Christmas cards made by 11valerie11 on SCS, plus she also included a pack of Eastern Eclectic Rub ons!  I was even excited about the thank you note she included!  It sure is fun to win something once in a while, and I've been lucky on SCS twice now!

Here's a picture of what I received in the mail today!

SCSPrizeValerie.jpg

Thanks again, Valerie, and Splitcoaststampers!

Zoofari Picture Frame

This is a picture frame I made recently for a baby gift.  I knew his room was decorated in a jungle animal theme so I knew "Zoofari" would be the perfect stamp set to use for this project.

I started with just a simple wood frame and covered the front and back with designer paper.  This is the retired Petal Patch DSP.  I used Royal Coat Decoupage Finish on both the wood and the paper.  However, I have also used SU glue sticks on both surfaces before in other projects.  The way the frame was made I also needed to cover the narrow inside edge of the frame with a strip of paper.

Zoofariframebackground.jpg

Front of frame

Zoofariframeback.jpg  

Back of frame

Zoofariframeinner.jpg

Inside edge (striped paper)

Zoofariframestart.jpg

Images © Stampin’ Up! 1990-2008

I have already stamped, colored, and cut out the Zoofari animal images and now I'm just playing around to see what I can do.  The SU Paper Snips scissors are the only way to go for a project like this!  Don't mind my messy Grid Paper but I use it all the time, over and over, and can't stamp without it.

Inkingtree.jpg

I decided to put a tree on the side of the frame, just cut one out freehand and then inked it a little with the edge of my inkpad to make it look like bark.

Treedimensionals.jpg

Putting Stampin' Dimensionals on the back of the tree.

Crimper.jpg

Crimpedleaves.jpg

I punched some small oval leaves, cut them down a little more, then ran through the Crimper.

Crimpedleavesgrassinked.jpg

Here is a strip of grass and the crimped leaves which I inked up a little with a green inkpad.

Zoofariframe3.jpg

Images © Stampin’ Up! 1990-2008

Laying things out, but the grass doesn't stand out very well.

Zoofariframebottom.jpg

Images © Stampin’ Up! 1990-2008

Added a darker green layer of grass behind the first.


Zoofariframecornermonkeys.jpg

Images © Stampin’ Up! 1990-2008

Added crimped leaves to tree.  Apparently I don't know that the reason the monkeys don't look quite right is because they don't have eight legs!  I need to color them in correctly!

IMG_1377

                                Images © Stampin’ Up! 1990-2008

And here is the finished project.  Some animals are popped up on the Dimensionals, the grass roughed up a little and the baby name inside a piece of Hodgepodge Hardware. 

IMG_1387

To finish the raw wooded edge of the frame, I wrapped a piece of Old Olive 5/8" ribbon around the frame, folded one edge under at the bottom of the frame and adhered.  It fit perfectly.

Three Stamped Birthday Cards

Here are three stamped cards I received for my birthday this week!

BDShesAllThatJan

                 Images © Stampin’ Up! 1990-2008

This one is from my SU upline/friend since 7th grade/college roommate, Jan, and stamped with the "She's All That" stamp set from the Occasions Mini catalog with a cute chipboard flower.

BDvintageSally

This one has vintage style stamps from my college friend Sally who lived across the hall in the dorm from Jan and me (once upon a time ago!!).

BDSimplySentThreeThoughtsCarolC 

          Images © Stampin’ Up! 1990-2008

And this one was made by my cousin/godmother Carol who made this with the Simply Sent kit "Three Thoughts".  This is her first experience with stamping…and on her own besides…so I think she did a great job!

Stampin’ Up! Heat Tool to the Rescue!

Five Uses for Your Heat Tool

  1. Embossing:  Stamp with Versamark or Craft Ink, dump on embossing powder, pour off excess, heat with Heat Tool to emboss.
  2. Drying ink:  Use the Heat Tool to speed the drying of pigment ink or any project where the ink takes a little longer to dry.
  3. Heat & Stick Powder:  Stamp with Versamark ink, sprinkle on Heat & Stick Powder, pour off excess, heat with Heat Tool to make sticky, then apply glitter or beads or whatever you are using for your project.  Heat again a tiny bit to set.
  4. Drying ribbon:  Use your Heat Tool to speed the drying of ribbon dyed a different color with ink or markers.
  5. Unstick adhesive:  When you have made the cutest little project and realize you put the ribbon underneath the layers of cardstock and designer paper the wrong way so that the whole thing doesn't work right and you don't want to start all over because it really is cute and you are so proud of yourself, but you used tons of adhesive because you wanted to make sure it all stuck well forever so you can't just peel things apart TRY YOUR HEAT TOOL!!  Just move the heat tool over the area you want to unstick until you think the heat has made it through the layers of paper and then try to peel the paper back gently.  I think you will find that you can unstick your paper from the adhesive this way and redo your project.  I unstuck about four different areas like this and only messed up one piece of designer paper that I had to replace.  I was even able to reuse the ribbon after rubbing off the adhesive.  So try it before throwing your project in the trash!

Tropical Storm Edouard–Not as Much Energy as the SU Convention!

Today Tropical Storm Edouard was predicted to make landfall very near Galveston, TX, but lucky for us it went a little east and didn't have nearly the impact here in the Houston-Galveston area that was predicted. �We only got an inch of rain here in southwest Houston, although the area where the storm did come ashore did get a little bit of flooding and more wind and rain. �For us it was just a rainy day, thank goodness. �I just didn't want my stamping stuff to get wet! �Or the electricity to go off!

The storm didn't have nearly the energy of the 6000 demonstrators at the Stampin' Up! convention last week in Salt Lake City! I wasn't even there, but the excitement was felt over the internet as those of us at home sat by our computers, refreshing the screen over and over, in order to catch the latest announcement made at Convention or see a photo of a new product!  Stampin' Up! is celebrating their 20th anniversary so this convention was probably extra-special….but every SU convention is extra special!  If you are a demonstrator, you need to experience convention at least once, and if you're not a demonstrator….well, you need to get in on a good thing!  A really good thing!

And Stampin' Up! is going to make that easier than ever for you with some exceptional specials for signing up:

  • Purchase the standard Starter Kit�for $199 and chose a free stamp set from the new catalog.
  • Purchase one of the mini Starter Kits for $99, designed for those who already have a lot of stamping supplies or who would like to branch out into another area.
    • Stamp-focused
    • Scrapbook-focused
    • Home Decor-focused

With four kits to choose from, anyone can find something of interest! �If you are even slightly interested, watch this video on my demo website �and find out more about becoming a demonstrator!

You will be able to sign up on my website (contact me for the password) and have your demo number and be ready to go in just a few minutes! �Stampin' Up! has really made it easy. �Call or email me to get the exact details on these offers which run from August 11 until October 11. �More information will be available on the website soon.

So much news out of Convention:

  • Stampin' Up! is partnering with Sizzix to give us our own SU Big Shot die cutting machine with several exclusive dies. Customers will be able to order beginning Sept. 2.
  • Shelli Gardner, founder and CEO of SU, has started her own blog at www.soshelli.com. �It's for everyone, so check it out!
  • Shelli will have her own Signature Collection, which will be products she especially loves or perhaps had a hand in developing. �They will be denoted with a small heart in the catalogs.
  • Never-Before-Seen Promotion: �Aug. 11 – Sept.30, a 15% discount on certain new stamps!
  • All new stamp sets in this upcoming catalog will be die-cut, but starting in Spring 2009 all stamps will be die-cut.
  • Special spread in Country Living Magazine in Dec. 2008 issue promoting a Holiday Collection Stampin' Kit.
  • Special promotions in the new Catalog Sampler, coming out soon.
  • And for the last general session of Convention, UPS surprised everyone with a package, the Ronald McDonald House Charities new stamp set for this catalog, "Say It With Scallops". �As yellow confetti flew through the air, the UPS truck drove up and UPS and SU employees passed out the stamp sets donated by UPS to all the excited demos!

New catalogs are on their way via UPS right now.� Hopefully mine will be delivered soon! Contact me to get your copy to begin celebrating Stampin' Up!'s 20th year!

PS:� I don't know why there are little squares in between sentences but maybe they will go away overnight!